Abe's Aviation
Tiedowns
Also See Below: Advice
for tying down your aircraft
After the awful happenings with the tornado that went through
Sun-n-Fun this year, I was keenly aware when I started to see things
from Aviation Consumer (I'm a subscriber) regarding the quality of
tiedowns, and their analysis of what worked and what didn't, at
Sun-N-Fun. Personally, I have been using "The Claw", for a few years now,
having in the past used a few various things:
- Dog Screw Anchors
- EAA L-shaped rebar
- Heavy steel ground anchors
- The Claw
The dog screw anchors are clearly too weak to tie an airplane
to. The handle itself will deform under load. The
EAA Rebar would work, but I can't trust any airplane to just one
piece of straight rebar for each area of the plane. The heavy
ground anchor screws I used before the RV-10, when I used to fly
over to OSH each day, and tie down for the day. They were
pretty darn tough to put in, but with a 4' bar, you could screw them
into the ground and they seemed like they'd hold fairly well,
although you disturb the soil a lot from installation so there isn't
that much solid soil left then to hold the big disc. That
brought me to "The Claw". The theory seemed good. 3
anchor points, with the pins driven in at an angle. I was
pretty happy with them, and although I didn't realize I needed to
install them directly under the aircraft's eye screws, they were and
are a pretty good system. But I wasn't really aware of the
shortcomings until after the Sun-N-Fun disaster when I started to
hear what worked and what didn't in that storm. As it turns
out, the Claw was a pretty good system, but it did have on
weakness...the legs would sometimes break. After hearing this
and thinking about it, it made sense...the legs are made of a cast
aluminum, and that just isn't as strong as if they were made by
machining them from some good aluminum stock. So I started to
pay a lot of attention as Aviation Consumer did it's review.
In it's first review this year (2011) the claw fared pretty well in
the group of things tested, but then they (and consequently I)
became aware of a couple of other tiedowns that may offer even
better protection. Among these were the Storm Force Tiedowns,
and the Abe's Aviation
tiedown system, available in a few different flavors. With OSH
on the horizon, I wasn't going to compromise this year. EVERY
year that I'm at OSH for the week, I spend at least one, if not more
than one, night where I'm laying in the camper in fear of what I'll
see in the a.m. after the big thunderstorm passes. It's
inevitible, and it happens EVERY year. It's never been a
problem, but I've went through many very windy and gusty storms at
OSH. **Post-OSH-Update: (yes, this year we had more 40mph
gusts again, breaking some RV-10 rudder stops off, but mine fared
really well)
To see the Aviation Consumer Tiedown Shootout video, watch this
link...it's a pretty great test.
http://www.youtube.com/watch?v=UIuYK_eEQ9c
I've taken enough engineering and physics courses in my life, and
had enough good life experience, to develop a good understanding of
what kinds of things would hold well in soil, and after thinking
about it, I could see how both the Storm Force and the Abe's system
could perhaps be a better system than the claw. In fact,
before I saw the video above, I was even considering the Storm Force
Tiedowns. But once I saw the video and saw what Abe's came up
with, I knew that was going to be the superior product..in many
ways...it was completely obvious.
Starting right out, the Abe's tiedowns are made of stainless
stell...giving them superior strength and life. I'm sure that
adds quite a bit to their cost, which admittedly isn't nearly as
cheap as the other systems, but I wasn't looking for the cheapest
way to tie down my plane...I wanted the BEST way to prevent my
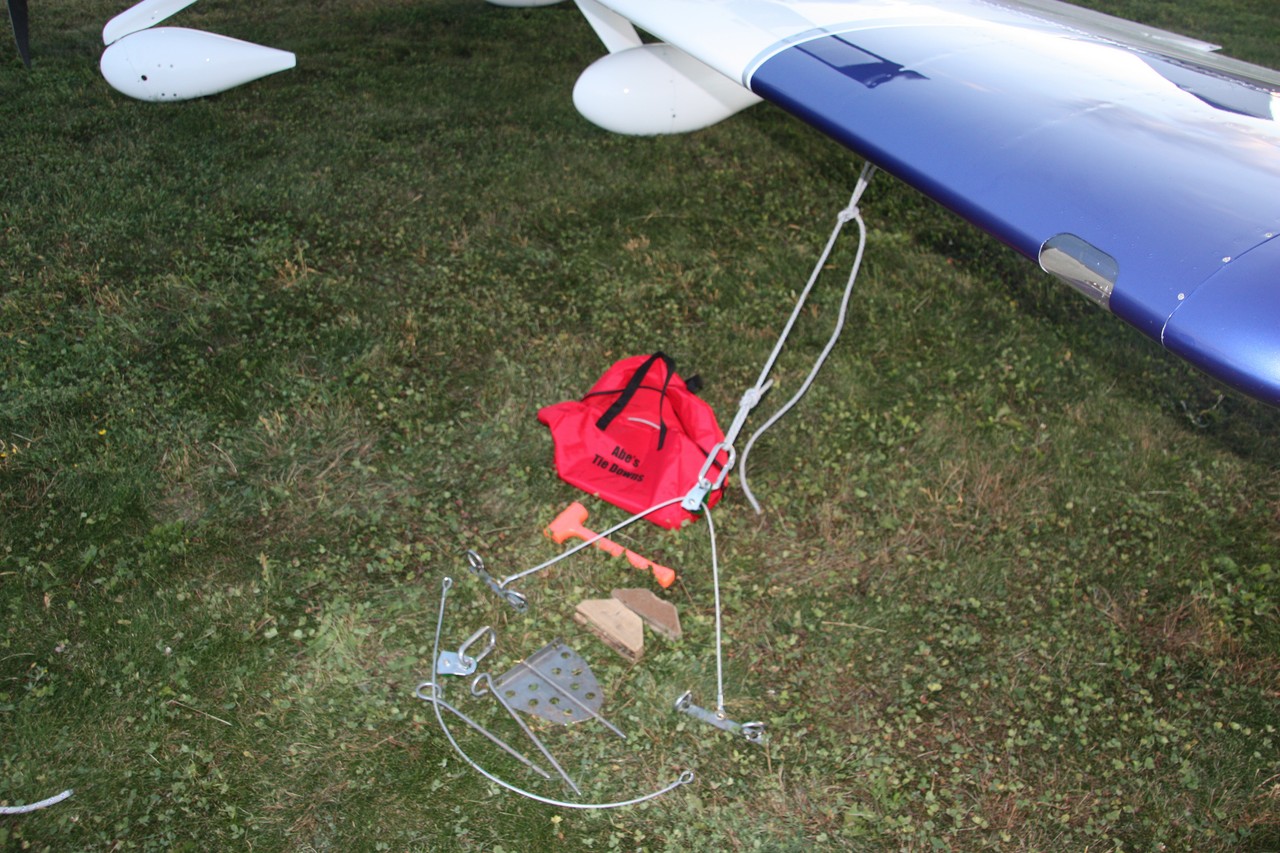
airplane from ending up upside-down at OSH this year. When you
look at how the Abe's system works, there are multiple (5 in my
case) flat "spades" that you drive into the ground with a hammer and
wood blocks (hammer not included), and then you drive in 2 extra
holding pins. You want to drive them in so that the rope is
angled towards the aircraft, not directly below the tiedown
rings. Any fool can see how this would provide a very solid
flat surface pushing against the soil, and give a very very strong
hold. In fact, in the Aviation Consumer video, they pulled
over 1000lbs and had to pull with a truck to test these, and the
tires spun on the grass before the things let go! So even with
only 3 tiedowns, you've got a pretty tough system, but the system I
bought from Abe's is the Deluxe 5 system, which comes with 5 spades,
each with 2 holding rings. The way this works is that while
the tail only gets one spade, each wing gets two spades, which you
orient about 90 degrees from eachother (see the last of the 3
photos), and then you connect them with a piece of cable (included)
and then there's a pulley that rides over the cable with a caribiner
on it that you tie to the plane. This allows you to have 2
places that are holding in the soil, spreading the load, and they'll
pull very strongly once you tighen up the ropes. The system
also came with some good hi-vis climbing type rope, although as you
can see in my photo, I bought some color-matching rope for my
set. With everything in place, you have a very significantly
stronger tiedown system than any of the other commercially available
models. It all comes in a nice big red bag, too, and includes
everything but the hammer. Read on below after the pictures.
Click for larger view

The images below came from the Abe's Aviation Site
http://www.abesaviation.com


So now that you know what's all in the system, how is it to
install? Well, I'll give you my experience and my take on how
it all is. First, if I were travelling long distances and only
using these for transient 1-night tiedowns in places where I didn't
expect bad weather, I'd probably just bring 3 of them. These
things are gonna hold pretty tough, so unless I expected high winds,
I wouldn't waste my time hammering them in. How do they hammer
in? Well, I've got to admit, they aren't nearly as easy to
hammer in as the claw or storm force tiedowns would be. In
those, you're only hammering in stakes. With these, you have
to hammer in the whole spade, and in rocky or hard soil, that could
get pretty tough. I initially tried to hammer them in with my
little mini hammer that came with "the claw", and although I got
them in that way, it took hundreds of hits to get them driven all
the way in. So as you can see in my photo above, I got myself
a plastic, shot filled heavier hammer. This is a much better
hammer with about a 2 or 3lb head on it, for pounding these
in. I've only put them into grass thus far, and fairly dry
soil at that. It takes a bit of hammering to get them
in. Once they're hammered, the tying down is quick and
painless. When I first got all 5 in and tied down, I was a bit
worried that with all that effort to get them installed, it would be
a royal pain removing them. This turned out not to be the case
at all! With the nice round loops on the stakes, you can just
pull on them or easier yet, put one of the ropes through and pull
straight up on the rope and they come right out. Then, since
the spades have a lip on the top, you can just hook it under your
fingertips and pull straight out. As long as you pull straight
up, they come right out without much effort. Holding at an
angle, pulling against your plane, they'd still have hundreds and
hundreds of pounds of holding force.
So after trying these out, and knowing how well they hold, this
system is what I'm going to be bringing to all of my longer-term
parking destinations with the RV-10 from now on. I may
actually on some trips still bring my "claw" system if I expect
rocky or hard soil, because I don't know how I'd get these pounded
into anything but grass, but a majority of the places I'd go and
stay for more than a day are places like Sun-N-Fun or OSH, and these
are ideal for that environment. The Abes folks tested these
things at places such as the grass strips in Idaho, and they worked
well there too.
***
Post-OSH Update: Advice for tying down
your aircraft
After reading some articles about tying down aircraft, and seeing
things in a local
RV group newsletter, and attending OSH, I've got some advice
for tying down aircraft that goes beyond what tiedowns you use...
1. Retract the Flaps!
Many RV builders put the flaps down to prevent people from stepping
on their flaps. This is fine for getting in and out when
you're with clueless individuals who don't even read your "NO STEP"
placard, but if you're leaving the aircraft unattended, retract the
flaps. Flaps will just add drag or enhance lift to the wing,
and either way will provide a better frontal surface area to the
wind, so if there are large gusts or winds, having the flaps down
will magnify the problem.
2. Always use a gust lock!
At OSH this year, people either didn't have strong enough gust
locks, or they didn't use them, but after the winds went through one
day where it was really blowing dangerously hard, I checked on the
RV-10 lot and personally walked by a few RV-10's that had broken
rudder stops and slightly damaged rudders. The ailerons are
less often an issue, but having flapping control surfaces is a
recipe for disaster and being stranded somewhere. There are
many gust lock options, but USE ONE.
3. Don't use ONLY a seatbelt to
secure your elevator! You can see I figured
this one out long ago from my Gust
Lock write-up from a while back. On my gust lock, I have
something that holds the rudder pedals really securely, and then I
attached a strap to it that was cut to the proper length to allow me
to use the seat belt to pull back on the stick, but ONLY to the
point that the elevator is approximately neutral. You do not
want the elevator fully nose down, nor nose up...either way will
just cause the plane to want to react to the winds. Keep your
elevator and other controls neutral, and let the air just flow
safely over the plane.
4. Use your tiedown properly.
If you use the claw, tie it directly under the anchor point.
If you use many other types of tiedowns, tie the ropes at an angle
of maybe 45 degrees to the wing for best holding. But follow
the manufacturers recommendations for proper use of the diedowns.