Matco Front Axle Replacement for the RV-10
added 1/20/2009updated 6/8/2011
Ever since the RV-10 came out, one of the biggest problems found has been the front axle design. Earlier kits had a stainless spacer, and you can read about the destruction caused by that system HERE. As you can see from that report being in 8/2006, it only took me about 6 months to have some major damage to my front forks. I still have that original fork, but it bugs the heck out of me that it got wrecked. One of these days I'm buying a new one, so I can bury my anger and move on. At any rate, it happened to more than one of us, and so word spread, and Van's came out with their own TWO Service Bulletins (HERE and HERE) that made things a bit better. They increased the thickness of the spacer, giving it more surface area, and made it out of aluminum so it wouldn't be so hard and sharpt to cut the fork. In the end I can't call this a fantastic fix in itself, because they provide NO method of anti-rotation of the spacer, and NO method of setting the actual bearing preload that is independent of the axle BOLT torque, which of course you wanto to be tight.
ENTER THE MATCO AXLE
Now, this is not the ONLY "better" way to do things that has been developed. There are people just adding anti-rotation to their aluminum spacers, and that helps a lot, but to date there are only a couple of attempts at actually giving a SEPARATE way to do bearing preload, vs just torquing with the axle bolt to preload the bearings. One attempt was excellent, machined out of stainless, with form-fitting bearing cups. It was high-priced though, which was the ultimate downfall. This one is from Matco themselves. They did not design or build the RV-10 (or other RV's) axle. They provided wheels to Van's. Van's actually didn't even choose the BEST wheel for the RV-10 nose, in fact. To streamline inventory and cost, the provided a wheel with a straight valve stem, that with the original axle design came very close to the fork (for some builders, it even touched if you left the valve cap on). So really, it was kind of a "cluster" from the beginning, and even after the two Service bulletins, it really isn't a very good system. That problem started giving Matco a black eye, as people thought it was THEIR problem, since they provide Van's the nosewheels. For more on the Wheel Issues, click HERE.
So Matco, in the interest of the builders, and their reputation, has stepped up to the plate to provide a definitely better system, at a pretty low cost. (around $60-75 or less depending on your RV model) What does the system offer? Well, it's a machined aluminum total axle replacement, that has one fixed end, and one threaded end, that you can use to set the bearing preload on the axle...without even touching the center bolt. Once you have the preload set so that the spacers are tight against the bearing seal....tight enough that the seal and spacers stay stationary with eachother even on landing, you now will have a wheel that won't rotate on the axle, but will rotate the BEARINGS within the wheel hub. This is how those bearings are SUPPOSED to work. Using the original parts, bolt torque and spacer thickness was critical, because if not set right, the bearings wouldn't even WORK...the grease seals would encourage the spacers to spin, and the bearings would spin ON the axle shaft (where there IS no bearing!!) and it would cause great wear. ANOTHER benefit with the spacer. Look at the photos below...the Van's spacers are much narrower than the black Matco spacers. Matco actually TALKED to Timken's bearing guys about these bearings. The seal itself is a very thin layer of rubber, mounted on a metal seal. (Unbelieveable to me) It's DESIGNED to be able to push a spacer up against to provide the bearing preload. I wouldn't have thought that true, but they actually TALKED to Timken. So, their spacers were made thicker, to cover more of that rubber seal, and give more surface are on that seal. It should help to keep more drag against the rubber, damage the rubber less, and keep that bearing from spinning on the seal better. So, you now have a properly preloaded axle center section, mounted to the wheel. They made it short enough to be used on other RV models, but incorporated a couple of additonal aluminum spacers that can be purchased for the RV-10 that give it the width required for use on the RV-10. Now you install the axle assembly with spacer in between the forks, and can torque the axle bolt to it's PROPER torque rating! They also provide hardware, with special locking washers, that not only lock the preload ring position, but lock the axle from turning in the fork. So there is now NO WAY that you can damage your multi-hundred dollar fork like I did. (Yeah, I'm still a bit ticked off). One other small benefit... With the original system, I was still able to use my valve stem with cap, and I had a couple HUNDREDTH's of an inch to spare...my cap never hit the fork on spinning. But with this system, if you install the slightly thicker "fixed" end of the axle on the valve-stem side, it gives you a few hundreths more space. So now my valve cap is maybe triple or quadruple the gap away from the fork...it's maybe 1/16" or 1/8" now. So, even though Van's sends the more inventory friendly wheel, it will work for most people.
The Install
I have scanned my install docs HERE.
The install is very straightforward. You remove the old parts, insert the new axle in the wheel and torque it for the bearing preload, and lock the moveable collar end down with it's set screw. You use one of the spacers and the original axle bolt to drill a 1/4" hole in your fork for the locking bolt. Then you just put it all in place and torque the bolt. What to watch out for?? Well, first, for where to drill the 1/4" hole in the fork, DON'T do this until you have fit your fairing bracket. There is a slot (see pics below) that you want to center that bolt in. Otherwise, you may interfere with that bracket. You can see by my dirty greasy lines where that gap was, where to drill the bolt hole. Other than that, and not torquing the bearing preload enough, there is not much you can do wrong. Remember that their special washers are NOT to be used with any other flat washers (they send you info with the kit).
Is there a flaw with the Matco system? Well, I can only think of one thing that I could ask for that would make it a bit better. There are no flats on the threaded ring, or fixed end, to put a wrench on. Yes, you can put the fixed end in the forks, and pin it with the bolt. That will help. They said that you should be able to tighten fully by hand, and that would be good. If you want more preload than that though, you're going to need to use a big pliers or something. They provide plenty of threaded position holes, so it's easy to find a tight one to set it at. It would just be easier yet if there were a flat that you can put a wrench on. The upside of having no flat is, if you hand torque it, you probably won't over-torque it. Otherwise you may risk doing so.
One more tidbit
Here's a "new to me" method of working on the nosewheel. (others have done this before) I cut a 1' x 1' square out of my hangar floor under the tail eyelet, and then hand-mixed concrete and embedded about a 10-12" long hex bodied 1/2" turnbuckle into the concrete, leaving the lower hook in place embedded in concrete. Now, flush with my floor is a threaded hole that accepts a 1/2" bolt or in my case, eyelet, that is removable. (Make sure to put the "wrong" threaded turnbuckle end down) I used a short hand-levered cable winch to the tail eyelet (currently available from Harbor Freight for $12.99!, to lift the nosewheel off the ground for nosewheel maintenance. Prior to this, I always uncowled the engine, and lifted on the engine lift rings using my engine hoist. But, the RV-10 lifts easily by pulling the tail down. (If two pilots board the steps at the same time, it will tail-strike, so obviously the balance isn't ultra nose-heavy!) Also pictured is my Harbor Freight #95912 winch, which is 3000lb rolling load rated and has a small key-fob wireless remote for operation. I haven't tried it yet, but Van's says the RV-10 should handle the tug fine on the tail eyelet (especially considering I'll still be pushing the prop/spinner as I back the plane in), so when there is ice in front of my hangar, I intend to use that to give the plane some additional pull. (I'll still push by hand a lot too) The winch operates about 6" at a time, with each button push, so it should go in nice and slow. I wanted to try a power-tow device, but I rarely need the extra push, and I've heard that those things don't work well on ice even with chains. That is my main concern for having this, as the city doesn't plow often enough to keep the ice away from the hangars.
Now for the photos and photo comments...
 |
 |
 |
 |
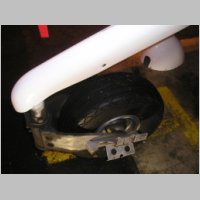
| Original
system |
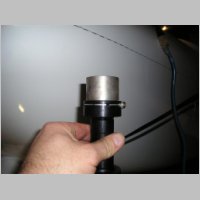
New
and old parts together |
Note the
larger spacer width (black) compared to the original (silver) |
|
 |
 |
 |
 |
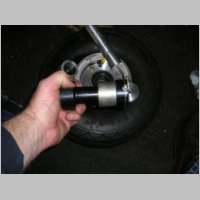
| Another
spacer-thickness
view to compare |
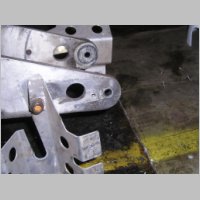
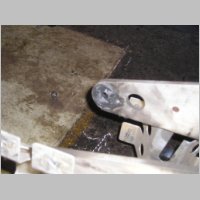
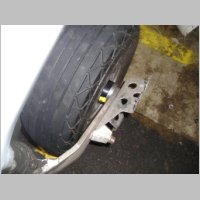
Moving
the
fairing
bracket to drill the 1/4" hole (Note the greasy lines where the slot bracket was) |
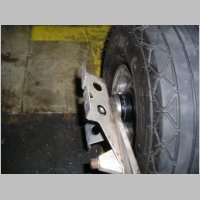
The
opposite side, for referance where the slot is. |
1/4"
hole is drilled |
 |
 |
 |
 |
| 1/4"
hole inside view. |
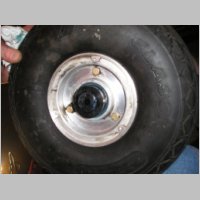
Axle center
installed and preload set. Note the "fixed" side is on the valve-stem side...gives a tiny bit more clearance. |
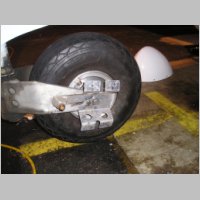
All
installed |
|
 |
 |
 |
 |
| Top
view...the photo stinks... there is more gap from valve cap to fork than it appears here. |
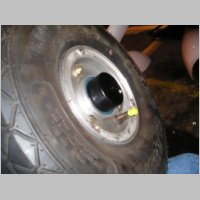
Opposite
side
installed view. |
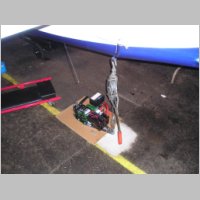
Cranking
the
tail
down... |
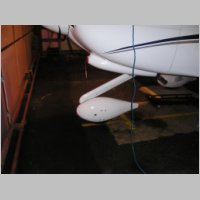
to
lift the nosewheel up. |
Some tips from Matco on installation (Thanks Phil)
Per Phil's talk with Matco:
"I just got off the phone with Matco and thought I'd pass along some information that is not included in their documentation."
1) The wheel
halves should be torqued to 99 inches. (NOTE:
This is now changed too 80 in.lbs) This is more than a
standard AN-4 bolt (50-70 inches).
2) Hand tight is probably too tight. You should be able to get the seals to hold position (when rotating the wheel in the correct direction) before reaching the maximum you can tighten by hand tight.
3) Be sure to lubricate the seals and mating surfaces with grease, this will help them hold position.
4) Once you put weight on the nose wheel, the friction of the bearing will help hold the seals in place too.
5) Make sure there is no grease between the seal and the nut. This friction will help hold the seal in place.
Updated Info 2011/06:2) Hand tight is probably too tight. You should be able to get the seals to hold position (when rotating the wheel in the correct direction) before reaching the maximum you can tighten by hand tight.
3) Be sure to lubricate the seals and mating surfaces with grease, this will help them hold position.
4) Once you put weight on the nose wheel, the friction of the bearing will help hold the seals in place too.
5) Make sure there is no grease between the seal and the nut. This friction will help hold the seal in place.
Matco Wheels and Brakes Guide
Matco NW511.25 Nosewheel Drawing
The Wheel Issue
As explained above, in relation to the valve stem to fork clearance, the wheel provided with the kit isn't really ideal. Here is a posting from a RV-10 Matronics list member (Thanks Doug) that shows WHY they chose the wheel they did:
Some of you have been reporting a
possible clearance issue between the valve stem and the nose wheel
fork. I laid my parts out on the table and started measuring. Something
didn't add up so I contacted MATCO, the manufacturer of the wheel. This
is their input:
"The NW501.25 is machined for use with an 1145 (Lamb) tire. It sounds like you are trying to use a 5.00x5 tire and tube on it? The NW511.25 is designed for the 5.00x5 tire which has a long valve stem. The NW511.25 has the valve entry hole on the back half of the wheel to accommodate the longer stem of the 5.00x5 tube." (George Happ - MATCO Mfg.)
Passed this on to Van's and got this back from Gus:
"The NW501.25 has been used on ALL RV-10 finish kits, and is on all the flying RV-10s, using the 5.00x5 tire and tube. The tires are essentially interchangeable; several builders have used the smaller Lamb tire on the 5.00x5 main gear of the two place airplanes. We don't use the 511.25 to avoid stocking two different parts. The valve stem does come close to the fork. On ours, with a plastic cap on the stem, the clearance is about 1/16. It probably may vary a little, if it hits you might have to leave the cap off." (Gus Funnell)
So there you have the
issue....very little clearance with the fork to valve stem, especially
with the valve cap on. After reading the above write-up on the
axle, George Happ contacted me and gave me this info, along with
telling me that tire balancing indeed is very helpful for the aircraft
tires:
The My advice on it is:
If you are not to the front wheel install portion yet, it is probably worth looking into either NOT buying the wheel from Van's, but buying the proper one direct....or, as soon as you get your brand new nosewheel, call Matco and get them to swap the half out.
Luckily for me, I really had no issue other than the clearance was minimal...but acceptable. The fork builds up a lot of dirt and grime, and you'd easily be able to see marks if the valve cap/stem were rubbing the fork in use. I've never seen any of that on mine.
So, it may not be a major worry, and if you already built it and it doesn't hit, you have nothing to fear. (Besides that, when/if you use Matco's new Axle, you'll get more clearance on that side if you install the axle in the orientation I did). If you haven't built that part yet, then if it were me, I'd play it safe and just use the best wheel for the plane...the one they're suggesting.
"The wheel for the 5.00-5 tube is the
WHLNW511.25. It is machined
differently to accommodate the longer stem on the 5.00-5 tube. We
offer an inexpensive exchange (under $20) for those who have not yet
mated the tire. We can replace one half of the wheel if the tire
has
already been mounted for about $60. The wheel needs to be sent
here to
have it done."
The My advice on it is:
If you are not to the front wheel install portion yet, it is probably worth looking into either NOT buying the wheel from Van's, but buying the proper one direct....or, as soon as you get your brand new nosewheel, call Matco and get them to swap the half out.
Luckily for me, I really had no issue other than the clearance was minimal...but acceptable. The fork builds up a lot of dirt and grime, and you'd easily be able to see marks if the valve cap/stem were rubbing the fork in use. I've never seen any of that on mine.
So, it may not be a major worry, and if you already built it and it doesn't hit, you have nothing to fear. (Besides that, when/if you use Matco's new Axle, you'll get more clearance on that side if you install the axle in the orientation I did). If you haven't built that part yet, then if it were me, I'd play it safe and just use the best wheel for the plane...the one they're suggesting.