Front Axle and Fork Wear Issue
Added 8/9/2006 - Updated 9/16/2006 - Updated 1/20/2009**** NOTE: You can read this page, but don't read it as the "final solution"!!
Once you finish this page, CLICK HERE for the 1/20/2009 update, where an entirely
new fix for the issue is reported.
I've just run into an issue that I'd heard about once before, and actually investigated at one point. It's turned out to be something that I would consider fairly serious. Back when I just had installed my wheel fairings during or just after my 25 hour flyoff period, I had heard about someone being concerned or having issues with the sleeves around their axle rotating and wearing on their forks. They determined that there is not enough pressure against that thin sleeve that pushes the bearings against the wheel to keep it from rotating around the axle shaft, and when it rotates, it causes wear on the forks, since they're aluminum. The person at the time said to watch to make sure yours aren't turning on the shaft, and that they called Van's and they sent him a set of shims, or some parts of some type that fixed the issue. A couple other builders also tossed out ideas.
Well, not being one to ignore a problem if I know about it, and having experienced a slight nosewheel shimmy on deceleration after installing the wheel fairings, I called Van's for myself and told them that I had heard about this issue, and that they had some parts that could be requested or sent out. The person I talked to had no idea what I was talking about and didn't seem to think there was an issue. So, satisfied for the time being, I thought I'd watch it and see how it went.
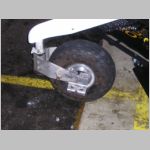
Now, 107 hours later, I'm not a very happy camper. I had what seemed to be a slight nosewheel shimmy on touchdown, only between about 45 and 35 kts. I had one shimmy yesterday that seemed worse than normal, so tonight I jacked up the plane and thought I'd look at the axle and look for wear.
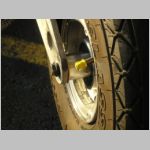
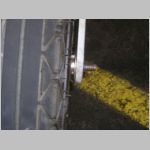
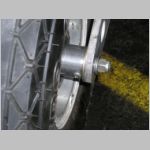
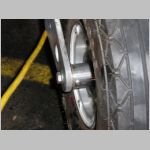
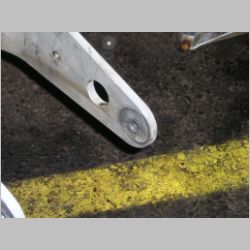
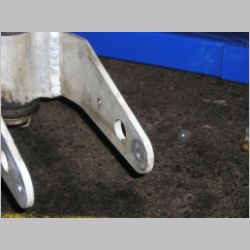
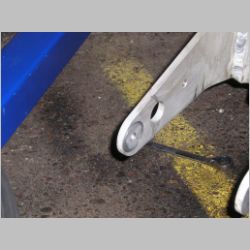
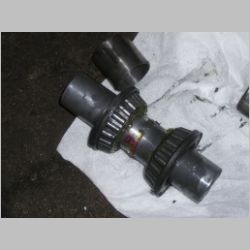
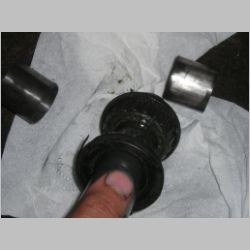
First of all, it is NOT apparent by just an assembled visual inspection. With the fairings off, I didn't see anything out of the ordinary except for the fact that my bearing rubber seals had been torn up a bit. Then I looked a little closer and found that my valve stem which was before just very close to the fork for the whole 25 hour flyoff, had been now bumping the fork slightly. So I pulled the wheel off and that's when the fumes started coming off my head. As soon as the wheel was off, it was easy to see that the collars on the axle had indeed been rotating. The wheel had loosened a LOT and easily could flop side to side at least 1/8" due to the slop.
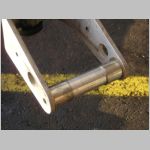
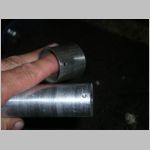
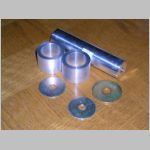
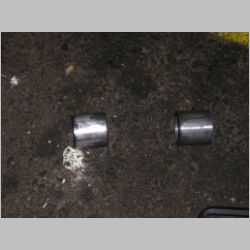
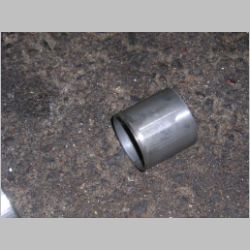
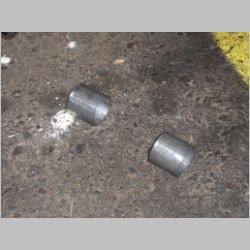
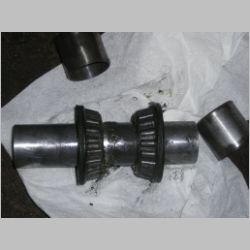
Part of it is caused by the collars wearing into a taper where they meet the bearings. If the collars were about twice as thick, they would be MUCH better in this respect. The worst part though was that the grooves were worn pretty deep, effectively loosening those collars a huge amount. The groove on the right side of the fork in the photos is probably about .020" deep. But the one on the Left fork is .040" deep....which is HUGE. Immediately I started to wonder about the integrity of the fork itself, but for now I'll assume that it is still OK, or that I can at least still deal with it effectively somehow.
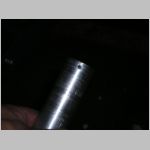
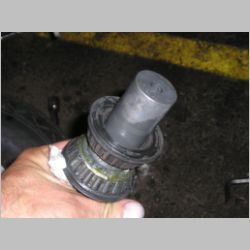
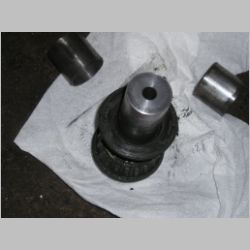
Look closely at the collars below. The outer sides are still fairly flat, but they were the side that ground the grooves into the forks. The inner sides are tapered as they hit the curved part of the bearing near the center where it rides on the axle shaft. Look closely at the rubber seal. It's torn, and there are pieces missing. Even the axle itself shows a little wear from where the rotating collars wore it a little.
Now for the fix:
Please refer to 1/20/2009's update HERE
Tomorrow I will be calling Van's, and I'll show them the photos if they'll take the time to look. If they have a fix, I'll try to get it sent overnight so I can continue my flying plans that I had for the weekend. Hopefully the forks are acceptable....my guess is they could be. If they were less than $100 though, I'd probably buy them for peace of mind. At 107 hours, it's pretty irritating to find something that can cause this much permanent parts damage.
Barring anything else from Van's, there is one fix that I would strongly suggest people think about. (of course, if there's an official fix that they'll publicize, use that one) I would suggest putting a very large Stainless Steel flat washer just inside those forks, and shorten the axle shaft by the same thickness as the washers. I'd also shorten the collars, but not by the entire thickness of the washers. This is because those collars will wear into a taper again. IDEALLY, the collars would be replaced by something twice as thick. The large flat washers need to be large enough that they're bigger than the collar diameter, so that if the collar ever spins again, it will rotate against the steel washer, and not the aluminum fork.
Next, you need to keep the collar from turning. My thought is to drill and tap a hole through the fork side, right where that groove ended up, for a 10-32 allen head lock screw. Then, on the axle shaft, and collar, you would notch the collar slightly, and place the axle in place and drill into the axle itself a little hole. This way you can then insert a screw, or allen head lockscrew from the outside of the fork, and have it end up right between the collar and axle, preventing it from rotating. You could do the same thing in a couple different ways, but this should work.
One other part of a fix should include improving the way the collar meshes with the bearing. As previously mentioned, it would be much better if the collar was twice the thickness. Barring that, it may be a good idea to pile on some JB weld or something to the intersection of the collar and bearing. This will possibly harden and help prevent the bearing inner race from rotating on the axle shaft as well. The fit is too loose to easily prevent the bearing from rolling on the shaft, so something should be done about that.
In an ideal world, you could have the axle shaft thicker in the center where the bearings are, and thinner on the outer edges. This may allow you to use stacked washers as shims to adjust the bearing preload separately from the axle bolt tightness. Or even for the deluxe system, perhaps a couple of large but thin nuts could be used on each side to tighten the bearings and then the 2nd nut to lock the first one from backing out. At any rate, if there is someone with access to a machine shop, this could be a good opportunity to redesign this axle area and make some bucks because now that I've really had the chance to ponder it, the design was completely deficient in the first place. It should have been designed better from the start, so that none of the common wear parts would take out that expensive fork, or cause an accident by cracking the fork ear off where the metal fatigued.
Update 8/10/2006
Refer to page 46-06 on your plans for visual information
I both figured out an idea, and just got off the phone with Gus at Van's. Yes, they are aware of the issue. Apparently they did change the U-1023 spacers that are delivered with the kits and now instead of thin stainless steel, they're thick aluminum spacers, that should spin less easily, especially stuck against the similar aluminum, as it might tend to gall and stick. He didn't know why they didn't make it an S.B. and send out new parts. So, this is DEFINITELY something to address for anyone who hasn't yet, and these parts should be available free. This isn't to say that the new fix is ideal, but certainly better than what I had to fly with for 100+ hours.
The NOSE FORK ASSY part is somewhere around $160, for those who are interested. I may end up doing that, depending on how paranoid I am....which remains to be seen.
I am getting the new spacers via UPS ground, instead of overnight, because I also have one other thing that I'd like to try and accomplish. Personally, I think I know what needs to be done to protect those forks. Today at fastenal I found 3/8" ID x 1.5" OD stainless fender washers and they're .050" thick. A very similar Aviation hardware washer would be the AN970-6, which are only 12 cents at Van's and are 1-5/8" diameter and .063 thick. The idea is that if that U-1009 axle is cut down in length by the same thickness as 2 of those washer, you could then install a large-area flat washer against the fork, and that would prevent EVER having that fork wear. You never want to unnecessarily wear an expensive part. So, on my order is a few AN970-6's, -7's, and a new U-1009 axle. The axle was about $15, and I ordered it so that I could allow these parts to ship UPS ground, and still feel good about chopping up my old U-1009 and shortening it at a local machine shop so I can put these washers in for the weekend. If the new spacers work fine with my shortened axle and washers, then I will just leave it that way permanently. Small price to pay to fix the issue fast....less than an hours' flight time. The bigger problem is until I either get over it, or buy a new fork assy, I'm going to have that nagging thought of the fork damage. There's still about .290-.300 thickness to that fork, which should be good, especially if you hold that nosewheel off well on landing.
More photos to come as things come together...
|
|
|
|
|
|
|
|
|
|
|
8/10/2006 Update (p.m.)
Today I stopped by a machine shop and had them take off about .115" off my axle, to accomodate 2 AN970-6 washers on the outer edge. Yes, they are .063 each, so .126" would have been the standard, but I wanted the axle to be even just a little more snug than before, because any flexing inward will bring that valve cap closer to the fork. As a side note, this from John D. today...a note someone sent him:"returned the nosewheel to Matco to have it replaced with WHLNW511.25 which is correct for the valve stem on the tube and avoids the clearance problem with the supplies WHLNW501.25."
In other words, Van's is sending out the wrong wheel for the application on this plane...because they use this wheel for the RV-7's and such, and didn't want to have to stock 2 parts. So we get to receive the one that isn't made for the application, and therefore unless you swap wheels, you're going to have minimal valve stem clearance.....pretty nice, huh? <not>
Anyway, I had the axle cut shorter at a machine shop, and then I just had to guesstimate how much to take off the 2 spacers. Knowing they had worn into a taper on the inside, to fit against the bearing, I had them only cut down by .085" total. I did .035" on one side, and .050" on the other. That way I could have a slightly longer sleeve on the left side, so my valve stem had just that little extra clearance from the fork. This brought forth a small problem... Tonight when I assembled it as in the first photo below, it looked great. VERY much better than original. Then, when I put the whole wheel together, I found that the spacers had worn probably at least .120" because there was tons of slop in the spacers yet, even though they now had a nice flat surface to sit between, and had been cut less than the axle, and the washers were in there to fill in some space. The spacers just spun. So, I decided since I already ordered another axle, I'd take my bandsaw and VERY carefully trim off some more axle, and just use one more washer on the left side. That should keep that valve stem even FURTHER away. If I was right, I could get it so there would be plenty of pressure on the bearings and spacers to hold them in place so they don't spin. Sure enough, it worked just great. I could now torque that bolt down tight and keep the spacers from spinning, and the bearing too. Just to be totally sure they never spun again, I drilled a couple of holes in the stainless spacers, and remounted it all. Then I made a pilot hole in the aluminum axle shaft, and took it all apart and tapped it for an 8-32 screw on each spacer. Then I cleaned it up, regreased, and put it all together. Now it is very solid, and should never wear the fork again....I just am left with a crappy fork...so I'll probably just get a new one. Once my new spacers and axle come in, I may tear it all apart and use those pieces, but I'll still probably cut the axle and spacers down and use the washers on the outer ends. It will prevent your forks from being the sacrificial component. The bearing, for future reference, is a Timken LM-67000L-A. About $25 at the local bearing supply shop or Van's.
A note about tightening the axle nut... Tonight on the RV-10 list, someone said that George Orndorff (A Van's tech center place), says that the bolt should only be snugged, and then rechecked often in the first few hours. I don't personally believe this is true on the RV-10, but perhaps it is on the other models. Here's why. I studied this long and hard, and now I fully understand why this is such a huge freaking issue. It didn't make sense at first, having worked on dozens and dozens of automotive bearings in the past. You see, on automotive apps, the bearings are pressed in on the backside, and a nut and washer holds the bearing tight. But it pushes against a different area of the bearing. And the grease seal is usually a seal that is pressed into the hub, with a seal around the shaft on the ID of the seal. This is NOT how these bearings are on this application. On THIS application, you are expecting that the sleeves, the axle, the bolt, AND the inner race area of the bearing do not ever rotate. The problem is, if these bearings were a tight knurled, or press fit onto that axle shaft, it might be easy to keep them from rotating by just not letting the shaft spin. But, what happens here is that the grease seal is a large seal that the wheel spins around....so the seal is on the OD of the bearing in this case. That's why my stinking seals were so torn when the wheel wobbled. The kicker to the problem is, if you don't have the spacers very tight against the bearing, there's not enough force to keep the bearing from turning on the shaft. If the bearing spins on the axle shaft, then it's becoming USELESS as a bearing. At that point, you're using the aluminum axle as the bushing, and the wheel is rolling by spinning the hard steel bearing race against your soft aluminum axle shaft.....instead of turning the roller bearings inside of the wheel's outer race. The seal itself has a lot of drag against the wheel as it spins, and this drag will make it so that the wheel tries REALLY hard to make the bearing spin. As it turns out, if you don't have tight spacers, it's really easy to get that bearing spinning. And once the bearing is spinning, the spacers stuffed right up against it will spin too. And once they start spinning, they'll spin against the fork. If you have the stainless ones like me, they'll ABSOLUTELY then start carving into your forks. If you have the new and improved thick aluminum ones (that I can't comment firmly on because I haven't seen them), then they would have more surface area against both the bearing and the fork....so on one hand the bearing will try to turn it harder, but the fork will prevent it harder as well. To me, this is STILL going to be a less than ideal situation until you PREVENT the spacers from turning, and you PROTECT the forks from being worn if they do turn. The lock screws I put in should keep the spacers still. The washers will protect the forks. The one further improvement that would be simple would be to drill a tiny hole in the fork on one side, that drills into the aluminum axle, and then tap for a small hex head internal setscrew lock, so that you could pin the axle from rotating at all too. Beyond that, the only real improvement I could think of is if you could find a way to either press-fit, or hold that inner bearing from turning on the axle. Perhaps knurling it, epoxy, a small keyway and shear key, or something like that would be the ticket. If you've done all of the other steps, and have tight spacers, you probably wouldn't have any huge issues from that point.
The worst thing about it is that no matter what you do, you really don't have independent control over how tight the bearings are seated...separate from how tight the axle bolts are and how long the spacers are. Just to let you know how this all ends up the way I have it tonight, the wheel will not continue rolling if you spin it by hand. I don't think it's too tight from a bearing perspective, but the grease seals against the wheel hub provide a lot of drag, so they don't let the wheel spin real freely.
A couple other tips, while I'm at it. By the time you get to 25 hours on your plane, re-check that large nut that holds the fork on. Mine needed to be tightened almost one full flat to the next castle stop, to retorque it after it took it's set. I think the spec is about 24lbs. pull of breakout force to rotate the nose at an angle.
The second tip that I can't yet verify is fairing balance. To prevent shimmy, I've heard that a good idea is to balance your fairing. Since I had a little lead shot around, and I wanted this all to be perfect now, tonight I weighed out a little lead and taped it to the nose of the nosewheel fairing. I got it so that I could hold it where it mounts, in the centers of those 4 screw areas, and get it to be about neutrally balanced. Then I just took a little shot away, poured the rest into the nose of the fairing, and mixed a couple of squirts of epoxy. I poured the epoxy into the nose over the shot, put down one layer of cloth, and then a little more epoxy. By tomorrow that stuff won't be going anywhere, and I already re-checked the balance and it's now much less tail heavy, so maybe that will improve things too.