Time for Tires and Brakes
Added 11/7/2006 - Approx. 173 flight hoursUpdated 11/23/2006 - Lining Replacement
Updated 3/16/2009 - 2nd Lining Replacement
Updated 3/29/2011 - New Diagrams and Rapco/Desser Info
Updated 7/13/2011 - Rapco Brake Linings and Discs now available!
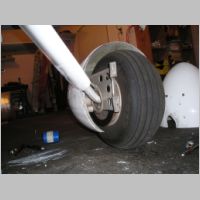
Living in the Great North country, our temps have been dropping lately and that means it's time to change the air in the tires from summer air, to winter air. (it's a joke, people!) But seriously, the pressure in the tires drops in the cold weather quite substantially, so you need to fill them back up. Tires should be filled to 42 PSI on the Mains, and 40 PSI on the front, which should be done with no weight on the wheels. Having a pair of homemade jacks handy, I jacked the plane up and went through the trouble of disassembling my wheel fairings to get access to the air stem. Many people have made an issue out of how hard it is to get to the stem, and some people cut holes and put plugs in the fairing to accomodate. I agree totally that it's a real pain, but I don't know that it's a good idea to try to find a convenient workaround....and here's why. You really do need to regularly inspect the tires and brakes. If you always just popped a cover and filled them up with easy stem access, you'd possibly overlook critical issues with brake lines, brake linings, tires, axle nuts, and things like that. So in my opinion, it's maybe better to just bite the bullet and pull the fairing fronts so you can check these things.
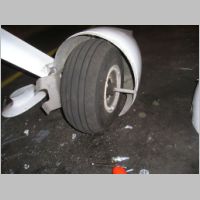
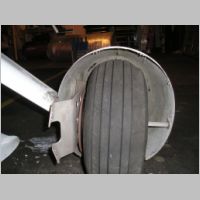
In my case, it was a good thing I did. You can see by the tire photos that I have the typical RV uneven tire wear. Some say it's from improper toe-in. Some say it's from the wheels hanging and drooping inwards in flight and touching on the outer edge first on landing. One guy suggested that if you land firmer you'll flatten the gear quicker and wear less on the edges. So I like the last idea first...the problem with my tires is that I land too smoothly. ;) At any rate, these tires can be flipped and installed backwards on the opposite gear leg, and then you can wear the other side of the tire and still get good life out of them. I do have a low spot on each tire, probably from a skidding landing or brake-locking stop, which is very common, so I have ordered replacement tires...more on that later.
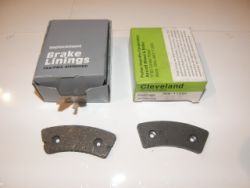
Another thing I found while the fairings were off is that I have confirmed that I'm not a very good "feet off" taxi guy. I'm pretty hard on these brakes with the free castering nosewheel and I need to make a better point not to ride the brakes. My brake pads at 170 hours were worn down quite a bit. The pads, Cleveland p/n 66-112, are only available currently as Cleveland parts, so they cost about $15-16 each lining. I have spoken with Rapco though, and they may actually be interested in making these for the experimental market, so with luck we'll have cheaper pads later on. The Brake assembly, by the way, is Cleveland p/n 30-59E, and the wheel assembly is p/n 40-59A.
Now for the tires... I read a cool Aviation Consumer Article on Tire Value that was linked to from Desser Tire's site. This article compared the "value" of various tires. While the article didn't directly apply to our tires, it was good info nonetheless. Our mains are a 15/6.00-6 6-ply tire, which is 15 inches tall. It is NOT the same as a standard 6.00-6 tire, which is almost 2 inches taller. (Our front tire is a 5.00-5 6-ply tire) So this limited my selection a bit on main tires. The article explained that in theory, you're best off either buying the most expensive Goodyear tires, which have more tread and should last a long time, or buying the cheaper retread tires, which have lots of tread, but softer rubber and still last a long time. One other benefit is that the retreads are often more "round" than the factory tires. Many factory tires are slightly oblong, and the retreading process has actually very tight tolerances and often produces a rounder tire. In the case of the tires I bought, I was told that the rubber was also slightly harder than the McCreary AirHawks that I was also considering. Personally I went with the "High Performance Retreads". Saved almost $20/tire over the AirHawks. I also got LeakGuard tubes, and don't forget the free tire talc from Desser.
So, by taking the time to pull my fairings, I was tipped off to impending maintenance that would be required, and I was able to order parts to have on-hand for the proper time. My plan is to change the brakes a.s.a.p., but flip the tires for the winter season...when I may be slipping on ice and then grabbing asphalt. May as well beat these tires a bit more.
Here's some additional info on Cleveland stuff:
Cleveland Brake Info
Cleveland Brake Kits
And some photos...

|
|
|

|
|
Brake Lining Replacement
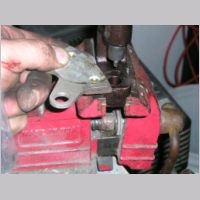
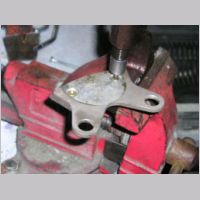
Updated 11/23/2006 - Lining ReplacementI shot these pictures during the brake lining replacement, for those who've never seen it done before. You need to purchase 4 brake linings, which usually come with rivets (although it might be nice to get a couple of spares on hand). There is one additional item you'll need: A Brake Lining rivet tool. There are 2 types, generally. One requires you to hammer the rivet, and one has a screw handle for squeezing the rivet. I'd highly recommend the screw version, even though it's a couple bucks more. Much less worry about cracking your linings or having the rivets come out poorly.

|
|
|
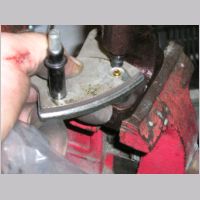
| Notice
above
the
way the tool is used for driving out the old rivets.
You simply use the pin attachment to the tool to drive the rivet out, and it falls through the hole in the bottom of the tool. |
||

|
|
|
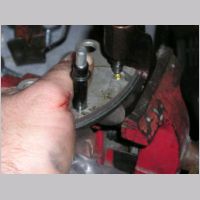
| Now,
when
you
want to drive the new rivet, you put an insert in the back of
the tool, that fits in the hole by the rivet head. You can cleco the 2nd hole in place using a black cleco. Then just position the tool with the press-out needle attachment removed, and start screwing. Soon you'll have a perfectly formed rivet on the backside of the lining. |
||
In addition to this lining
replacement, I also "rotated" my tires to balance out the wear to the
other edge of the tire. This consisted of removing the air from
the tires, including the schroeder
valve,
removing the bolts from the wheel halves. Flip the tube inside
the tire, once again lining up the valve stem with the light spot of
the tire (red dot). Then reassemble. I actually also moved
my right tire to the left and vice versa, which will keep the tire
rotation the same as previous, since some types of tires are touchy
that way. Then just bolt it all up per specs (150 in-lbs) and
fill with air. The brakes are bolted back on with a torque of
75-80 in-lbs. At the same time, I noticed that with the linings
used up, my brake fluid reservior had emptied just to the point of
seeing some air in the line up by the reservoir. With the new
linings, this is not visible anymore, but I used the opportunity to
re-blead the brakes, adding a few more pumps of fluid to the system
(first purging the air from the bleeder line of course), so that next
time it shouldn't quite get that low. All in all, it was a very
easy job, and a test flight proved all was well.
3/16/2009 Update
446.6 Flight Hours
Just completed my Annual Condition inspection for 2009 and did a check of my brakes and tires, and packed the wheel bearings. The first set of linings went just shy of 170 hours before I heard the light grinding sound of rivets hitting the discs. A couple flights ago I thought perhaps I heard the sound again, but wasn't sure as it was pretty faint. Indeed, at somewhere around 445 hours, I was once again touching the rivets on one side, and just barely about to touch on one of the linings on the other side.
This brings me to put out a little more info on brake wear. As I was inspecting the brakes, I did not think I had to replace them NOW. They looked to be about 1/2 used in thickness from original. I had a set of linings on hand, with rivets, so it wasn't waiting for parts, but stupid frugality that made me think I should stretch out the life another month or two before replacing them. But, I had to know what the real wear was, and being Annual Condition Inspection time, I really should both fill the tires and repack the bearings...so I tore into it. I'm taking my most major vacation flight ever in a Month and I didn't want anything to prevent it's success. After removing the outer (easy) linings, I was still unconvinced that I needed to pull the wheel and replace the inner lining. I measured the thickness of the NEW linings at about .22", and the thickness of what was left on the backing plate of my outer lining at about .12". Hmm, that's over 1/2! Well, it turns out that there are more variables than that. If you get to about .10", you'll start hitting the rivets. So if your brakes are visually nearing 1/2 of new thickness, it's time to replace them. I was very close, on that lining. But then I pulled the wheel and checked the inner lining. That one had started touching the rivet on one rivet. The brakes don't always wear 100% evenly througout the length of the lining, and the bottom side of the lining on the inner, had worn thinner than the other areas. It was immediately apparent that I needed to replace my linings right away. Checking the other side of the plane, I found that I was also very very close to the same point. So the moral to the story is, check the linings, and if you get to somewhere around .12" remaining, you're done or already too late. My first set lasted ~170 hours, but with a bit of discipline to not ride the brakes, I stretched the 2nd set to about 270 hours. I think if I try even harder I can get into the 300's, but I would plan ahead....expect that as you're getting your airplane flying you're going to replace them more often. Count on having a set on hand by the time you hit 100 hours. Inspect them regularly.
This brings me back to my comment that I tend to make when people suggest adding a tire-inflation port to their wheel fairing. I'm not at all against having a knockout plug that you can use to fill the tires regularly. I think maintaining tire pressure is important. If you get Leakguard tubes, you won't lose as much air, so ditch your original tubes and get those, and that will make inflation frequency less. But, what I do think is that if you have a fill port, at least for me I'd be more tempted to NOT inspect my brakes as often as I wanted. On this particular day, I did not WANT to pull my fairings apart. I was REALLY not looking forward to it. I wanted to get on with my day, and just fill the tires with air. But the reality is, I hadn't inspected the brakes since the fall, and to inspect them, I needed the fairings off. So I removed the fairings, and then it was time to study my brake linings as I mentioned above. So in effect, I prevented myself some major disc damage by not having a fill port on my fairing that would have allowed me to be lazy and just fill the tire with air. No, you may not be so pursuaded and you may be diligent to inspect the brakes...but I see the time used to fill your tires as the perfect inspection interval for checking brakes.
This time around in ordering spare brake parts to have on hand, I decided to order a few additional things. I recently spoke with a builder who had lost his snap ring on one side of the wheel. That got me thinking...if any of my parts get damaged, I don't have a way to continue. So, it would be cheap insurance to keep a set of parts on hand. I checked Aircraft Spruce, and they don't list the same wheel parts breakdowns as we have....we have the 40-59A wheel assembly, and the 30-59E Brake Assembly. Doing a little online searching, I found the parts at one of my favorite suppliers...skygeek.com (seems to describe me, I guess).
Below is a list of all of the replacement parts other than bolts, nuts, and bearings, for ONE side. The quantity of linings and rivets is the total for doing TWO wheels. The confusing part for me was the 153-00300 and 153-00400 Ring-Grease Seals. I had to look at my original RV-10 plans to find out the difference as they BOTH are listed as "Figure No. 9". Doing a little checking finds that the 153-00400 is used on the inner, with the large flat felt. The 153-00300 is used on the outer. I thought I'd pass these parts lists and links on because it is hard to find a good blowup diagram on the net. If the links below are ever broken, send me an email and I saved them as .pdf's.
Also, an update regarding Rapco replacement pads. 3/17/09 I called Rapco again to refresh the issue that perhaps it would be a good idea for them to start making 66-112 brake linings, since we now have 180 approx RV-10's flying, and nearly 1,000 kits sold, and I'm already running my 3rd set of linings. The sales end of the company really would like to see something happen. It sounds like they've considered it a few times, but FAA/PMA approval process is long, boring, and expensive. On my prior contact they even said maybe they'd do it for only experimentals. This time around though, a couple years later, it sounds like nothing has yet happened, and they said it would probably be a while...a long time, even if they did decide to do it. So, for the time being, stock up on the Clevelands. The price is rising, so best to own a set of 4 soon.
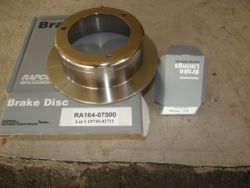
Update 7/2011: Rapco linings and discs are now avialable at Vansaircrafttires.com (It's just Desser tire, under a different name) as Rapco p/n RA66-112 linings, and RA164-07500 discs! I got some for myself, here are a couple pics.
Click this link or the photos to link to my new write-up
3/16/2009 Update
446.6 Flight Hours
Just completed my Annual Condition inspection for 2009 and did a check of my brakes and tires, and packed the wheel bearings. The first set of linings went just shy of 170 hours before I heard the light grinding sound of rivets hitting the discs. A couple flights ago I thought perhaps I heard the sound again, but wasn't sure as it was pretty faint. Indeed, at somewhere around 445 hours, I was once again touching the rivets on one side, and just barely about to touch on one of the linings on the other side.
This brings me to put out a little more info on brake wear. As I was inspecting the brakes, I did not think I had to replace them NOW. They looked to be about 1/2 used in thickness from original. I had a set of linings on hand, with rivets, so it wasn't waiting for parts, but stupid frugality that made me think I should stretch out the life another month or two before replacing them. But, I had to know what the real wear was, and being Annual Condition Inspection time, I really should both fill the tires and repack the bearings...so I tore into it. I'm taking my most major vacation flight ever in a Month and I didn't want anything to prevent it's success. After removing the outer (easy) linings, I was still unconvinced that I needed to pull the wheel and replace the inner lining. I measured the thickness of the NEW linings at about .22", and the thickness of what was left on the backing plate of my outer lining at about .12". Hmm, that's over 1/2! Well, it turns out that there are more variables than that. If you get to about .10", you'll start hitting the rivets. So if your brakes are visually nearing 1/2 of new thickness, it's time to replace them. I was very close, on that lining. But then I pulled the wheel and checked the inner lining. That one had started touching the rivet on one rivet. The brakes don't always wear 100% evenly througout the length of the lining, and the bottom side of the lining on the inner, had worn thinner than the other areas. It was immediately apparent that I needed to replace my linings right away. Checking the other side of the plane, I found that I was also very very close to the same point. So the moral to the story is, check the linings, and if you get to somewhere around .12" remaining, you're done or already too late. My first set lasted ~170 hours, but with a bit of discipline to not ride the brakes, I stretched the 2nd set to about 270 hours. I think if I try even harder I can get into the 300's, but I would plan ahead....expect that as you're getting your airplane flying you're going to replace them more often. Count on having a set on hand by the time you hit 100 hours. Inspect them regularly.
This brings me back to my comment that I tend to make when people suggest adding a tire-inflation port to their wheel fairing. I'm not at all against having a knockout plug that you can use to fill the tires regularly. I think maintaining tire pressure is important. If you get Leakguard tubes, you won't lose as much air, so ditch your original tubes and get those, and that will make inflation frequency less. But, what I do think is that if you have a fill port, at least for me I'd be more tempted to NOT inspect my brakes as often as I wanted. On this particular day, I did not WANT to pull my fairings apart. I was REALLY not looking forward to it. I wanted to get on with my day, and just fill the tires with air. But the reality is, I hadn't inspected the brakes since the fall, and to inspect them, I needed the fairings off. So I removed the fairings, and then it was time to study my brake linings as I mentioned above. So in effect, I prevented myself some major disc damage by not having a fill port on my fairing that would have allowed me to be lazy and just fill the tire with air. No, you may not be so pursuaded and you may be diligent to inspect the brakes...but I see the time used to fill your tires as the perfect inspection interval for checking brakes.
This time around in ordering spare brake parts to have on hand, I decided to order a few additional things. I recently spoke with a builder who had lost his snap ring on one side of the wheel. That got me thinking...if any of my parts get damaged, I don't have a way to continue. So, it would be cheap insurance to keep a set of parts on hand. I checked Aircraft Spruce, and they don't list the same wheel parts breakdowns as we have....we have the 40-59A wheel assembly, and the 30-59E Brake Assembly. Doing a little online searching, I found the parts at one of my favorite suppliers...skygeek.com (seems to describe me, I guess).
Below is a list of all of the replacement parts other than bolts, nuts, and bearings, for ONE side. The quantity of linings and rivets is the total for doing TWO wheels. The confusing part for me was the 153-00300 and 153-00400 Ring-Grease Seals. I had to look at my original RV-10 plans to find out the difference as they BOTH are listed as "Figure No. 9". Doing a little checking finds that the 153-00400 is used on the inner, with the large flat felt. The 153-00300 is used on the outer. I thought I'd pass these parts lists and links on because it is hard to find a good blowup diagram on the net. If the links below are ever broken, send me an email and I saved them as .pdf's.
Also, an update regarding Rapco replacement pads. 3/17/09 I called Rapco again to refresh the issue that perhaps it would be a good idea for them to start making 66-112 brake linings, since we now have 180 approx RV-10's flying, and nearly 1,000 kits sold, and I'm already running my 3rd set of linings. The sales end of the company really would like to see something happen. It sounds like they've considered it a few times, but FAA/PMA approval process is long, boring, and expensive. On my prior contact they even said maybe they'd do it for only experimentals. This time around though, a couple years later, it sounds like nothing has yet happened, and they said it would probably be a while...a long time, even if they did decide to do it. So, for the time being, stock up on the Clevelands. The price is rising, so best to own a set of 4 soon.
Update 7/2011: Rapco linings and discs are now avialable at Vansaircrafttires.com (It's just Desser tire, under a different name) as Rapco p/n RA66-112 linings, and RA164-07500 discs! I got some for myself, here are a couple pics.
Click this link or the photos to link to my new write-up
| Qty |
P/N |
Desc |
Note |
Fig. |
Price ea |
| 1 |
153-00300 | 153-00300 Ring-Grease Seal | Outer - 1 per side |
Figure No. 9 | $6.49 |
| 2 |
153-00400 | 53-00400 Ring-Grease Seal | Innter - 2 per side |
Figure No. 9 | $6.99 |
| 1 |
153-01500 | 153-01500 Ring-Grease Seal | Figure No. 10 | $9.75 | |
| 1 |
154-00300 | 154-00300 Felt-Grease Seal | Figure No. 11 | $4.42 | |
| 1 |
155-00100 | 154-01300 Felt-Grease Seal | Figure No. 12 | $4.79 | |
| 2 |
066-11200 | 155-00100 Snap Ring | Figure No. 13 | $5.70 | |
| 4 |
066-11200 | 066-11200 Lining | Figure No. 11 | $18.62 | |
| 8 |
105-00200 | 105-00200 Rivet | Figure No. 12 | $0.35 | |
| Cleveland
30-59E
RV-10 Brake Parts List |
Cleveland
Brakes All Models |
||||
| Cleveland
40-59A
RV-10 Wheel Parts List |
Cleveland
Wheels All Models |
||||
| Cleveland
Tech
Service Guide 2000 |
|||||
| Cleveland
Tech
Service Guide 2009 |
|||||