| 1st task was to drill and pop rivet the door brace stiffeners after they had cured. I put flush head rivets in instead of the LP4-3's. |
|
| I'm going to cover Them with headliner anyway, but just didn't want the 'bumps' to show. They are slightly weaker than the |
|
| LP4-3's but in my 'infinate wisdom' I don't think it will matter much. Then a quick trip to West Marine to pick up some SLOW |
|
| hardner to allow for a little longer pot life. Used packaging tape to protect the cabin/fuse frame/skins from the wet epoxy 2-3 |
|
| widths seems to be enough. Cut som HD garbage bags to lay up the parabeam (pretty neat stuff!) which wetted out easily.Then |
|
| with Judy's help. We brushed. wetted, smeared, clecoed, and otherwise joined the 2 Left door halves together and then got them |
|
| placed on the fuse. I was a little stressed about the time, I mixed the epoxy in smaller batches so that there would be less heat in |
|
| the 'pot' and with both of us working it really went fairly well. I didn't time exactly how long from the time we started |
|
| brushing/smearing/spreading until we clecoed them together but I guess it must have been 45 mins to 1 hr. This is Defniately a 2 |
|
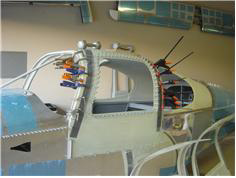
| person job. Temp was 75 degrees. As you can see from the pics, I used a variety of clamps tp get the doors to sit flush with the |
|
| Cabin door frame, it was flush all around without the need for Duct Tape. could have easily done the other door today but not |
|
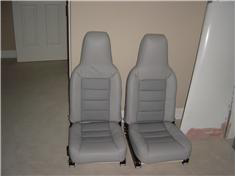
| enough clamps, so that's tomorrows project. BTW my Seats arrived from Classic Aero Today. Wow!!!! I just sent them my seat |
|
| frames 1 1/2 weeks ago so I wasn't expecting them back so soon. They look GREAT THANKS Luke! |
|