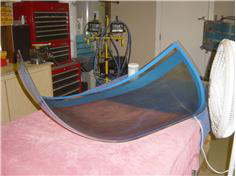
| Prepped the windscreen for installation. I had previously rough cut the windscreen, but today, I needed to get it ready for install |
|
| tomorrow. I left the pressure sensitive contact covering for all of the final sanding and fitting. I used the air grinder with the cut-off |
|
| wheel to do the bulk of the work. I found that by using the side of the cutoff wheel it acts much like a disc sander and works very |
|
| effectively and gives more control on the fine adjustments. I probably too 20 or more tst fitting on and off session to get it ready. |
|
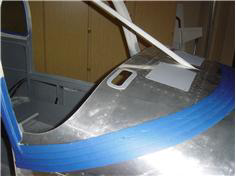
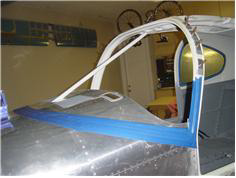
| For some reason, the left side (pilot side) has move curvature in it than the right side. I found that I needed to use the .062 alum |
|
| fingers that I made for the door and rear window install. I drilled the frame for 4 on each side. The right side still requires a hand |
|
| clamp to get it to sit flush. After getting the edges final cut, i hand sanded them with 60, 100, and 220 grit respectively to get the |
|
| edges scratch free. I used some 3M fineline tape and masked off a border and then applied 3 coats of peelable protective |
|
| coating to the exterior side of the windscreen and 2 to the inside (That's all the material I had left!). I marked the perimeter of the |
|
| windscreen on the last trial fit w/ a Sharpie and then masked the area off w/ masking tape, I'll Scotchbrite the upper fwd fuse in |
|
| the AM and then prime it w/ 988 and then spray it with some semi flat black paint I picked up @ Ace. I need to remove the center |
|
| post and get it painted and reinstalled before floxing in the windscreen. |
|