Completing Van's SB-06-2-3
Today I took the time to stop and complete Van's SB-06-2-3, the first Service Bulletin for the RV-10. This service bulletin is posted HERE on Van's Site for your reading. In case you're and RV-10 builder who's been living in the cave that they call their shop, and haven't heard, Van's found on N410RV during their annual condition inspection that they had some cracking around the upper hinge bracket on the rear spar of the Vertical Stablizer. The plane in question had over 1,000 hours of time on it. They quickly decided that they probably should have added a doubler plate to the inside of the rear spar, since the spar has no other doubler on that top area. You'll notice that the lower 2 hinges are riveted in areas that also contain doublers, so this should be the only one that's vulnerable.Before I started, it was my plan to just completely rebuild the Vertical Stablizer....one of the nice benefits of being a homebuilt. I wasn't happy because I didn't want to drill rivets on my newly painted tail and then have to repaint them. In addition, this is the very first piece made in the RV-10 kit, so if there is something that will have beginners mistakes, this would be the piece.....and many of you remember the middle nose rib ding that we got from not knowing that we should trim back the nose rib a bit and not stuff it into the skin. I still may rebuild a complete VS some day, but right now I'm not motivated. For those interested in doing so, here's a parts list, except for the doubler involved in this SB, which you can probably get for free or cheap.
Vertical Stab Parts
$79.20 VS-1001 Skin
$13.91 VS-1002 Front Spar
$22.50 VS-1003 Rear Spar
$8.45 VS-1004 Bottom Inspar Rib
$5.33 VS-1005 Bottom Nose Rib
$6.61 VS-1006 Top Rib
$6.99 VS-1007 Middle Inspar Rib
$15.00 VS-1008 Rear Spar Doubler
$25.75 VS-1009 VS Tip Fairing
$4.95 VS-1010 Bottom Rudder Hinge Bracket
$4.00 VS-1011 Middle Rudder Hinge Bracket
$3.90 VS-1012 Top Rudder Hinge Bracket
$5.24 VS-1013 Middle Nose Rib
$15.40 VS-1014 Rear Spar Cap (**2 Req)
$1.75 VS-1015 Doubler
FREE VS-1017 Doubler from SB-06-2-3
$3.50 R-1007 Rudder Stop
$222.48 Total
Now for the process:
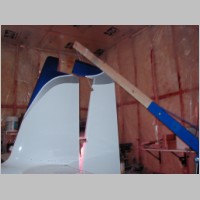
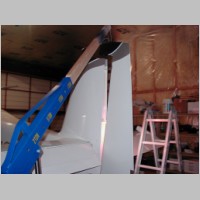
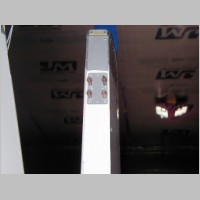
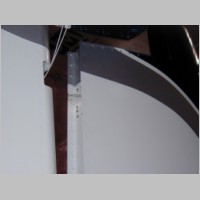
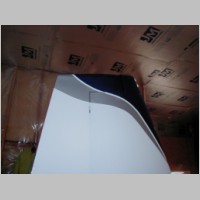
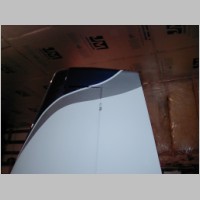
Due to having a nice routing of my wire through the tail into the rudder for the tail light, I didn't want to disconnect my Rudder and remove it completely if not necessary. So, I extended the arm on my engine hoist (glad I decided not to sell that yet), and turned it into a crane. I removed the hinge pins and hung the rudder by the top rod end on. Then I drilled out the rivets per the SB. 2 on the top of the rear spar, 8 that hold the 2 hinges, and 6 on the rear upper skin where it rivets into the top rib....NOT the rear-most rivet, that one goes into the rear spar only. Be careful drilling the rivets. That was my big reason for delaying the SB...I wanted to fly to Sun-N-Fun and if I damaged the VS during this process, I could have ended up downing the plane until I could rebuild the VS. Luckily only one hole got a little oversized during this procedure, and with the doubler plate on it at least you're forming a shop head on a nice tight new hole.
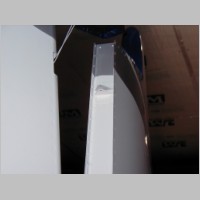
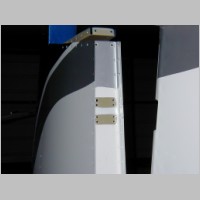
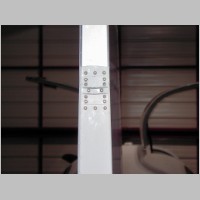
With the hinges off, it's time to take that newly primed doubler plate and match drill the plate itself into the spar. You'll be adding a bunch of rivets around the plate, in addition to the ones that previously held the hinge. After match drilling, it gets removed and deburred (gee, haven't done that in a while). Then you install the rivets on the doubler. I put the doubler-only rivets in first, and then added the hinge rivets last. When installing the hinge rivets, I started at the bottom and worked my way up to keep good visibility of the shop heads I was forming. My hand JUST made it inside the VS to hold the bucking bar. No, there's no way you're going to squeeze these rivets like you did when you assembled it the first time.
Once all the rivets were in place, I took a vacuum and sucked out all of the old rivet heads that fell into the VS that I could find. There's probably a couple more to get that fell into the bottom. It might be a good idea to tape in a head catcher into the VS before drilling them out if you're picky and don't want to leave any in there.
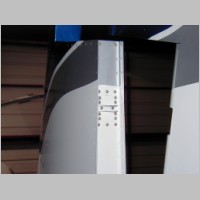
Then the easy part....just squeeze in some new rivets on the top rib. I did a pretty good job of drilling them out, so the paint actually looks quite good around the visible areas. I'll just need to do a little spot touchup of all 3 colors and it should be pretty un-noticible. After that, it's the less fun step of getting all the hinge pins in again (with fresh nuts), and then you're done.
Total time was about 2.5 hours.
Up until now, I've avoided drastic slips and large rudder movements. It'll be nice to relax knowing that I didn't have any cracking and that this should keep future concerns down. For the non-builder, you should understand that service bulletins are to add safety to an airplane. Things come up, and when someone notices a problem on one plane, they determine if it's an issue that could affect others, and if so, they issue a bulletin to perform a modification that will enhance safety. Luckily, with many thousands of rivets holding the plane together, a rivet here and a small crack there probably won't cause an accident, but we're all diligent in preventing any cracks and bad rivets that we can. From a homebuilt point of view, we should see enhanced safety over certified planes, as the review and repair process can be much much shorter and smaller on a homebuilt, so a fix for us is usually a quick and cheap endeavor. If this were a certified plane, it would have cost more to repair, if they even would have issued the SB at this point. Considering the whole VS can be built for under $250, this homebuilding thing is a real bonus.
Due to having a nice routing of my wire through the tail into the rudder for the tail light, I didn't want to disconnect my Rudder and remove it completely if not necessary. So, I extended the arm on my engine hoist (glad I decided not to sell that yet), and turned it into a crane. I removed the hinge pins and hung the rudder by the top rod end on. Then I drilled out the rivets per the SB. 2 on the top of the rear spar, 8 that hold the 2 hinges, and 6 on the rear upper skin where it rivets into the top rib....NOT the rear-most rivet, that one goes into the rear spar only. Be careful drilling the rivets. That was my big reason for delaying the SB...I wanted to fly to Sun-N-Fun and if I damaged the VS during this process, I could have ended up downing the plane until I could rebuild the VS. Luckily only one hole got a little oversized during this procedure, and with the doubler plate on it at least you're forming a shop head on a nice tight new hole.
With the hinges off, it's time to take that newly primed doubler plate and match drill the plate itself into the spar. You'll be adding a bunch of rivets around the plate, in addition to the ones that previously held the hinge. After match drilling, it gets removed and deburred (gee, haven't done that in a while). Then you install the rivets on the doubler. I put the doubler-only rivets in first, and then added the hinge rivets last. When installing the hinge rivets, I started at the bottom and worked my way up to keep good visibility of the shop heads I was forming. My hand JUST made it inside the VS to hold the bucking bar. No, there's no way you're going to squeeze these rivets like you did when you assembled it the first time.
Once all the rivets were in place, I took a vacuum and sucked out all of the old rivet heads that fell into the VS that I could find. There's probably a couple more to get that fell into the bottom. It might be a good idea to tape in a head catcher into the VS before drilling them out if you're picky and don't want to leave any in there.
Then the easy part....just squeeze in some new rivets on the top rib. I did a pretty good job of drilling them out, so the paint actually looks quite good around the visible areas. I'll just need to do a little spot touchup of all 3 colors and it should be pretty un-noticible. After that, it's the less fun step of getting all the hinge pins in again (with fresh nuts), and then you're done.
Total time was about 2.5 hours.
Up until now, I've avoided drastic slips and large rudder movements. It'll be nice to relax knowing that I didn't have any cracking and that this should keep future concerns down. For the non-builder, you should understand that service bulletins are to add safety to an airplane. Things come up, and when someone notices a problem on one plane, they determine if it's an issue that could affect others, and if so, they issue a bulletin to perform a modification that will enhance safety. Luckily, with many thousands of rivets holding the plane together, a rivet here and a small crack there probably won't cause an accident, but we're all diligent in preventing any cracks and bad rivets that we can. From a homebuilt point of view, we should see enhanced safety over certified planes, as the review and repair process can be much much shorter and smaller on a homebuilt, so a fix for us is usually a quick and cheap endeavor. If this were a certified plane, it would have cost more to repair, if they even would have issued the SB at this point. Considering the whole VS can be built for under $250, this homebuilding thing is a real bonus.
|
|
|
|
|
|
|
|
|
|