And They Lived Happily Ever After...The
End
An ADS-B Story
If you've read my websites for a while, and see these links HERE and HERE about my more recent ADS-B installs, you already know that I have a long history with ADS-B. No, I don't go back as far as the original Capstone project (although my EFIS does!), but I was probably one of the very earliest adopters of ADS-B in the lower 48. The fact that I got in early, meant, of course, that I got to experience more pain than most ADS-B users have. Pain in the form of laying on my back under the instrument panel, mental pain from having to read installation documents from multiple systems, and in my case, even pain from having to dig in and learn to decode RS232 streams to see what data was in them. ADS-B is both my great friend, and one of my bitter partners, but like a bad marriage, we still stay together for the kids. (Smiley face here)
I couldn't resist putting this video at the top of the write-up so you wouldn't miss it, but if you have patience, read on before watching it.
ADS-B, Friend of Foe?
The truth of the matter is, ADS-B is something will be "required" (if you want to do the things many people want to do) after 2020, for most people, but it is something that every airplane should be scrambling to install today, as well. It's the future, and the benefits far outweigh any downsides....even if you fly a piper cub, or heck, even a breezy. In my love-hate relationship with ADS-B, you have to understand that while I think the traffic technology is fantastic, the weather technology leaves a lot to be desired. This is partially because the FAA in their infinite lack of wisdom, really didn't make it as accessible as they tout. If they put a GBT (Ground Based Transceiver) at every airport with an instrument approach, I'd say it would be vastly better. But not being able to get weather at low altitudes is a major flaw, in my opinion. It's the reason I now have SiruisXM weather, and why I stayed with WSI weather for so long. The weather is just much more accessible. But even if you had satellite weather in cockpit, the traffic features are still a huge benefit. My recommendation still stands: If you're an avid traveler and cross-country flier, you should strongly consider a SiriusXM weather receiver in your plane, along side your ADS-B. It's the only way you'll be able to skirt around thunderstorms at 1000-2000 AGL out in the wide open middle of the USA, where coverage by GBTs just isn't sufficient, or in mountain valleys when the ceilings won't let you top the mountains.
In the beginning, there was NavWorX...
Looking back at ADS-B in my airplanes, I first flew with a NavWorX ADS-B system in my plane in late 2008. By early 2009 I had my system installed, and was an avid ADS-B traffic user (TIS-B), with ADS-B Weather (FIS-B) on my ipad for much of the time. I went through a couple of upgrades of equipment over the years, but largely it all worked about the same until 2016, when I wanted to fly my RV-14. I didn't have WSI weather in that plane, and had to use ADS-B for both weather and traffic. At that point, I had hardware refreshed on both airplanes. Moving into mid-2017, it was a fairly sudden shock that NavWorX folded, leaving me wondering what the future would bring. You see, at that point, I could only receive 978Mhz frequency, so from an air-to-air perspective, I would not directly see any 1090Mhz equipped planes. This would be precisely at those times where I wanted it most, such as in the pattern, in mountain canyons, or down low while traversing the country. Roughly 3/4 of the ADS-B installs were running the 1090Mhz frequency, and so in my mind, dual-frequency reception became a must for me. NavWorX had intended to add that in later software, and their AD fixing hardware was supposed to be dual-frequency ready too. But with them gone, that squashed my chances of staying with NavWorX.
Then I was punished by installing Echo UAT
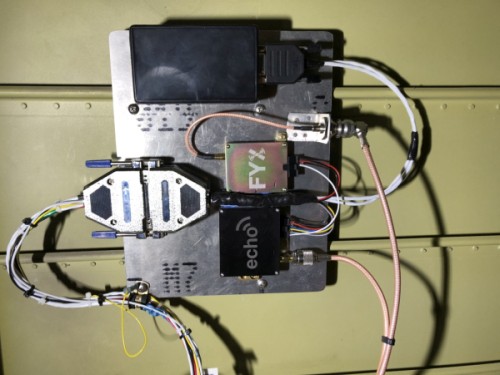
In 2017 at OSH, I had seen uAvionix ADS-B system, the Echo UAT, and while I wasn't very impressed with the unit, I did find that it indeed could put out the proper 38,400 baud rate for me to use, should I ever need it. So in the fall when NavWorX abruptly folded, I put that down on my list as an upgrade for both airplanes. Flash forward a month or two and there was a discount on a package to replace NavWorX systems with uAvionix systems. I bought 2 of them in anticipation of being able to receive 2 frequencies. I finally got them late in 2017, and started the install, and if you read my above links, you'll know that immediately I found issues I wasn't happy with. A friend who also bought the echo, and I, started working on a way to fix everything, and for the most part, I think we did a great job. We still had some ghost/shadow targets, but otherwise, the system was far far better than a stock Echo off the street. One curious oddity is that my FIS-B weather reception was a bit odd, both on ipad and on EFIS. The nexrad radar image wouldn't appear smoothly, painted fully in, but would have a more "striped" appearance on the screen for a while, taking more time to download the weather. I attributed that to being a lower quality receiver that was making my weather reception suffer a bit. Otherwise, with our special "filter box" installed, it was working ok. The sad part was, by that time I had realized how many things I saw that I felt were signs of bad programming or hardware limitations, and it left a bad taste in my mouth. My buddy sold his Echo, but still helped me with mine. I vowed to some day, when I could afford it, upgrade my 2 planes to another system produced with both quality hardware and software.
Lost Causes...a GTX345 story
(at least I dodged that bullet)
In May/June 2018, I had a good friend of mine with a Chelton EFIS ask me what he should do. He was also a NavWorX user, and didn't want to deal with the AD, although in his case the AMOC available for the NavWorX would have worked fine for him, as he has a GNS480 like I do in one airplane. But that still leaves you with only 978Mhz reception from an air-to-air standpoint. It was a hard topic to discuss, because by this time, with NavWorX gone, there were really NO good REASONABLY affordable systems to suggest for him, in the under $3500 category. I had also decided by then that 1090Mhz was probably the way to go, for reasons of high-altitude, international flying, and the sheer percentage of other planes running 1090ES. Any UAT he installed would just be another box he'd have to wire in. The GTX345 from Garmin was a common choice for many people, but in their "Buy all garmin or you suck" philosophy, they don't make the GTX345 as inter-operable as other companies make their systems. Garmin and Proprietary are like synonyms. The GTX345 only puts out 115,200 baud, and only on an RS-422 port. The Chelton and many others are RS-232, and the Chelton uses 38,400 baud. Not only that, but following my anti-proprietary philosophy, the GTX345 has another fatal flaw...it doesn't output Wifi for iPad EFB's. It works fine with Foreflight running Bluetooth, but if you have FlyQ (I do), or WingX (I do), or FltPlan Go (I do), or some other apps, you can't use it because they use wifi. The GTX345 is great, IF...capital IF, you have an all-Garmin panel. In fact with the right all-Garmin panel, a remote mount unit would be an option and it would be a decent system...other than the lack of wifi. But that takes the GTX345 way out of "easy" option status for a Chelton EFIS user and some other MFD users. What ever happened to standards, anyway?
ADS-B done right, the NGT-9000
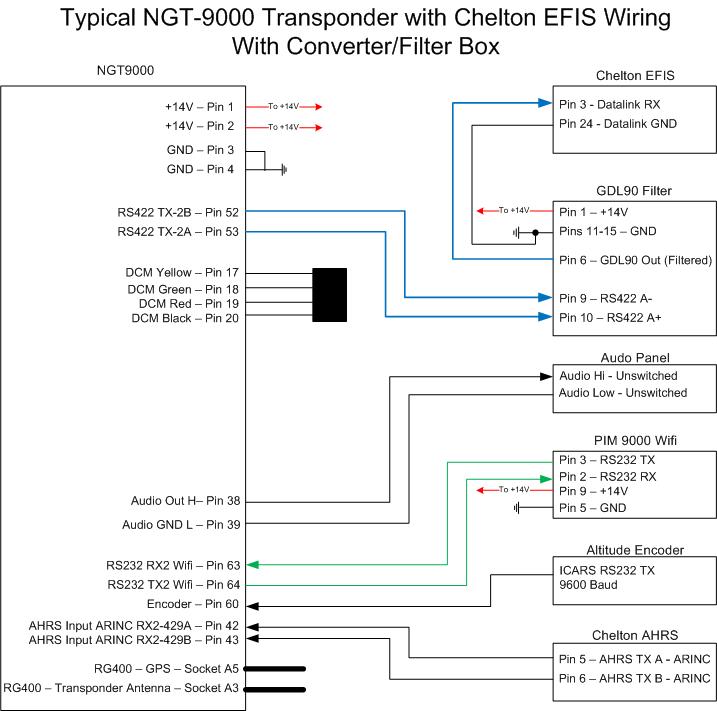
Given that the GTX345 was a poor choice for my friend, I told him he should look into the L3 Lynx NGT-9000. To make it even easier, I called their tech support and asked them some questions. It didn't take very long for me to see that this would be the box for him. First from a technical standpoint, the NGT-9000 does NOT in normal configurations, have an RS-232 GDL90 feed coming out of it that we could hook to the EFIS, if you adhere strictly to asking for RS-232. But the reality is a different story.
The NGT-9000 has a host of difference that make it a far superior box to integrate, and perfect for use with the Chelton EFIS. First of all, there is an RS-422 interface, much like the GTX345, but that interface is fully able to transmit both weather and traffic, and it can be connected directly to the Chelton's RS-232 interface. Even though they are electrically slightly different, this is the procedure that is done between the NGT-9000 and the Aspen system, per the install manual, and it works perfectly with the Chelton as well. The RS-422 interface in the NGT-9000 supports multiple baud rates, including the required 38,400 baud. So one can simply buy this transponder, connect one wire (2 if you include a signal ground) and you will have weather and traffic on your EFIS or MFD. But it gets much better than that. The NGT-9000 ships with the PIM-9000 wifi adapter. This device is very similar to the wireless adapter that NavWorX sold as an option for their system, and it allows that GDL-90 data to work with ALL of those EFB systems, including Foreflight, FlyQ, WingX, FltPlan GO, and basically all of the others. So you end up with a much more useful system in the cockpit as well. Not only that but the wifi can be used for some maintenance functions if necessary.
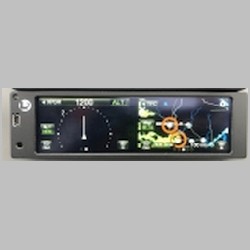
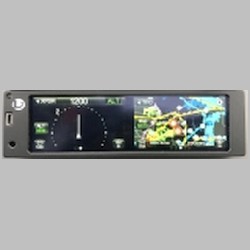
But beyond that, the NGT-9000 is MUCH MUCH more of a transponder than the GTX345 is. The GTX345 basically sits in your panel and stares back at you giving you 4 digits all day long...your squawk code. It's a complete waste of real estate if you have a panel mounted transponder. Remote mount transponders can be nice, but now you're REALLY tied to your other Nav/Com/GPS/EFIS choices more permanently, and hey, just like when ADS-B came out, you no longer have the "easy" upgrade path of just yanking the transponder and putting in a better one. The NGT-9000 delivers you a touchscreen panel capable of not just giving you squawk, but NexRad radar, Terrain and TAWS Class B with terrain alerting, a Traffic Radar Scope type display, with N-Numbers and speeds of targets. Add to that METAR/TAF info, and surprisingly, even NOTAMS for the airports you visit. Thow in things like display of winds aloft, temperatures aloft, Airmets and Sigmets, and and even lightning strikes when paired with a stormscope, and more! From a map perspective, one thing I like is that I fly my EFIS in Track-up mode, but since the NGT can also do North or Track up, I choose North-Up here. That gives you one more way to display weather stations. The screen is really far more valuable once you put that data on it. You can load up the radar scope traffic on one side, and Nexrad on the other, and still see the little 4-digit squawk on the screen, and access it quickly if necessary. I find that while having Traffic on the EFIS is a must, seeing it against a background map can sometimes make it harder to see. But having a dedicated mini traffic scope on your transponder makes it super clear.
Now put the icing on the cake...the NGT-9000 includes ATAS, which means it will call out traffic in a way such as "Traffic 2 o'clock High, 3 Miles" and phrases similar to that. In fact, after watching this video "L3 and Aspen Present: Making a Sound ADS-B Investment" I came away with even more appreciation for their unit. It's the ONLY unit out there that's certified for the level required to allow these traffic call-outs under 2000' AGL (if I'm remembering this right). Apparently the other systems have to limit their traffic alerting at those altitudes such as pattern altitude, because of their certification level. And, there are some smarts to the alerting as well in that they claim you can even fly in formation with other planes with this system without getting inappropriate alerts. Is that not enough? Well, how about this: The system can be integrated with a WX-500 stormscope, if you want lightning detection, and there are multiple levels up upgrade for the unit once you buy the system, each of which can be done later if wanted. Want real TCAS? Just add the directional antennas for TCAS. Want Diversity (multiple antennas, top and bottom, for better detection), then just add the diversity antennas and license. How about TCAS AND Diversity? Sure, just add the antennas again. You can outfit this thing to be much like an airliner would have for a system in it, if you want. This box is NOT just a little toy ADS-B system designed for drones...this thing is the real deal, capable of handling much larger aircraft than the ones I fly. In short, it's a very well built, quality system. So for my buddy with the Chelton EFIS, this was a great upgrade, and for me, it was a great motivation.
Software wise, it's also a work of art. Peruse the L3 Lynx NGT-9000 Pilot Guide once, and you'll see why. The software engineers have very well designed traffic alert algorithms, and so many details taken into account when they wrote the software. The traffic alerting has various sensitivity levels, for times when you're in the airport environment at low altitudes vs enroute at higher altitudes. There are terrain alerts that take into account descent rate. There are multiple methods for detecting collisions, such as a vector crossing intercept algorithm, AND a closing speed to your protected airspace around you algorithm. It was very interesting to even just read their pilots guide for me, because my buddy and I worked many hours trying to build our own traffic alerting box with such algorithms, just to fix the lack of such alerting in the Echo UAT I had. We even had to program in traffic filtering so that we wouldn't see airliners over 30,000' above us, because that box didn't even do BASIC filtering, whereas the NGT-9000 offers Normal (+2700'/-2700') filtering, ABOVE filtering which is +9000'/-2700', BELOW filtering which is -9000'/+2700', and Unrestricted which is +9,900/-9,900'. Now that's how you design traffic filtering, folks. So yeah, finally I found a piece of high quality hardware that was worthy of being called "Avionics" again.
My First Taste of an Install
So after learning about the system, and filling in my friend, he decided that he wanted to not have to hack together some garbage, but put in a top notch system. He flies big jets for a living, and his standards are high. He bought his NGT-9000 at SteinAir, and after it was delivered his Avionics guy started the install. They had some questions along the way, but overall it went real well, and when he was done, he flew with it and was very pleased with the performance of everything. Yes, I was envious.
That Nagging Feeling...that I gave in to
Flash forward to OSH 2018 and I swung by the booth at L3 to let the guys there know how happy my friend was, and that some day I was hoping to have the same thing. They gave me a rebate slip that runs through Sept 2018 that told me of a $350 off promotion on the unit, which sat on my desk for a while until I couldn't resist it any more. I finally ordered 2 of them! Surprisingly, the price really wasn't much different than a GPS equipped GTX345, and I already owned the GPS antennas I needed, as they were installed with my NavWorX systems. This meant that not only could I install this system, and replace my old transponders, but I would already have the GPS antennas in, and could then remove the weight of the UATs in the tail of my plane, and can remove my extra UAT antennas at any time. The system listens on both 978Mhz and 1090Mhz, so you see all traffic directly. I also learned after my test flights with the new system, that I now not only have a faster data download of weather with no "striping" on my NexRad, but I also no longer get ghost/shadow targets of myself showing up on my screen, when flying the same flight route and profile that would cause me continuous shadows when flying with the Echo. That didn't happen on the NavWorX, but the Echo was plagued with them. So it was a win all the way around.
My Installs
Both of my installs went fairly well, other than the fact that I had wired both boxes in the tail of my airplanes, and now not only didn't need that wiring anymore, but wanted to use those same wires to connect to my EFIS. So that meant opening up the planes and pulling back the wiring to the panel. More so in the RV-14 than the RV-10. The install itself was actually very easy, other than the physical contortions required to pull back those long wires.
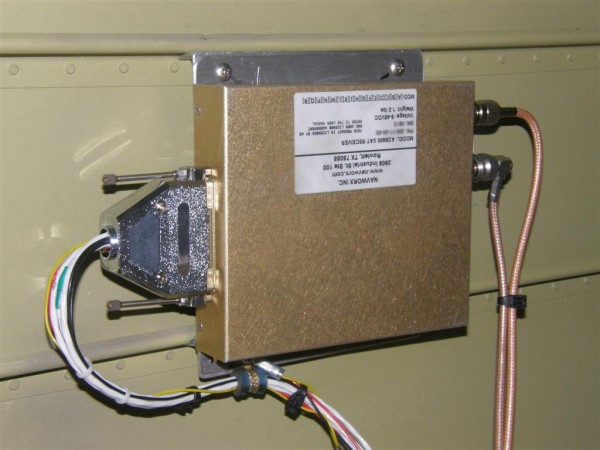
First, I removed the backplate from my old transponders, and then removed the mounting trays/tubes. On one of the planes, that was one of the most significant tasks, as the fit was tight. Then with that out of the way, I took the old hanging backplate and de-pinned the connectors, labeling the wires as I went, because some were no longer needed and some would be re-used. The Altitude encoder, for instance, would still be required, but the ARINC connection to my GNS480 would not, nor would the RS232 to the GNS480 for squawk code sharing. With the old transponder completely gone, and the wiring hanging there, it was now just a task to determine what needed to be connected to the new transponder. The DCM module, mentioned below, is kind of a neat little thing. It's a pre-pinned little storage module that saves a copy of your transponders configuration and licensing keys, so if you ever remove the transponder and insert a new one it will have everything programmed and ready to go. Here's what I found:
1) 2 power wires +14V (Pins 1 and 2)
2) 2 ground wires (Pins 3 and 4)
3) 1 Altitude Encoder Input (Pin 60)
4) DCM Module (Pins 17 yellow, 18 Green, 19 Red , 20 Black)
5) RS422 Transmit for GDL90 Data to EFIS (Pins 52 and 53)
6) PIM-9000 Wifi Module (Pins 63 and 64) *Additional power and ground to that module also
7) Audio and Audio Ground to Audio Panel (Pins 38 and 39) *To receive audio alerts via intercom
8) AHRS Input via ARINC 429 (Pins 42 and 43) *Optional, if you want the box to receive heading info
9) RG400 pigtail with TNC for GPS antenna (Port A5 on NGT-9000) (Left on Connector from Rear View)
10) RG400 pigtail with BNC for Transponder Antenna (Port A3 on NGT-9000) (Middle on Connector)
* Note on item 5. If connecting direct to an RS232 EFIS, use the install manual Appendix D-1 near the very end and connect as you would an Aspen system. If you decide to build and use a GDL90
Filter and RS422 to RS232 converter like I did, you will connect both RS422 wires to it.
Here are the wiring diagrams that I did for myself with a converter and a friend without a converter box.
For a better PDF of these, CLICK HERE
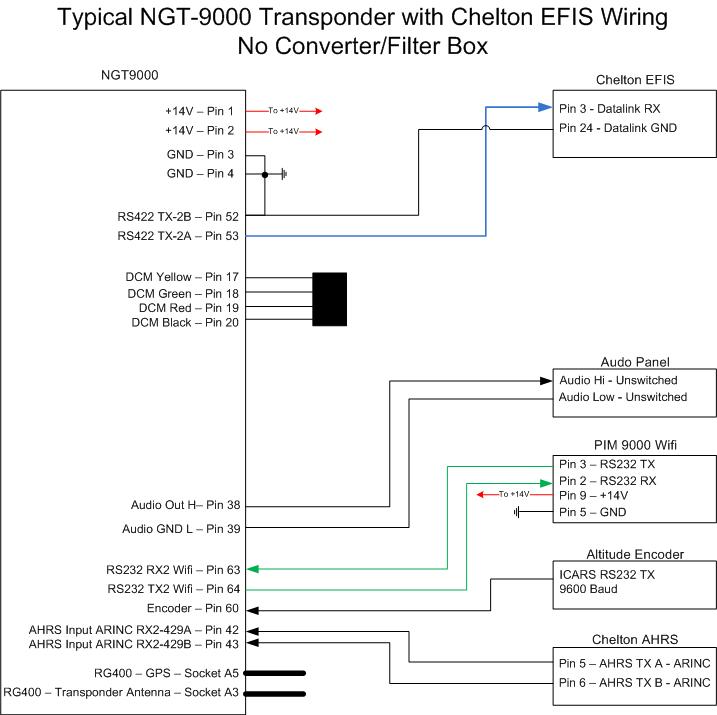
Of the above, items 1,2,3,5,7,9 and 10 were all wired to my old transponder already, in one form or the other. So for those, I had to change the gender of my pins/sockets for the new transponder, but then could just insert the pins. Item 4, the DCM module, comes pre-pinned so it takes all of 30 seconds to pop it into the proper holes. Item 6, the PIM-9000, is just the wifi module and you can mount that anywhere you want. I kept mine under the panel but on the sidewall, so a short run of wire and a power/ground pair and it was done. You could tap into transponder power if you wish, or power from any other breaker or fuese. They recommend an inline 1/4W fuse. It does not draw much power. Item 8 I did not install yet. The consequence of this is minimal. Without it, when you are not moving more than 7mph, you will show "Traffic Unavailable" as the unit has no way to determine your heading so that it could display targets on the traffic scope in the proper orientation. Personally, I'd love to see them just change the scope to "North Up" mode and display it that way, but I can understand why they did what they did, as they were going for no-bones-about-it reliability. So one of these days I'm going to add the 2 wires from my ARINC outputs on my AHRS and then it'll have heading 100% of the time. As soon as you start to taxi, this is all a non-issue.
There are numerous other alert lamps, or discrete inputs such as mute switches that you can install, if you wish, but the above will get you 99.9% of the functionality you want or need in most cases.
On my install, I didn't connect the RS422 direct to the Chelton, even though it works fine that way. Since we designed "the box" to fix the issues with the Echo UAT, we also had another version of hardware that had RS422 inputs and RS232 outputs. This made it a nice install because I can still feed GDL90 format data out from the Transponder, through "the box", and tag my friends ICAO codes as "friendly" and prevent traffic alerts on them for when we fly formation. I can also do data logging to memory card on all GDL90 data coming in and out of the box, should I ever want it for troubleshooting. The code is written modularly, so we could turn off the now-unused features like altitude and squawk input and output. "The Box" in RS422 version also does baud rate conversion, and IF a person needs to talk to an EFIS like mine, can be used to downshift 115,200 baud to 38,400 baud, and connect to the Chelton's RS232 port. You set the GTX345 to OPT LGCY ADSB and then you get weather and traffic data out in the proper format. So our project paid off for anyone who was stuck by buying a GTX345 rather than the nicer NGT-9000.
The hardware itself was packaged impeccably and looks to be very high quality. There WAS one thing that I wasn't as keen on, but here in June 2019 someone finally solved that issue for me by giving me the solution: RTFM!! (You know, Read the Manual) If you've ever installed a rack mount device from Garmin, you know they have those cam locks that you turn them a quarter turn to insert, then once in, you use a ball driver and as you turn it clockwise the cam flips in place to lock the unit, and you then press hard on the bezel and just snug up that screw. Well, the NGT-9000 has a similar screw to tighten it after you press the bezel in place, but it's not a cam system, but a hard-to-describe pop-down lock on the bottom of the transmitter. For insertion, it's much nicer. For Transponder removal, I thought it was a nightmare because you had to have access below the transponder to push up on the lock, while you pull it out. As it turns out, this isn't true at all. Indeed if you turn that faceplate hex screw counterclockwise long enough, the lug that holds the transponder in and tight actually retracts itself into the transponder, making it simple to take out! I wish I'd have figured this out earlier, but thanks to another Chelton/NGT-9000 user, I'm set straight. On one of my planes, I have an engine monitor right below the Transponder, so I had been removing that, to have access to release the lock. But now that I know the real key, it's simple! Otherwise on the install, all of the brackets, cable clamps, and everything else they include are all top notch built. I bought right-angle install kit versions, and probably should have gone with straight mount instead. The only difference is the way the RG400 cables attach to the unit, one coming straight down from the back of the transponder, while the other comes straight out the back. Both of my installs could have been perfect for the straight kit, but I did right-angle. On one of the planes, there is zero issue. On the other, it probably requires the RG400 to bend a little more than I'd like, as soon as it gets about .5" below the transponder. It works fine, and really isn't a problem but I may buy straight pigtails and the other bracket, just to make it perfect.
For antenna wires, I was able to use an old WSI antenna TNC cable that went to the cabin top on the RV-10, so just swapped in a GPS antenna and it was done. For the other plane, I ran a length of RG400 to the tail and used the GA35 antenna that the NavWorX used to use. Both work great. The transponder cables and antennas simply were re-attached and they required no changes.
The Config
Once the install is done, the transponder is almost ready for flight. What's left is the configuration. There are 2 methods that can be used, one being a USB direct-attached Windows based PC app, and the other being that same app, but WiFi connected. The preferred method is to use the hardwired cable. The App is specified in the manual to work with Windows 7/8/10, but in speaking with tech support, they say to use just windows 10 due to flakiness in the app operation occasionally with Win7/8. My Transponder shipped with version 3.1 of the software, and I had good luck reading and writing with one desktop PC, but could only read, with my Windows 7 laptop for some reason. Generic WinUSB drivers are installed, using a 3rd party too, and on my laptop I tried running everything in the wrong order, and never did get things just right again. You first connect the USB cable, then install the driver FOLLOWING the manual procedure, and then it work. I used a BlueRigger Active USB 30' extension cable to reach the PC from the plane...and to reach the other plane I linked 2 of them together. Here's an amazon link. Once you've got the driver installed and the cable in, it's as simple as telling the app to connect to the NGT-9000 via USB, and then you're in a whole software interface made for viewing and modifying the config. Very easy and mostly intuitive. Key things are to A) have your ICAO code in OCTAL format ready, to enter into the app, and B) any license codes you purchased. In 2018, you can apply and get a free ATAS code, so to enable that feature you will need it. You can easily do this after the install if you need to. I also had a code to enter for the terrain feature. Most of the settings are completely intuitive, but don't overlook that you have to not only enable FIS-B and TIS-B/ADS-R on the aircraft specific page, but also on the MISC page for RS422 output, if you use the RS232/422 output to your EFIS.
Backing up a little, there are 2 ways to enter ground maintenance mode. One is to connect the USB and then go into the tree menu under Service and Tell it to Reboot into either "Operational Software" (Normal Running Mode), or "Maintenance mode" either with or without WiFi, or "Ground Test" mode. If you use No Wifi then you'll just keep using the USB cable to configure it. If you choose with-wifi you can then use the MPC.EXE software with your PIM-9000 wifi module to do your config. Now, obviously if you're not near a PC, there needs to be another method that doesn't require your USB cable, to get into maintenance mode. There is...and it's easy. To enter Maintenance mode, you have to power on the unit, wait for the logo screen, and just as it starts to dim, press and hold the lower corner of the screen. It then asks if you want to reboot the unit, which then asks you which mode you want. For instance, if you're doing your transponder tests, and they want to use the IFR-6000 box to test your transponder's Mode-S info, you would boot to "Ground Test" mode, otherwise the transponder will detect you're on ground and not work for altitude reporting.
I had my transponders and encoders and altimeters tested right after this install, and we had to do that, to get reliable test info.
Software upgrade
As I mentioned, my units shipped with software rev 3.1. At OSH 2018, they said that in September 3.2 would be coming out, with some minor enhancements. This in fact turned out to happen right after I completed my install, so I requested access to the 3.2 software, got it for download, and then upgraded. That process is documented in the manual, but for a short description it's pretty simple. You download the software package and use the latest MPC tool to "Load Software". Just point it to the package and upload. It does its thing and you're upgraded. But, there was also a 2nd package for GPS update in this one. To install that update, I first had to power cycle the transponder, then upload the package, and then power cycle it one more time to be recognized. Pretty simple, and now I'm running the current 3.2 version.
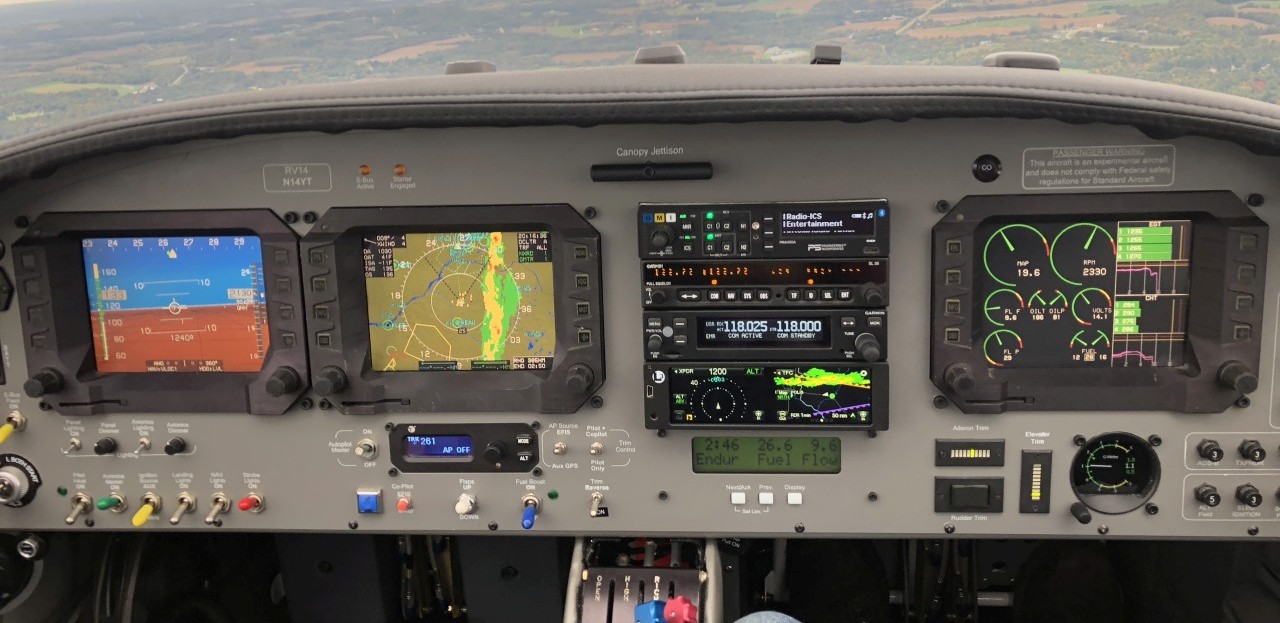
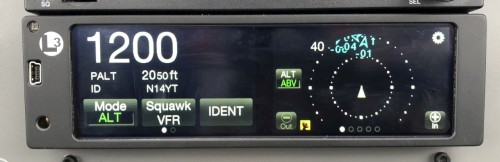
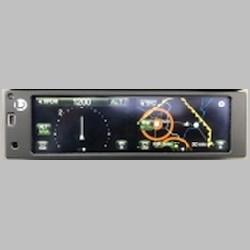
New Panel View with Transponder Installed
Transponder Photos
I have to apologize for the quality of these photos. They don't really do a great job of representing the screen quality or colors on the display. The display is excellent looking. I went out on a day that was purposefully a little overcast to get some photos, but it was a bit bumpy out as well.
(Most photos clickable to enlarge)
 |
 |
 |
 |
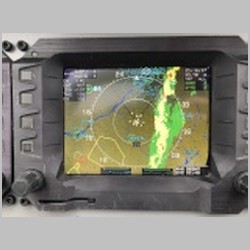
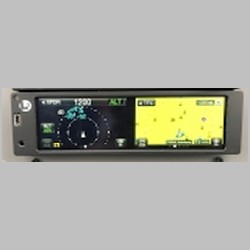
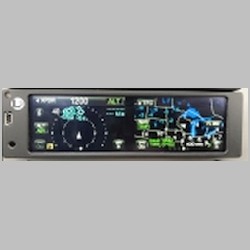
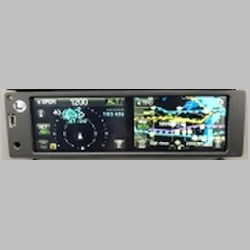
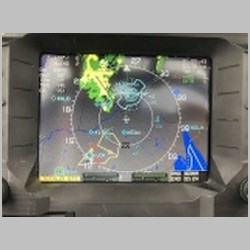
| Notice the
weather on the EFIS MFD above. It's just your
every day average weather display. One thing that
I find nice though, is that since airports, navaids, and
some airspace are drawn in light blue, depending on your
zoom level, it can be hardt o see the targets you're
looking at. Sadly, the flight I took this day
didn't bring me very close to any traffic, so I had to
zoom out to see it. But, if you use the Radar
Scope display for traffic on the NGT-9000, it provides
you a nice black background with only traffic on it, and
it does a great job showing the direction to your target
and the direction the target is moving. So by not
always having your only traffic display on your EFIS, it
gives you a dedicated display that clearly shows that
critical information. The terrain screen shown above is pretty plain, in my neck of the woods. We're flatlanders in my area. But it is very nice that it shows the AGL altitude, just as my EFIS does, to the terrain below. Many EFIS systems don't have that feature, and this one does. It also shows airports and towers, as you can see. In the 4th pic above, you can see how airmets and sigmets are displayed. You can turn them on and off individually, if it gets too cluttered, but it does provide yet another place you can see this information. For a Chelton user like myself, it's even nicer because that information is not displayed on the standard map page of the MFD, but on the datalink page. So this provides me with yet another way to simultaneously present more information than I was able to before. |
|||
 |
 |
 |
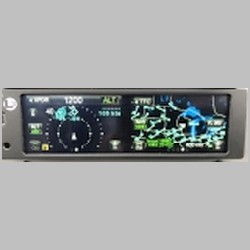 |
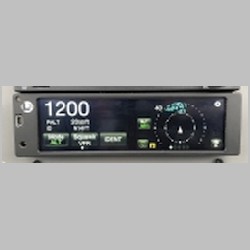
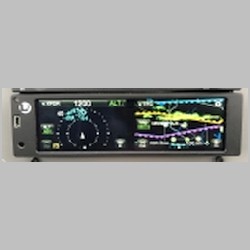
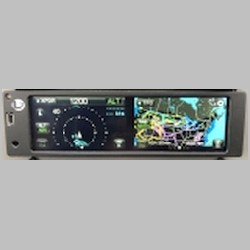
| Moving to the
second row of pics, you can see a more zoomed in version
of the map screen. Notice that it displays the age
of the radar "3 min) on it, and the zoom level, and
we're in TRK up mode. The 3rd pic shows the
display of temperatures aloft, and the issue time.
You can zoom in and out to see large or small areas, and
if you see the soft key for FL 090 on the right, you can
choose your standard flight levels of where you want to
view temperatures for. The 4th picture has a
similar display for winds aloft. Another thing I
can't see on my MFD Map, without changing to the
datalink page, so this is one more place to see it. |
|||
 |
 |
 |
 |
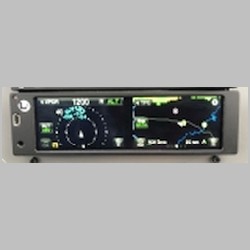
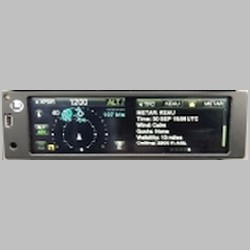
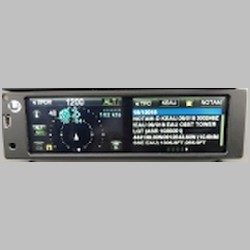
| In the pictures
above, you can see the display of METARs, TAFs, and
NOTAMs. I mentioned this before, but, think about
it...how many times when you're out buzzing around for
local flights have you looked up the NOTAMs for all your
neighboring airports. Did you ever land at one
without reading the NOTAMs? I know I have.
But now you have a way to get that information, without
even having to pull out your iPad. It's
downloading them all the time, and they are just there
to display. The 4th pic above shows a zoomed out display of the weather, but the display below shows something even more important to me. Notice I can zoom out and see a whole continental US view of the weather, with Airmets and Sigmets and Icing. Sure, the Airmets and Sigmets are available to me on my datalink page on the Chelton, but, the Chelton as far as I've found, does NOT do continental radar, only the regional area around you provided by FIS-B. Remember, I'm flying with an orphaned EFIS, so we have some limitations, but this gives me a way to see the weather 800nm ahead of me or more...something I couldn't do before this, without an ipad, or ipad and SiriusXM. I did have it when I had WSI, but lost it when the other WX feeding my displays was FIS-B. All in all, I'm very happy with the new system and what it brings to the panel! |
|||
 |
 |
||
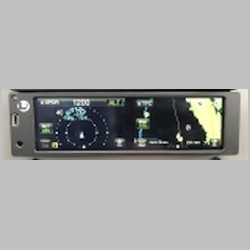
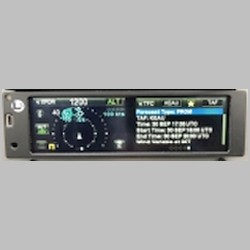
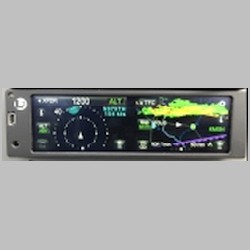
BONUS! TFR's!
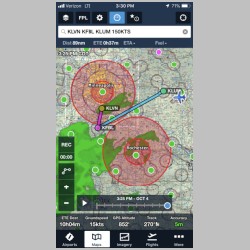
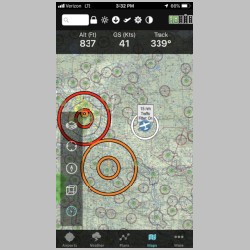
One of the absolute worst limitations of my EFIS is what I consider a "bug" but it may have been just a simple oversight when they created the software in the days that they were working on it. That's TFR display. The Chelton EFIS has a known issue with our software in that ANY TIME TFRs are issued and there are more than 100 of them, the EFIS will stop displaying ANY OF THEM. Yesterday I got to fly during a time when those horribly wasteful and useless Presidential TFRs were issued. See below and you will see the TFR display of Foreflight, WingX, and FlyQ. They all display them. But, you have to then plan to have your ipad/iphone out and connected the whole flight and be paying attention. What if there were a way you could display them all the time?
Check out the bottom row of pics. You can clearly see them being displayed on the NGT-9000's map page. And yet when you see my EFIS in the last pic, there is traffic, there is weather, but there are NO TFRs today!?!? That could get you into trouble in these days of never, ever, ever ending campaigning. Another big bonus by having the NGT-9000 transponder...and think about that if you just have a plain old transponder in your panel. The Garmin GTX345 is an "ok" ADS-B transponder, but since it doesn't have Wifi, and Doesn't have the right baud rate to integrate to my EFIS, it's a dud, but when you stack it up against these other features that the NGT-9000 supports that it does not, it really makes it clear which is the better buy.
 |
 |
 |
|
 |
 |
 |
 |
MyRV10.com Home | MyRV14.com Home