2010 Inspection and Upgrades
Added 3/28/2010 - 599.6 hoursUpdated 3/7/2011 - Mili and iPad Charger Updates
The winter sea season always brings some downtime for cold weather and upgrades. This year I decided to tackle some things unnecessarily. Sometimes that can be a mistake, and it kind of proved to be the case for me in some respects, but when all is said and done, I'm now happily done with my Annual Condition Inspection and have some nice upgrades for the plane.
Task #1: Seat Cushions
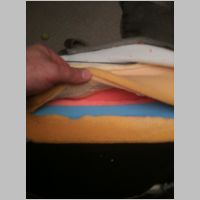
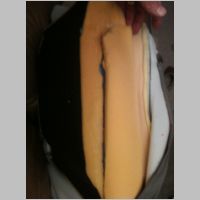
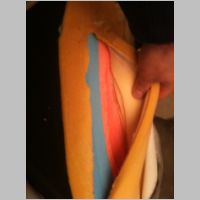
My seat cusion on the Pilots side had been caving in a bit on the right, next to the tunnel. I'm not sure if this is from the rear-seat heat affecting the foam, or just my fat rear end, but as I pulled back the seat cover, I could see that the yellow outer foam had separated from the seat, exposing the inner confor-foam, which had started to break down. I had heard that the inner foam should be more or less protected from the environment a little, so I checked into it with Oregon Aero and ended up sending my seat cushions in to be repaired and they replaced much of the outer foam on the cushion. It's a relief to see a vendor do a great job on a repair like that. The cushions aren't cheap, so I was kind of dreading the process, but it went really smoothly.
 |
 |
 |
Task #2: Front Seat Iphone Power
(plus: iPhone Battery Pack Review)
The next thing on my list was to get myself set up for charging iPhones and iPod Touches. In 2009, we got the entire family set up with either an iPhone (me) or iPod Touches (the rest). These are the ultimate traveling entertainment for the space constrained. I also hate clutter. I bought tons of chargers for the cars, house, and everywhere, but I don't like to carry all that stuff with me everywhere I go. So it was time to set up something more permanent.
For my LE1600 tablet, I had a Lind power adapter semi-permanently installed under the throttle quadrant. If you do it carefully, you can fashion a nice bracket under there to hold the high quality Lind metal case power supply. That's what I did. It doesn't even come close to interfering with the levers or cables, and it uses some of that wasted space. I plug it in to a lighter socket that is mounted on the subpanel, which is also handy in that it can be easily unplugged by hand by reaching under the panel, if there were some sort of emergency. Otherwise, it's always on when the engine is on, and there is a panel mounted power jack under the quadrant by my heater control knobs.
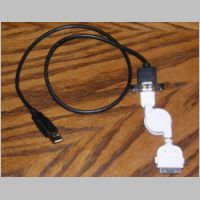
To further use some of the wasted space, I decided to mount my USB charger jacks on the quadrant sides. Once again, these fit very nicely with no chance of interference with the cables or levers. I could have panel mounted them but that would mean A) cutting aluminum, and B) finding space on the panel. Not one to make permanent changes flippantly on the panel that I so dearly love, I decided to just put it on the quadrant sides. You can see the USB cable extension below. I made a metal plate to screw to the trim panel on the quadrant, and then hooked up the USB panel mount jack to it, and ran that up to another USB charger on a sub-panel mounted Lighter socket. (more on that later) You can see I also use retractable iphone charger cables (eBay) although the one pictured is white. I try to only use Black in the plane, to avoid reflections. I find it important to think of the small details such as color, if you want to get good pictures out the windows without reflections.
Regarding the USB panel mount cables, you can find them online, but SteinAir has them, so many of you can just get them there very easily.
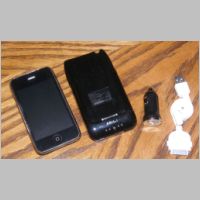
MiLi Review
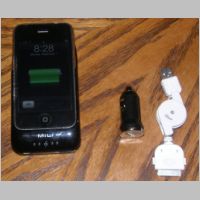
Another thing I've found very handy this year is a MiLi Power pack for my iPhone. I got it before OSH so that at OSH I wouldn't be stuck without a phone that works. If you have an iPhone and use it a lot, especially near 3G coverage, you know it burns batteries pretty quick. Well, the MiLi is a perfect solution for me for an emergency or long day. It's a battery pack sled that you slide the phone into and it will charge the phone for you, from it's own battery. So I can run my phone down, slide it into the battery, and it'll charge right back up again. Or, I can use the phone with the pack attached, and when the pack starts dying, I can charge it up and use just the phone battery. I do it the first way...just use the battery pack to recharge the phone. The pack uses a USB to mini-USB cable, which charges with any USB charger or my in-plane jacks. It also has a USB port on it that you can chain another device to charge. So if you need to charge a headset, or another phone, you can. Very handy indeed.
Pictured is also a Brando anti-glare screen protector that saved my phone during OSH. I had my phone face-down on the wing-walk of the plane and stepped on it. Brando protectors are very nice, great anti-glare, and easy to install/remove...and will last forever if you aren't harsh to them. They make the phone actually smoother to operate, too...less sticky than the glass.
One other thing pictured is a mini-USB charger that I got from eBay. They're nice, but I've moved on from them now. I use the cheap ones in the car, but see the next section for more...
 |
 |
 |
 |
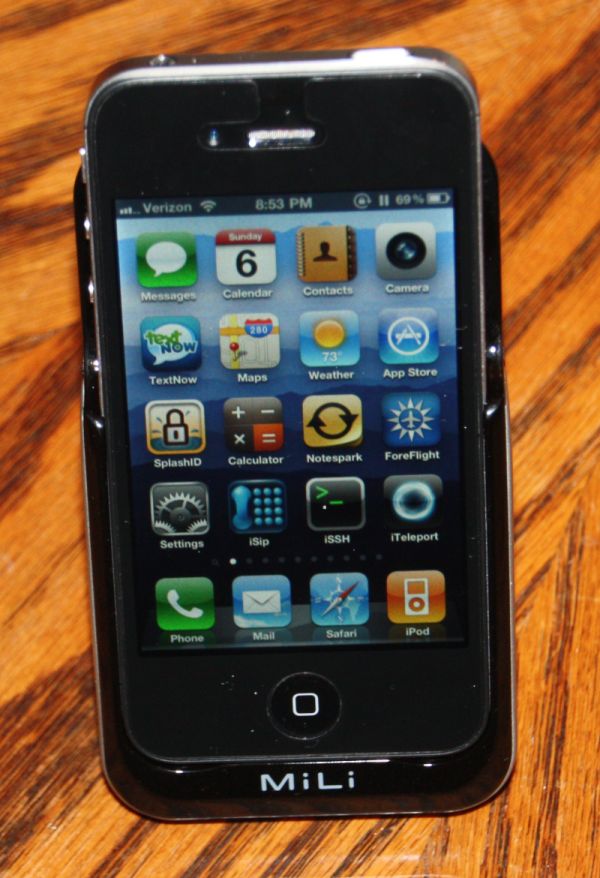
Update 3/7/2011
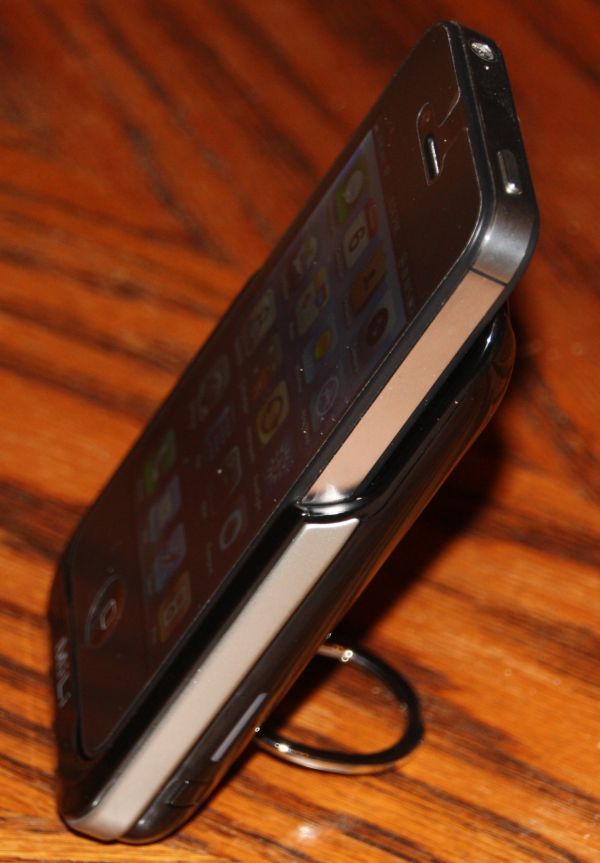
Having just switched to the Verizon iPhone 4, it was time to get a new Mili for this phone. I found that there are new models available for the iphone 4, from thinner and more compact models that double your battery capacity, to the HI-C11, which I think triples it. The cool side benefit is that it comes with a kickstand built in, that you can use in either orientation, on a desktop. When you buy, shop around. I found them on Amazon.com for under $70, whereas many places were $90. Here are some photos...
USB Chargers
When it comes to chargers, I am a little picky. I don't want cheap, Chinese, eBay chargers in the plane. First, I don't want to worry as much about quality of components and electrical noise, although that hasn't been an issue. I'm more worried about safety and ruggedness. So, I stopped using the cheap ones and went to something better.
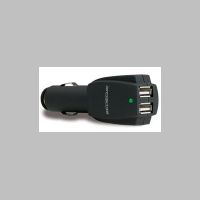
Below you'll see first a picture of the Scosche dual charger, and the USB12VM mini charger. These are higher-output than the cheap ones. The dual can charge 2A and the mini can charge 1A...more than many other chargers. They're built well, and that mini is really something...it sticks into a lighter socket and has almost nothing sticking out, so it's small, light, and space saving. I used the dual charger for the 2 jacks on the sides of the throttle quadrant. I used the mini's for the rear seat charging jacks. (More coming below...)
Before buying these 2, read on below...
 |
 |
Update 3/7/2011
No Longer can I recommend the above chargers as your primary charger, if you own an iPad...there's something newer and better out there! I do love the above chargers, and use them in my cars still. But an iPad requires higher charging current than an iPhone to charge at the normal rate. Apple sends the iPad with an AC charger that is a larger capacity charger, but you'll want one in your plane too. I've now replaced my front seat chargers with 2 of these...the Scosche Dual USB charger for iPad. It has a 2.1A output on one USB jack, and a 1A output on the other, allowing you to charge an iPhone/iPod and an iPad at the same time. Under my panel are the same 2 ports on my throttle quadrant where I can charge the iPad or the iPhone, and I have one 1A port allocated to my Holux Bluetooth GPS, and the other one free. So if you're an iPad owner, these should keep your iPad charged up quicker for use after your flight. They're not very pricey, either...I think I spent around $20.

Task #3: Rear Seat Charging Jacks
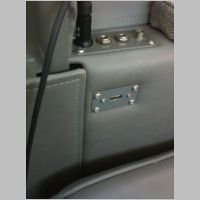
In the back seats, since we now had 4 iDevices in the family (5 if you include the iPod Nano that I keep in the plane), I wanted to have USB jacks too. The kids sometimes also bring Nintendo DS's along and the jacks can charge those, too. So what I did was to install 12V lighter sockets under the side armwrests. They're hidden away from view. Inserted into them is a Scosche mini charger, attached to a 12" USB panel-mount cable, with the face plate on it facing the passenger. Now the kids can charge right on each armwrest. It's more convenient to use while you're actually using your iPod.
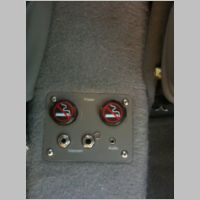
I also got the Napa Part Number 782-7683 no-smoking lighter socket plugs for my center-tunnel Accessory outlets. Since I now won't nearly need them as often, and the stupid caps kept popping off on my old sockets, I wanted a nice solid-seating plug that was low-profile. I snagged my jeans on the old caps and actually ripped them, so I wanted something that wouldn't stick up far, so during maintenance it's not a pain. These look awesome and work perfectly. I won't hardly need those outlets anymore.
The one thing that I'm still considering is video. I am now glad that I didn't do what my winter plan originally started as. I was going to permanent install a video distribution amp, and sound inputs, so that I could plug an ipod touch into the system and have it pipe the video to two permanent headrest mounted screens. Well, the headrest screens are a bit of a pain to fit in the metal frame of the seat, plus it's one more thing to break, or, worse...become obsoleted by newer or better technology....not something I appreciate in permanent mount equipment. Imagine installing an overhead DVD player....man, I don't even USE DVD's anymore!!! I suck them into our TVIX box and play them from there. Discs? Why carry discs? Especially when the kids have iPod Touches that can store 32-64Gb of videos, which is a TON! So now it's no more permanent installs for me. I've settled on for the short term, just using the iPods, plugged into the sounds system. I do plan to investigate and perhaps buy the iPad...but I'm kind of ticked at Apple right now...first, they're way too restrictive on their apps and content, and second, I don't want 3G at all, but I do want GPS. Apple in their infinite wisdom (not) only gives you GPS with the 3G version. That's stupid. But, once all the versions are released, I'll at least consider it. The one huge benefit that it gives is a large screen that can be positioned out of the glare of the sun...so whichever kid sits on the shady side can hold the screen for the 2 of them. And, being non-permanent, I can sell it or whatever, if we decide we don't like it.
 |
 |
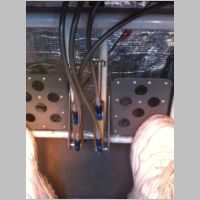
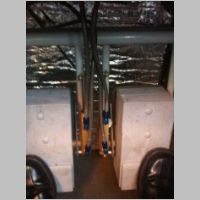
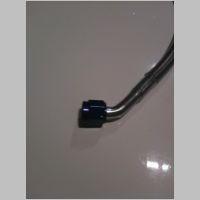
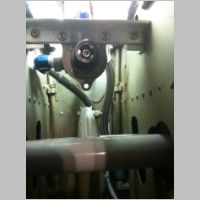
Task #4: Braided Brake Lines and Hi-Temp Brake Fluid
This one went real easy! First, the standard brake fluid isn't really ideal for ANY plane, but especially ours. I didn't know better at the time, however. The thing is, standard brake fluid has too low a flash point and can cause fires. Well, with non-steerable nosewheels, some of us tend to ride the brakes a little, and just like the Cirrus, we have wheel fairings. With that enclosure over the wheel, and us using the brakes a little more, it can get hot, and there have been owners now who've actually had fires or near fires on their wheels. So, the RIGHT thing to do is to use the RIGHT fluid. I bought some Royco 782 Synthetic MIL-PRF-83282D fluid from SkyGeek.com, for only $8.99/qt. and used that to replace my original fluid. I started by draining all the fluid out of my lines, then refilling it completely and re-bleeding from the bottom up, the new lines. It went really well, didn't take long, and now gives me warm fuzzies.
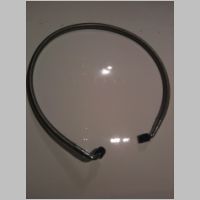
The other half of the job is replacing the brake lines themselves. While I had the lines off, I decided to buy and install Bonaco Inc.'s RV-10 Brake Hose Kit. They make a custom cut complete brake line replacement kit for the RV-10. I had already installed the brake lines on the outside of the fuselage down to the wheel....although I did a big circle loop around the axle that was unnecessary for flex lines...so I knew the line quality was exactly what I wanted. I left the hard lines in the tunnel and under the seats though. But, I now replaced all of the lines and fittings around the rudder pedals up to the firewall reservoir. The lines were maybe 1"-2" longer than necessary in some cases, but they worked well. Bonaco took the time to think it through and replaced all the fittings on the cylinders with the right ones too. I think they're all -3 size fittings, but I haven't verified that. The only real downside I can see is that you can't see through the lines to know when the fluid is low or the bubbles are out. I saw bubbles in my old lines once and found that my brake pads were worn almost out, so they had used up the fluid in the reservoir. But, by doing a complete brake bleeding, getting rid of all bubbles to the top of the reservoir, and filling it completely, I have no worries now. They may weigh a pound or something more, but they won't ever burst, and the other cool thing is, the hoses on the pilots side are now thinner than those huge thick braided ones you get with the kit. Plus these are teflon so they'll last forever.
 |
 |
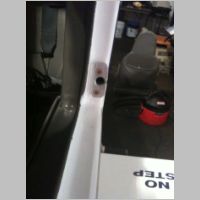
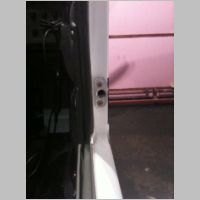
Task #5: Door Latch Warning - Door Alarm - and Door Pin Guides
This one took a little more planning, but worked out excellent! First, the door latch warning kit came out basically a week or so before my first flight. I was NOT about to delay a first flight over those stupid lights. I knew about the hazards of the doors, and I've always been diligent. I intended to install them when convenient but it takes a lot of time for a busy person to find a convenient time. Well, this spring was it. I also always said that I didn't want to install just a stupid simple light warning kit, nor did I care about door locks. I don't want my frigging doors ripped off because someone wants in. I want those idiots to get in easily but then really want to leave. So I found the perfect solution....
I did a custom circuit for the door alarm system, using already existing LED's in the panel. I also integrated it with a door alarm system. I picked the Commando Alarms 520-S model, for it's features and size, after talking to their tech support. I didn't install their huge horn though, but instead picked a super loud piezo siren at Radio Shack. If you look at their alarm, you'll see that it also has Keyless entry, so I can use the included 2 Key FOB's to arm the alarm system. With the circuit plan I put together, I can have the alarm 100% disabled and NO RF INTERFERENCE while flying, and in that configuration it activates the door latch warning system....or, I can turn on the alarm system which changes the operation of the door latch warning system to accomodate the alarm. It works perfectly, and allows me to have a loud alarm and door latch warning, all in one system. The alarm means that if someone does open the door, they'll be greeted with quite the shreek....all operated off my AUX battery system, so I don't have to worry about being stranged with my cranking battery dead. It did take a little thinking to come up with a circuit that could do both, using the same switches, and completely remove power from the alarm in flight, yet allow it to power the alarm IF WANTED, when on the ground. But, the circuit itself is dead simple.
Door Latch System
So while on the on the subject of door latch systems, I've decided that Sean's Door Latch system is THE SYSTEM to get. Sean has a website, PlaneAround.com where he now sells the entire retrofit and initial install kits. With an impending trip, I don't plan to rush the install, so they'll be done later, but I do plan to install them.
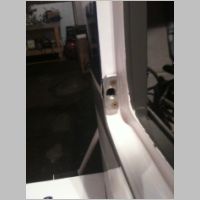
I did, however, take the time to remove my old Nylon door guides and replace them with aluminum ones. I was going to just buy an aftermarket pair, as they are available from multiple sources now, but, I had some minor concerns. Many people who've bought them have mentioned trimming them down to fit the door as built. I looked at my 1/4" nylon ones and saw that my door seal just barely clears both blocks, so I only wanted my new ones to be 1/4" thick. I decided just to buy some 1" wide 1/4" aluminum stock and cut my own...that way I could custom make each one to use the exact same screw holes, wether perfect or imperfect. I got 12' of aluminum for about $12, and cut a few pieces out. In the end I was totally surprised. I was worried tha the aluminum would grind, and at first it did. But, I then decided to clean and lube the pins and sockets with a very thin coat of lithium grease, and now my doors latch easier than they ever have before. I also filed a nick out of the taper of the pin on one door. Over the past couple years I've had a couple of boneheads try to close my doors and latch them before I could get to them, and they've hurt my paint. Now this summer I can fix it and hopefully it'll be the last time it needs fixing, because once I install Sean's latches it just won't happen again.
 |
 |
 |
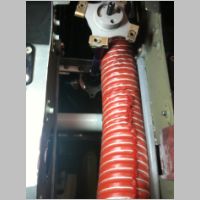
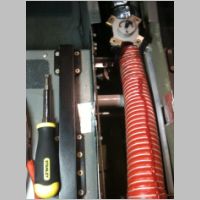
Task #6: Protect Rear SCAT Tube
This one was SUPER minor. Recently a builder asked how I keep my rudder cables from rubbing the SCAT tube. I told them that I didn't have an issue with it rubbing. Well, I checked it thoroughly when I had the tunnel open and I don't know that it actually rubbed but on one spot the string on the SCAT tubing had a tiny amount of fuzzing to it. I decided to pre-empt any issues and I covered the cable on that side with a nylon hose length slit down the side and glued to the tunnel. Now it can't rub even if it wants to. If I'd have had some more firewall insulation, this is the section of hose that I wanted to wrap with insulation...but I didn't have any so I just moved on for another year.
 |
 |
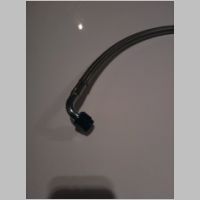
Task #7: Replace Fuel Hoses with Teflon Hoses
This job turned into one of those head bangers for me. While ordering the Bonaco Brake Lines (above), I decided to also use the downtime to replace my original custom-self-built fuel hoses. My original hoses were excellent at the time. They were perfectly fit, secure, and quality built, if I must say so myself. I also shopped for hose that was capable of a small bend radius. Well, my hoses were awesome. The ONLY problem with them was they maybe had a 5-10 (probably realistically a 10-15) year life to them. I say this because many planes are flying with much lesser quality hose that is much older...so mine could have gone for years and years, and mine showed NO sign of age. But, mine weren't perfect....they weren't Teflon. So I decided that now that I knew the length and fitting configuration, I could just easily order replacements that were custom built, made of Teflon.
I called Bonaco and gave them the dimensions and they made me a couple of custom hoses. With the fuel valve choice I had, I used one hose with 45 degree ends on both ends, and one with a 90 and 45. I wanted exact replacements. Well, that went good enough. The bonaco lines are pretty flexible, although not as flexible as my old ones. They are also sweet in that they're over protected by a clear layer. They're THINNER in overall size than my original, too. But, this means they're best installed as original hoses, because my snap bushings were sized for the bigger hose. By doubling up on my snap bushings I made that work well though. But then I ran into one snag. One hose just didn't want to seal perfectly, on the valve end. It would very slowly seep. What really makes it a pain is that in order to test it, I wanted to fill all 30 gallons on that tank, but when it leaked, to de-couple the hose I had to drain the tank the whole way. So I went through many routines of draining and filling the tank, only to keep banging my head. I decided it must be one half of the fittings, so I replaced the fitting on the valve, since it was just an AN822-6D. Nope, that didn't fix it either. So the hose went back to Bonaco and they kindly made me a new one and sent it out. I am glad to say that it now doesn't seem to be leaking, although I've only flown it for a bumpy .4 hours. But, the tank is full and the fitting is dry. It should be good to go, at this point. It's one of those jobs that wouldn't have been a headache if I'd have just waited maybe 5 more years and done it then...but now I have teflon lines and they'll never need replacement....so I'll probably never even take them off again. One thing about the teflon lines...they take a set. So, removing them later is a little tougher as they just don't want to flex back for easy removal.
Oh, and another note about Teflon lines. When I talked to Brett at Bonaco, I asked him if these were CONDUCTIVE Teflon lines. I was surprised to hear that I'm the first person who's ever asked him that. Yes, back when I built the plane I had wanted to go teflon, but since I coudln't custom build my own teflon hoses on-site, I needed to do hoses that were D-I-Y first, so I knew what length and configuration I needed. I didn't want to waste the time to get the proper measurements to send a hose builder. But, in doing the research into hoses I became aware that you really want to have CONDUCTIVE teflon hoses. The plastic (Teflon) hose can easily build up static which can cause a discharge spark. But Conductive hoses are made for fuel lines. So if you do have someone build you hoses, make sure they're conductive....or better yet, call Bonaco as they already know what you would need. I believe that depending on your fuel valve they even have standard lengths for you to buy...but verify the length before you do.
 |
 |
 |
 |
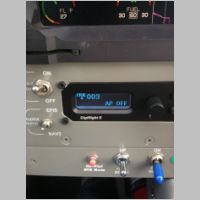
Task #8: Autopilot Repair
Here's another one that turned into a little fiasco. Back in Oct/Nov. I decided to take the opportunity to send TruTrak my autopilot because my original green screen started missing some LCD lines on it. I guess that's a common problem. Well, I shipped it out, got it back, and it had a new White screen. Ok, no biggie. But then after a successful first test flight, on later flights, it didn't hold altitude or heading anymore. It was dead. Shipped it back again, and they fixed that issue. Got it back in the plane and went for a night flight and realized that the dimmer didn't work. Darn! Shipped it back AGAIN and requested a complete functional test before it was returned. Well, I got it back and I think the dimmer worked. Actually, I'm not sure it did even, because it didn't take long and I realized that in TRK mode it no longer worked properly. Sometimes it would hold heading 10 degrees Right. Sometimes it would be less. But, no longer would it work stand-alone to properly and precisely track a heading....and yes, I did verify I had GPS input. By now it was getting irritating, and also during all of this I noticed my software revisions were changing many times. So I wasn't sure if it was all software, or hardware, or what. Finally, I got it all squared away though and now my AP seems to be working ok. (Although I haven't done an X/C trip to test it fully) One thing with the new software is that it now gives you textual indication of GPS signal, including NO GPS, NO FIX, GPS OK, so that you know the GPS status. That's pretty handy. The dimmer works well, too. So this week, before the trip, I need to get out and ensure it flies with the Chelton's perfectly too, so that it's all set to go.
 |
 |
 |
 |
Task #9: Garmin Radio Service Bulletins
Being the owner of both a GNS-480 and an SL-30, I ended up with another task this winter...both of those radios had a S.B. come out in 2009, involving Spurious Emissions, and that requires a trip back to the factory for rework. Garmin was on the ball though, after the first of the year, so I shipped them out via overnight or 2-day air, and had them back in about a week overall. It was amazingly fast service. The GNS-480 came back with a new internal clock battery, too, which was a needed fix. If you have one of those 2 radios, check out the Service Bulletin and send them in. It is no charge. I paid for the shipping myself, so I spent a bit...but I've heard cases of people going through dealers where the entire thing was free.
Service Bulletin Sample Link
Task #10: Complete the Annual Condition Inspection
This year was really one joyous Annual Condition Inspection time. I went through the above activities which led me into many areas of the airframe on their own. I also got into things like the prop lubrication, and wheel bearings, as sideline tasks as part of the ACI. No squaks this year at all to report. It all was very good. I replaced my upper Lightspeed plugs after about 217 hours in service. They were pretty worn. I think I did get a plug clean and re-gap in there since install, but after seeing how they looked I'd say that 200 hours is about right for my replacement comfort. 100 is a bit short and the plugs are coming up in price. Gap them at 100 and replace them by 200 and you're good to go. My fine-wire plugs on the bottom had NO increase in cap from the .018 that they're set to, and all plugs were identical in color and condition. It was awesome to see that after balancing my injectors last fall, the cylinders now act identically. In fact, my compressions were 78,78,79,78,78,78....and my gauge seemed to read just a touch lower than the input gage when shut, so they're all up there right near the 78-79's and lookign REAL nice. Also, my oil change had basically nothing visible in it this time...which is pretty much a first. You always see something in there, from normal wear, but this filter ran 45 hours and showed basically nothing. So the engine seems to be in tip-top shape.
My next planned task is the upgrade of the ELT to the new Ack E-04, once it is finally shipped to me....it's ordered already.