NavWorx Mounting
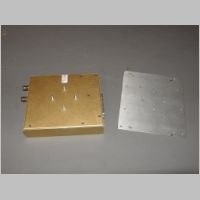
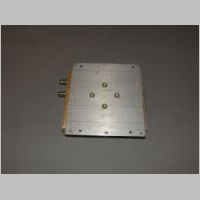
Added 5/14/2009With the NavWorx now a permanent part of my wired-in avionics, I decided I better come up with a good mounting system rather than the temporary mounting I had previously been using. I wanted it to be secure, of course, and keeping it up and out of the way would be a big help too, so the sidewall in the tailcone seemed like a great place to mount it. Van's does offer a sidewall plate that rivets in for mounting the strobe pack, and it wasn't available when I mounted mine or I may have used it. The problem with that is that I needed to accomodate the mounting nuts of the NavWorx box and allow for future removal and replacement. The NavWorx, as you can see below, uses 4 inset screws that secure by putting nuts and washers over the mounting bracket. The box does come with a nice "L" bracket that is very strong and suitable for floor mounting or mounting to a strong surface. Unfortunately there isn't a lot of strong area for me to mount to in the tailcone without drilling through the outside skin and having to paint rivets. There were a couple options, but none that would be as nice as a sidewall mounting location. You could use Van's mount, but you'd have to add a metal plate anyway to the back of the box, to act as a set of flanges for mounting to the plate on the sidewall. With that in mind, I decided it would be just as easy to mount a couple of aluminum angles to the J stringers, just like the Van's plate does, and then cut some .063" or .090" AL plate to attach to it.
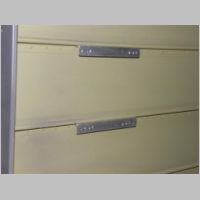
The idea ended up working great for me, but I did get thrown a small curve while I was putting it all together. The J-Stringer edges that the aluminum angle mount to are not perfectly perpendicular to the sidewall. So you end up with the face-out part of the aluminum angle being a little tipped up from vertical, so the plate wouldn't lay flat on both of them at the same time. I was a bit worried at first and considered buying Van's bracket or bending some aluminum to make my own fit just right, but then I got a little creative fabrication in my head. Since I was using the thinner aluminum angle, I just put it in my vice with the center facing up, and gave it a couple of turns. That decreased the angle from 90 degrees to something less...maybe 75 or 80-ish. That was enough that the face-out side of the angle was flat, and the plate laid right over it with no problem. The aluminum angle is pop-riveted in with LP4-3 rivets, and the metal plate is a scrap from when I cut my panel for my radio stack. So cheap, easy, and works great.
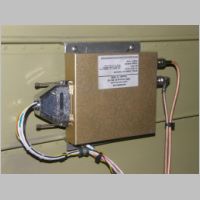
I've heard of many people mounting their box in various locations, so I don't think there will ever be a real "standard" location that would work for everyone, but this would be a simple one if you're considering it. It gives you access to a tail shark-fin antenna for the receive (and maybe later the transmit) portion of the ADS-B UAT, and it was a reasonable distance to my GPS antenna for the unit, that is mounted aft.
|
|
|
|