New Safety-Trim Trim Servo Controller
Added 10/27/07 - 286 hoursUpdated 2/28/09
Why worry about the trim system?
Ever since I was just a few hours into my flyoff of my RV-10, almost two years ago now, I've had one nagging issue with the RV-10. For those of you who've joined me for a demo flight, you probably even got this pointed out to you. The elevator in the RV-10 has a LOT of authority, and so does the elevator trim system. During my flyoff period, I was going through a manual in a binder, and it laid on the top of the stick while I was reading it. I was hands-off on the airplane, and suddenly the airplane was climbing like a rocket! From that moment on, I had a lot of respect for what could happen with an inadvertent trim activation. I decided that SOME DAY, I would have to find a good fix for that problem. One that worked well and was well thought out and addressed the trim speed issue during cruise.
Ever since I started giving demo flights, I give a couple of standard statements: "Go ahead and fly the plane as you would your own. Don't be afraid to do steep turns or whatever you are comfortable with. But, be aware that while the roll forces get very stiff at higher speeds, the pitch forces are very light, so be easy on the elevator. And, the trim works very quickly...here, let me show you....now that we're flying level, hold the trim switch back for a count of 1 second..." That's usually the point where their eyes bug out when they see how much trim you can get at full-speed in 1 second. I've made it a point to show people going all the way back, so obviously I believe that it's an issue. I just didn't have the luck of finding the right off-the-shelf system to fix it until now.
One thing that I strongly suggest for most people, and ALL people with kids, is the addition of a Co-Pilot trim disconnect switch. On my panel, I have a lever-locking switch that basically just cuts off the ground lead to the trim switches on the co-pilots stick. (Note: I used a NKK Lever-locking ON-OFF-(ON) switch that is pretty cool, mouser.com has them p/n 633-M2019LL1G01) As many of you know, the trim relays are activated by switching a wire to ground, and so by switching off the ground on the co-pilot stick that feeds all of those circuits, you can easily and effectively disable their trim switches. I had that feature installed since day 1, and it is VERY nice when hauling the kids around the sky...not to mention those inquisitive buddies of yours who like to push buttons about 3 seconds before they ask what the button does.
Fast forward a year and a half to OSH 2007. On my way to OSH to grab my campsite, I had my first instance of a sticky trim relay. The old style Ray Allen relays are seemingly prone to sticking, and they now use a different relay that is larger to prevent the problem. I had the trim stick about 4 or 5 times in the days surrounding OSH, and on at least one landing I was forced to land the plane holding a lot of stick force. Read my report here about changing out those relays. After changing them out, all was well again, although discussions on the Matronics RV-10 list got me thinking. There are those who wonder, why do we use old mechanical relays for trim activation when these days there are great and reliable ways to do it via solid-state? There is a certain comfort level of using relays, because they don't use "magic" like transistors, but if you've ever watched the track record for mechanical limit switches and relays you'd probably find that there's a reason "solid-state" became a popular phrase many years ago.
Address Trim Cautiously!
One of the biggest reasons that it took me 285+ flying hours to address the trim speed issue is the fact that playing around with your trim is serious business. I don't know how to get that point across better than to take you out, let you fly, and activate the trim for 1 second....just ONE second, in cruise, and then disable your stick trim. You would be AMAZED at how hard to manage the aircraft will become. This means that if you install an aftermarket (or for that matter, the Van's standard) trim system, you want it to be reliable and safe. I've had the opportunity to look at a few different trim systems, and you have to pay close attention to the details. One system used Pulse-width-modulation to pulse the DC power to the motor, so you could maintain the source at 12V, which keeps the motor from lagging. This in itself was cause for a small bit of concern, because AC or pulsing DC circuits can be a cause of noise in your electrical system. That particular system used a microprocessor to keep the trim at 1/2 speed for 1/2 second, then begin ramping it up over the 2nd one-half second, and at that point it would run at full speed. 3 problems there...one is that microprocessors run code, and can become flaky or erratic after an electrical surge or spike. Not good. I'm not ready to trust a microprocessor circuit driving my control surfaces like that. Sure, and Autopliot does it, but autopilots are designed to be able to be easily overridden by the pilot. Trim systems are NOT. The second problem with that system is that if you accidently laid a book on the trim switch like I did, you'll get a gradual application of trim, but very shortly thereafter it'll be full speed, and you'll get out of whack really quick. The 3rd problem is that when you're in the pattern, you're not going to get any full-speed trim operation until you've waited 1 full second of holding the switch. The RV-10's standard trim motor is fast enough at low speed to be great, but if you induce a lag into it, you might not like how quickly the trim reacts during takeoff and landing.
Enter the Safety-Trim system...
The Safety Trim System
Note: I have no interest in any company mentioned on this page and I wrote the write-up and informed the RV-10 community before I even informed Bob that I had completed and tested the installation. Bob's an RV-10 builder who designed this trim system based on feedback he received previously on the RV10-List and from comments that I provided regarding RV-10 flight qualities as he was near the end of product refinement before he released it for sale.
Coincidentally, just as I was planning to address the trim speed during cruise issue within the next month or two, I ran into Bob Newman, of TCWTech.com, maker of a new trim system called the "Safety-Trim" system. I spoke with him on the phone and at the time he had just been getting ready to release the system for sale. It was a case of perfect timing. As we talked, I was initially skeptical, as I usually am with any small-product offering from a small business, but I quickly became interested when we discussed trim system theory. Bob used a voltage controlled system for reduction in trim speed, due to the noise possibilities of PWM mentioned above. He also is a believer in being able to recover from a stuck or broken trim switch (something I'm a little less concerned with) by reversing the trim system. He appreciates having a panel mounted switch that can be used for both disabling the trim in an emergency, or reversing it, should the need arise. The thing that really stands out though is that he wanted a system that would PREVENT a crash from being caused by a runaway trim in the first place, and he had a way to do that. Let me show you how...
Bob designed a method into his trim controller that would limit servo operation to 3 seconds per switch activation. Should you release the switch for just a few milliseconds, you get another 3 seconds of trim. Using this method, he can prevent the trim system from running all the way to a limit...or even from running far enough to make the plane uncontrollable. But, wouldn't this use a microprocessor that I then couldn't trust? Nope, his trim system is driven by an analog circuit that is designed to just plain stop working if a component blows out. No runaway trim operation here.
Additionally, his trim system provides 2-axis control, so you can use one circuit for elevator, and the other for either aileron or rudder. (Note: If you are installing rudder trim, and I do suggest that, then I'd use Elevator + Rudder with this controller) It is short-circuit proof, and protected from reverse polarity, and is compatible with the common Ray Allen trim servos and switches.
How the panel mounted switch works is really kind of nice too. He uses an ON-OFF-(ON) switch for the trim system. If you turn it ON, the trim system will work. Most people will just leave the switch in that position all the time. Should you ever experience a trim system problem, you have the option to turn the switch to the OFF position in the middle. The (ON) position is a momentary position that runs the reversing function. You must HOLD the switch with one hand and run your trim with the other hand to utilize this function...a good thing, too, because inadvertently reversing your trim could be a big problem. One side note here: I *really* don't think a person needs more than the switch that Bob provides with the system...however...I already utilitize a lever-locking switch for my co-pilot trim disconnect, and I decided that just to ensure that nobody would ever bump my trim switch to the OFF position, I added a NKk M2019LL1G01 Mini Lever-locking ON-OFF-(ON) switch to my panel in place of the one he sent. (Update: I have had 2 times where even with a lever-locking switch I have managed to bump the system off while playing around with things pre-flight, so I now am even more solidy of the opinion that lever-locking to ON is probably the best way to go) It gives me just a tad more peace-of-mind, and even more important, it matches my other switch. ;)
So, with the ability to have dual-speed trim, slow during cruise and fast in the pattern, and the ability to prevent runaway trim issues, I decided that I had finally stumbled on a product that I was willing to mount into my plane. I had Bob send me one right away so I could get it installed before my next trip.
Wiring the Safety-Trim
Those of you who know me know that I agonize over situations like this. My existing trim system had now been working well since I replaced the relay after OSH, and everything was going good. You hate to buy a new product that makes certain claims and rip out a working system for one that is unknown. I started by unmounting my 2 relays, and letting them hang, and I sat and stared for a while, wondering if I really wanted to do this. Finally, I just chopped out the old relays. I wired the aileron circuit and power and ground temporarily and gave it a quick test. Sure enough, it did just what he said it would. 3 seconds of operation, dual speeds, reversing, the whole thing. Well, time to start splicing and re-wiring. I was initially going to make it all temporary and let it hang and go for a flight, but every step of the way as I tested things, it always worked fine, so I just kept working on making it permanent. (Note, after the original writing of this article I added Rudder Trim and decided to re-wire so that the rudder trim used the controller's 2nd axis, instead of aileron trim. In the RV-10, Aileron trim could always be left full speed and even if the trim ran away there is unlikely to be any major handling problem. I did find that the rudder trim can benefit from the 2nd axis being set to slow speed, however, so I re-wired it as needed)
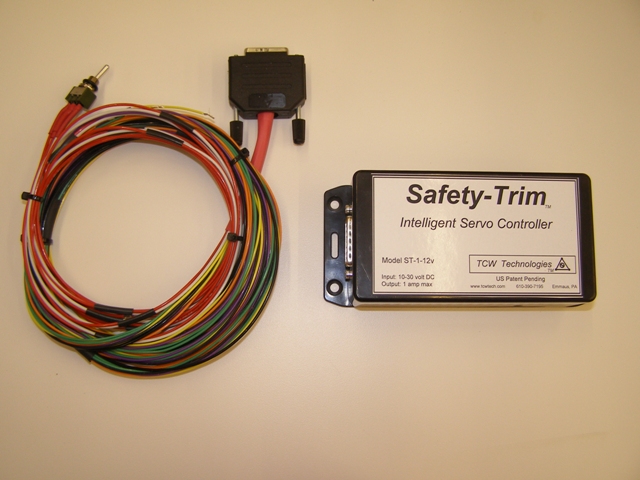
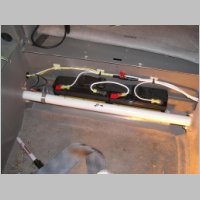
The thing I noticed right away is that this thing was way easier to wire up than the standard Aileron/Elevator Ray Allen relays that I had previously used. Man, had I been able to install this system initially, it would have saved me a lot of time as it's so easy to install, and I never would have had that stuck relay problem in the first place. You can see from the photos below, stolen from Bob's site, that it comes with a complete (and well made, too, I might add) harness, ready to splice in and install. I must say that I was a bit surprised at the physical size of the box, being about 5 or 6" long, but it is much lighter than it's size indicates, so I found a handy place just below my radio stack where I could stick it in. You could wire it anywhere, from the tail, the subpanel, or even under the seats. It didn't take long and all the connections on the panel were done, and I sat back amazed that it could be so easy to install. If I were re-installing my Ray-Allen relays, it would take me a lot more time to get it all in and done right.
** Installation note regarding switches: I called to verify on this one, but as you know, the trim system works by pulling either of the 2 input wires on the controller to ground, causing it to activate in that direction. The standard Ray Allen switches can easily be used by connecting the RED/WHITE wire of the switch to ground, which pulls ONE of the 2 white wires to ground when activating, but when in the neutral position, the 2 wires are basically tied together. This is not a problem for the controller.
Regarding a retrofit...
One nice thing about this system is it's a very easy retrofit installation. There is enough wire in the harnesses that if you have all the relays mounted in the same general area, you should be able to easily take a flying RV-10 and cut this system in without much hassle. Other than the waste you go through buying relays as an original installation, and then throwing them away later, there's no reason why a person can't just fly it the "bad" way and do some testing, and easily upgrade once they see how bad it really is. It's a pretty drastic difference. I know how it is to sit watching the email lists and wonder...."is it really worth it?" or "do I really need that?", so perhaps what a person needs is to first do their testing, and picture what they'd do in some situations where the trim got wild. I think once a person discovers the "problem", they'll want to take a preventative solution.
2-speed operation installation
I haven't mentioned this yet, but the RV-10 has one great method of switching to that lower speed without relying on an airspeed switch....a flap position switch. If you use the Van's flap method of a flap position system, it gives you a -3 degree, a 0 degree, and then 2 REAL flap settings of 15 and 25 degrees for use during landing. The -3 setting is the reflex setting, typically only used in cruise...precisely where you need the trim speed reduced. Technically you should be taking off with in either the Zero degree or the 15 degree flap configuration, although I typically just leave them in reflex unless I am on a short or turf runway. (When retracting from a touch-and-go, they'll automatically go to reflex.) Not only that, but you can't activate the flaps to the lower settings until you are at lower airspeeds. This means that if you put in a microswitch that will sense when the flaps go into -3 reflex position, that would be a perfect time to make your trim system run slower, as you use the reflex position for cruise, yet during an instrument approach, dropping the flaps to ZERO would be a preferred way to get set up for flying the approach. Since you can't drop an additional notch of flaps until you hit 87kts, you can bring them down to Zero and get your full-speed trim function, and your position system is then just a click away from dropping them to 15...you'll then be able to fly your approach at 100-120kts (90 or 100 inside the outer marker) and when you have the runway in sight you can just drop the flaps and re-trim and have all the trim speed you need. Beyond that, there are additonal reasons why an airspeed switch is a good idea...keep reading on.
In thinking of how to install some sort of flap reflex switch, I had a dilema. For one, it's a pain to access the tunnel. I didn't want to have to re-adjust a microswitch and take apart the tunnel more than one time. Then, how complex of a bracket would I need to create. And, if I used a bellcrank, would it have too much travel for a little limit switch....I don't want it to be mounted too far from the torque tube, so that those 3 degrees of rotation don't add up to a huge distance of arm travel to activate the switch. BINGO! As I was replacing my aux batteries, I came across the perfect location, and eventually a perfect method.
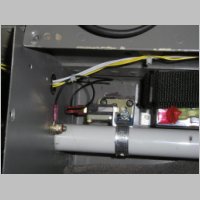
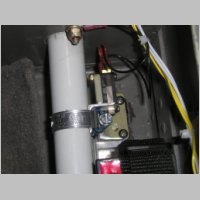
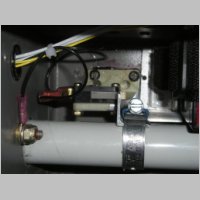
Mounting a microswitch inside the place behind the rear-seat-passenger's ankles that houses the flap torque tube (and in my case the aux batteries), would be an easily accessible mounting location. With the torque tube rotation, it rotates backwards as the flaps come up. So I just needed to find a way to put an arm on the torque tube, and have it swing into the microswitch. Additionally, you need that arm to not start any higher than the 12 o'clock position because it will rotate into the cover panel. I then realized that a hose clamp with a small piece of angle under it (only about 1/2" wide) would be a perfect lever arm for the actuator, and as I was digging through some scrap I found the perfect switch mounting. From plans page 8-3, part HS-1008-L and -R, I had cut a bit of a bad cut on one piece when I built the elevator, and being a pack-rat I threw all old scraps into a box. One of those pieces was just perfect for attaching to a microswitch (I used a VX-53-1C23 switch from mouser.com) and mounting to the floor panel next to the torque tube. I glued it down with E6000 and screwed in 2 self-tappers to hold it down as well. As an overall arrangement, it allows simple adjustment by loosening the hose clamp and adjusting so at full-up travel the lever is pressing down on the switch all the way. Then, when you deploy the flaps, about 1.5 degrees into the rotation the switch clicks and you're now at full-speed trim. (The 2-speed option just gets switched to ground when you want slow speed) Simple, easy to get at, and absolutely perfectly effective!
So with it all installed, it's time to fly!
Additional Note updated 2/29/09
Although the trim system has been working perfectly, with this being the downtime of the year up here in the tundra, I have decided to play with things a bit. Since Bob is now selling airspeed switches for the speed selection, I got one and installed it in series with the flap torque-tube switch that is already installed.
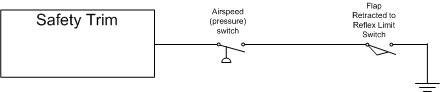
As you can see from how it now works, in order to have low speed trim (for in cruise), you would have to have BOTH conditions satisfied....the flaps fully retracted to reflex, AND airspeed above a certain setpoint (default is 100kts). That way if you either slow down below the setpoint, or you drop your flaps to the zero flap point or further, you immediately get full speed trim. Initially I didn't think this was such a necessity, but let me explain why it may be more of a concern than I thought.
I had been doing touch-n-go's with my wife a few weeks ago, and on landing we were very nose-up on trim...toward the top of the 10 segment LED. When you touch down and want to go-around, you don't want to stay on the ground and run off the runway, so you need to start your flap retraction and get that power back in for takeoff. Great, except that the RV-10 has so much power that you'll be off the ground in no time, yet if your flaps retract fully to -3, you'll suddenly be set for low-speed trim, yet still in need of lots of trimming. The flaps will retract much faster than the trim will travel from nose up to takeoff configuration. I was finding that I'd be off the ground with the flaps up, and not yet be trimmed all the way down to comfortable climb. So, I installed the airspeed switch in series as above, and now I will still always have high-speed trim all the way until I am climbing out at 100kts or more. I was ititially worried about cutting yet another item into my pitot system, but if you use good tygon tubing and fittings, you won't have any leaks. Trust me that with all it's power, speed, electric trims and flaps, and all the gizmos that we have in our -10, it's important to make things simple for those who are just starting to fly these planes. The airplane can be a handful for a new pilot. I didn't see the need for airspeed switching when all I was doing were cross-country flights, but now practicing touch-n-go's I see a real benefit for the airspeed switch.
Flying with the Safety-Trim
Before my test flight, I was a bit worried about a couple things. First of all, if you're time-limited to 3 seconds of trim, will that be enough? Next, if it works by controlling the voltge to the motor, will the motor stall with the controller set near it's lowest setting? What about during takeoff? If I take off with the flaps in reflex, will I get enough trim speed to handle a sudden change in trim requirements at slow airspeeds? Well, let's get on with the talk and answer some of those questions...
First, during takeoff, I intentionally trimmed it a bit out of trim more than my normal takeoff position...a couple bars out on the indicator. As it turns out, at the lower airspeeds you don't have a ton of stick force to overpower, so flying the plane was just fine, and the trim was plenty fast enough to correct some out-of-trim ability, even at near the lowest setting for slow-speed. No problem there. The airspeed switch will help give you full speed trim for all of the takeoff roll too. Also, 3 seconds was plenty of trim for both my takeoff, and all of the landing approaches. I didn't pay attention on one landing and just flew as normal, and I was able to just use my normal technique and noticed no negatives with a 3 second timeout. Then, when I did fly one and watch what I was doing, I realized that when I trim the plane, I'm holding stick force, I trim some force away, and then I relase my pressure to test if it's "hand's off" or not. If not, I trim some more. So, I probably rarely use a full 3 seconds without testing it anyway, and even a couple microseconds of switch release will re-set the timer.
As far as the motor stalling, nope, not a bit. The controller doesn't allow you to set it so low that it will stall, and with the trim being so sensitive in the -10 in cruise, it doesn't take a whole lot of trim to make that tab move. So, we're good to go there. I also tested the reverse function and it worked as advertized. I'm now not worried about inadvertent operation of the reversing because I had to really consciously watch what I was doing to reverse my trim.
Now for the real safety testing...
I set the plane up at 135kts and the flaps at Zero. I held the trim for 1 second and released. Within that one second I was now rocketing towards the sky, and soon saw climb rates near 4000 fpm. I did the same thing starting at 135kts and the flaps in reflex so I'd get slow trim and after 1 second I was climbing quick, but nothing like I had with full-speed trim. You didn't get the G-forces, the climb rate, and the slow airspeeds.
I decided to quantify it a bit more. I leveled out at 160kts indicated, and tried again. This time with slow speed I held the trim for 1 second and watched my G-meter. It had one brief and instant blip of +1.4 G's as it started to climb. As I was climbing, it was hard to approximate the climb rate because of the constant change of rate as you lose power, but it looked like I was climbing around 2000 fpm. Now time for the high-speed trim test. With 1 second of trim activation, I was now pushing into the 2+ G's of force, and my climb rate exceeded 3500fpm, and it was a lot more extreme in how it pitched up. With slow-speed, you had much more time to "feel" you were starting to climb, and react to it, whereas with the high speed, it's a non-linear pitch feel...you don't notice it much for the first little bit of time, but once it starts to get out of hand, it really starts rocketing up.
Now for a more extreme test...
So this time I start at 160kts indicated, and at slow speed trim I hold the switch for 5 seconds (it times out after 3), and give it a chance to do what it would if I had runaway trim. The airplane climbs fast, but I never see more than a quick blip of the G-meter showing up...it declutters at < +1.4, so you only see it when you hit +1.4 G's. I let it continue the climb and it climbs higher until it gets into the 90's IAS, but then the nose naturally starts to drop, seeking it's new trim speed, and it seems to settle out at about 125kts. So 3 seconds of trim takes you to 125kts of trim from 160. I start the same test with 160kts and high-speed trim, but I cannot let myself allow it to go for 3 seconds. The plane becomes too uncontrollable if you let it get near 3 seconds. The G-forces are well into the 2's on the pitch up, and I'm sure that the speed it trimmed to would be somewhere near either very slow flight or stall, and I didn't want to take the time today to test and see if it would actually pull up into a stall with 3 seconds of NORMAL RV-10 trim.
So there you have it, a real-life proof that this system can add to safety in the RV-10. For one thing, after testing it, I am convinced that if someone did indeed have a full runaway trim with elevator in an RV-10, it would be a disaster. You'd never get to a breaker or disconnect switch in time. If it were a pitch down, you'd not only likely overstress the negative G capability of the airframe, but you'd be flying light in your seat and smacking your head on the cabin top. Limiting the trim to 3 seconds would help, but if you get 3 seconds of high-speed trim, I am not convinced that in every case a pilot would have the quick reaction to be able to recover before they get tossed about the cabin. Now, slow it down while in cruise, and then add on the 3 second timeout, and you have a system that can run to it's 3 second limit and still not leave the plane uncontrollable, and not push it into a stall. It's perfect for cruise operation, and lets you more precisely trim the plane. Drop the flaps just 3 degrees to the zero position, and you have your normal trim system back, with the exception of the fact that you still have the protection of a 3 second timeout. And to top it off, the 3 second timeout doesn't affect your ability to trim the airplane in the pattern, so you're able to perform all of your piloting in a safe manner. (Note that Bob did tell me that he has a way to factory-adjust that timeout so if you for some reason decide you need 4 seconds or something like that, he can make that work for you)
Negatives? Well, since I don't yet have rudder trim installed (hopefully VERY soon), I have my ailerons tied in to the system, and although I like having the trim runaway prevention, I don't need slow speed on my ailerons. So I may re-wire when I install rudder trim and run the rudder through the controller instead.
(Note, after the original writing of this article I added Rudder Trim and decided to re-wire so that the rudder trim used the controller's 2nd axis, instead of aileron trim. In the RV-10, Aileron trim could always be left full speed and even if the trim ran away there is unlikely to be any major handling problem. I did find that the rudder trim can benefit from the 2nd axis being set to slow speed, however, so I re-wired it as needed)
After flying with this system in my plane, I'm convinced that this is a real safety feature for the RV-10. Personally, I think it's something that should be made standard on this 4-place family x/c plane. After a few of us having relays fail in short order, and after at least a few of us personally seeing the effects of inadvertent trim activation during cruise, I really see this as a major safety improvement for our planes. You'll spend more than buying 2 relays and 2 speed controls from Ray Allen, but you're not just replacing those parts for a nice solid-state controller, you're adding runaway trim prevention, reversing capability, tons of safety, and a lot easier wiring installation.
See below for photos of my install. Note the panel switch located near my quadrant for quick but protected (by that large knob) operation. Then see the photos for how the flap sensing switch is mounted. I think that will be a very easy way for people to add such a sensor to their system without going out to the wing roots or into that tunnel.
 |
||
 |
 |
 |
 |
 |
 |
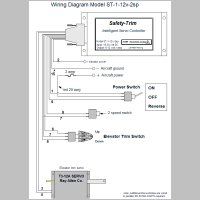
Here are a couple pages of the info sheet that I grabbed from their site. It shows the wiring arrangement, and a spec sheet for the system.
 |
 |