Interior Lighting - Finally!
Added 3/24/2007 - 205 Flying HoursWith the weather warming up and the hanger being comfortable to work in I've finally spent some time over the past couple of weeks getting my interior lighting in order. Previously, the only things I had installed were 2 dimmers. 1 dimmer ran the compass and CDI backlights, as an instrument dimmer. The other dimmer was connected only to a red EL light strip under the glareshield, cut to fit between the 2 hand-holds. The EL strip put out a very nice light, and did well for the panel except it did nothing for my far left and far right lower panel areas, and my backup gauges were unreadable at night without a flashlight. I needed to do something more...
Speaking of Flashlights, elsewhere on my site in lighting tips you can find references to my flashlight of choice. Adrian Moses was the one I think who tipped me off at OSH 2005 to the fantastic lights. They are the Coast Cutlery - Tek Torch (CCC7736D) V2 Dual Color LED Flashlight with White and Red LEDs p/n TT7736DCP. I sewed velcro on the back after removing the belt loop, and the velcro allows me to stick the holster anywhere for accessibility. I keep them on the carpeted tunnel sidewall just next to my right leg, and have one on the co-pilots side in an identical location.
Well, after a visit to SteinAir, I had more pieces of my lighting plan in place. First of all, the EL lightstrip was very nice, but with the new LED light strips available from SteinAir or Vans, I knew that was the way to go, SEE THIS LINK for photos of the lights. The thing is, the EL lights require you add a small inverter to create AC power for the light strip. When you turned on the lights, you could hear the interver whine just a small amount. Prevously my inverter had been mounted under my glareshield, near my instruments, and although I have never seen any negative effects, I figured since I was re-working my lights I would rip them out and install the nice and quiet LED strip instead. I find the LED strips put out the same light quality as the EL strips, very similar in brightness.
Next, I really needed to add some fill-lighting for the backup gauges and breaker area, and my lower switch bar. I had considered mounting some red lights forward facing in those small voids in the airframe near the side lower corner of the windshield on both sides. It would be a fantastic place for lights. The big problem is, with a glass panel, the person sitting on the opposite side will see a reflection off the screen when the lights are on. I considered adding an eyebrow to the lights, but then gave up in favor of other ideas.
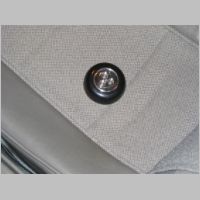
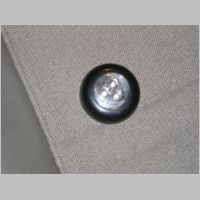
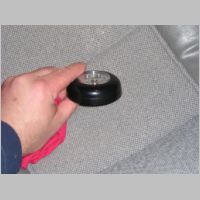
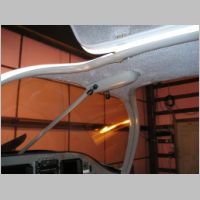
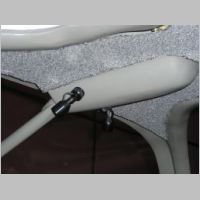
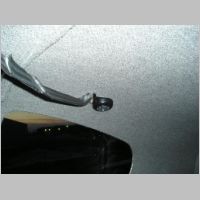
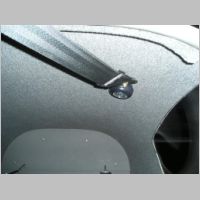
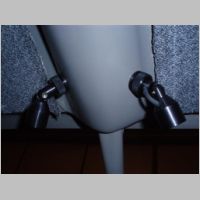
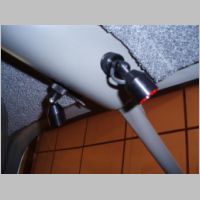
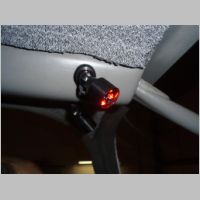
One thing I'm very glad I did was after mounting my GPS/WSI antenna on the cabin top, I did a DIY fiberglass cover for the antenna wires. Also, when I pulled wires up my windshield tubes, I pulled 2 RG400 antenna wires, 2 small antenna ground wires, and 2 small gauge additional wires for future use. In this project, I used one of those spares up, and installed 2 cockpit swivel lights. After borrowing a couple of old ones for testing, these lights proved they would be about perfect for my needs. I used the airframe as the ground return for the lights, just to save my other wire for spare. The cockpit swivel lights are very nice in that you can swing them where you need them. Last night I got my first ultra-test of the lights, doing a 1/4mi IFR departure at 10:40pm in drizzle, and I found it very nice that I could swing one down for use when writing my clearance, while leaving one on the panel for lighting my switches and gauges. Being LED's, they're another low-draw item.
From a wiring perspective, how I connected these was this: I have a dimmer circuit that is turned on by a panel switch "Panel Lts". The glareshield light is always on with the dimmer. From there, I have a DPDT switch "Interior Lights" that has ONE side connected to the glareshield dimmer circuit, and the other is left open yet for use with an overhead dome light for future installation. If I have the "Interior Lights" switch down, my overhead swivel lights are on, but if I go to the center position, I only get my glareshield light. This would be nice when you want to get the cockpit darker, but still keep the glareshield light bright enough to have basic vision. I hate having a bright cockpit at night, and keep my lighting subdued. If you turn the "interior Lts" switch all the way up, the other side of the switch will kick on the future dome light, which would be bright white, and non-dimmed. That takes care of my front-seat lighting.
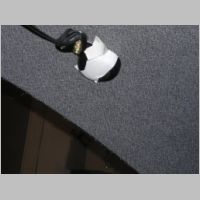
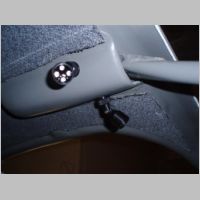
In the back seat, I found some of these lights that I think are made by Sunbeam, called Stick N' Click Lights, that have 3 LED's in them. They come with a magnet in the base, and double-sided tape, but I ripped out the magnet, and took off the tape. I made a couple of aluminum plates cut to fit the lights out of some .050 aluminum sheet, and drilled a hole and installed them under my front seat seatbelt anchor nuts. This gives a nice place to attach lights, one on each side, for use by the passengers, and it's not something that wrecks the headliner and it's non-permanent. The seatbelts kind of help hide them a little too, and they're readily accessible by reaching up and clicking them. I figure for the small amount of use a white interior light gets, these would be ideal for the rear seats since you don't have to run any wires.
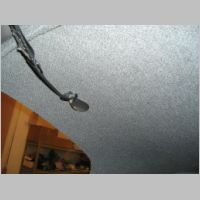
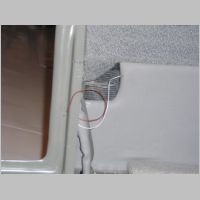
One additional, not-yet-finished light that I added for the rear is a pair of red LED lights that are made from 4-LED arrays. I potted them in epoxy in plastic shells, and used E6000 glue to stick them up under the triangular gusset above the rear seat vents. I haven't run the wires yet, but my intention is to connect them to the same switch that the overhead swivel LED's are on, so that they can be turned off in-flight, or left on and dimmable for passenger use just to give a soft red glow to work with.
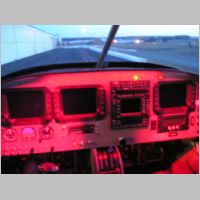
The picture of the red-lit panel is a little brighter in the photo that it is in real use. The lights are not at all glaring and work very well. It's temping to skip the overhead dome light, but I can think of times it might be nice to have.
First Flight with New Lights
After all the latest tinkering with lights, and last fall's rework of my defrost fans, I was thrilled to get a chance to test them both out. I had taken a 30 minute flight to visit friends for the evening, and during the daytime it was a bit hazy, so I kind of expected some rain, or at least ground fog in the evening, but nothing too nasty. We headed to the airport a little after 10pm for our trip home. The stars were visible where we were, which was about 20 miles away from the airport, directly over our return-trip flightpath, so I knew bearable weather was in store for the trip. But as soon as we got out of town, we were in thick foggy haze, so I got on the phone with a preflight briefer. Sure enough, the departure airport KTOB was reporting 400 overcast in drizzle. I thought perhaps it was just thick fog, but it was going to be pretty thick, followed by some lower layers of clouds too. The vis was about 1/2 mile. When we arrived at the plane, it was covered with drizzle, and the windows all fogged over right away. I fired up the tablet for the approach charts, got the Cheltons working away on a direct flight plan, and got my clearance. It was VERY nice to see that my improved defrost fans had cleared a good portion of the windshield, making them far more effective than the one small fan I started with last year. I swiveled the new red light towards my kneeboard and copied my clearance, and prepped the cockpit for takeoff. As we rolled onto the runway, you couldn't see very far down, but knowing we had 4000' overcast at our destination only 30 minutes away made it an easy "Go" decision, especially with visible stars only 20 miles from here. One thing about KTOB, there's a huge wind-farm just off the departure end of the runway, to the right. Lots of super tall wind turbines...very pretty to see by day, but a little bit disconcerting departing IFR at night. The cool part was, with the Chelton's synthetic vision, there IS NO TRANSITION TO INSTRUMENTS, and all this is visible on screen. Sitting on the runway, you could see the little yellow antenna type stick all lined up in rows, off the the slight right side of the departure. On takeoff, you just glance out the windto to make sure you're still on centerline, but you live and fly completely by EFIS. As we climbed out, the overhead map view had the windmills as red, meaning they were near or at our altitude and caused a hazard, but quickly they as we were in the thick of it, they were turning yellow, indicating we had altitude clearance from them. We continued our climb and I contacted departure, who immediately gave us a right heading turn for traffic, taking us right over the wind turbines, but with the synthetic vision we knew we were fine. After another couple of vectoring turns for traffic, we were climbing on course for home, and we got above the layers. You could see city lights surrounding us all enveloped in haze. The OAT was about 9C, with dewpoints running 8C at our destination. About half way home the city lights were all sharply visible and we were able to continue on as a normal night flight, for an easy ending. Part of me almost wished for a good IFR approach, but knowing we'd probably have ground fog with the cold ground, I'd be just as happy to wait a couple weeks and get some good 400' definite ceilings. ;)
|
|
|
|
|
|
|
|
|
|
|
|
|
|
|