Cowl Pin Fix and Alternator Maintenance
Added 5/8/2011Updated 6/2012
I thought this might be something that will help out some builders, so I took some pics and want to get the information out.
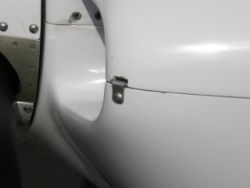
First, a confession....I did something stupid long ago. When doing a prop balance, I was tempted to leave the top cowl off while doing the run cycles, but decided to put it on each time. But, I didn't want to completely screw in all of the screws each time, because we'd be taking it right off again. The 2 horizontal front to back pins were in, and felt tight, so I figured for 2 minute runs it would be no big deal. I was wrong. Those pins can and do move forward, in seconds, when running the engine, if you don't have pin keepers installed. Lesson learned, fast forward 5 years and 725 horus...
On a recent flight I landed and noticed that one of the pins was starting to creep forward through the keeper. The reason this happens is because as the pin vibrates inside the aluminum hinge section that makes the keeper, it wears the keeper away. Eventually I had enough loosness that the pin started to slide forward. The keeper still caught it and just due to the angle, kept the pin from moving very far, but, it was time to react.
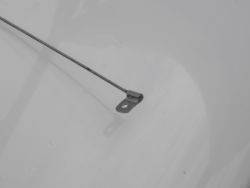
I created 2 brand new keepers, and this time I wanted to make them never be a problem again. I've really liked using the pin method for attaching the cowl. It's quick, easy, and looks real nice. But, the hard part for me was always grabbing the stubby pin end to pull the pin out. You can see some paint gone around that hole, because I had to always reach in with a needle-nose pliers and spin the pin so the bent end was out, and then grab it with another pliers and pull. What I thought now was that I could perhaps take care of this problem at the same time.
So, I created my new keepers, made sure the pins were bent properly to use the keepers, and put them in position, noting where the pin aligned rotationally to the keeper so that I could bond them together. I slid the pins forward a few inches, mixed up some JB Weld and, pushed the JB weld into the inside of the eyelit of the hinge section, surrounding the pin. Once dry, it performed a few functions:
- Keeps the pin from vibrating inside the aluminum eyelit
- Keeps the pin from moving forward due to much tighter fit
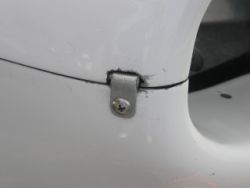
- Allows me to just flip the tab up after unscrewing it, and grab the tab to pull the pin
After flying with the JB welded tabs for a while, one of them broke off when removing the pin. I gave up on the JB weld idea and went to my plan B. I purchased some new pin material to completely remake the pins, and some Stainless hinge from McMaster Carr with the same size eyelits. After cutting the pins to length, I used silver solder and flux to solder the stainless tab to the stainless pin. It is now very very secure..far more than JB weld. I would recommend either doing tabs like this right from the beginning, or buy the filler plugs and use completely internal hidden pins with nice RV-10 cowl filler plugs like Sean Strasburg's plane has. If I were doing it from scratch, I'd do mine just like his.
So now it's far more secure than before. The only problem I had recently was that the pin pulled out the rear of the JB Weld on one pin. It's awful hard to get a good bond on a stainless pin with any adhesive. So what I may explore is either making a keeper out of stainless and then soldering it to the pin directly, or if there is any lower temperature solder that would work between aluminum and stainless, I could try that. For now I've tried to secure it using a loctite product to see if that holds better, but at least I shouldn't have much worry about the pin moving forward anymore. I went 725 hours with the old method, so I should be able to get far more time out of just about anything I try from here on. I would advise any new builder to just fix it right away. There are numerous people that have made some far more classy looking covers that screw in to hold that pin. I would love to have one of those nice arrowhead shaped shiny metal covers. Maybe one day I'll get around to that.
 |
 |
 |
 |
 |
 |
Alternator Issue
Recently I went to tension the alternator belt again. I replaced the belt not too long ago, just because it was a good time for me to do so, not wanting to wait until it was worn at all. But, prior to that, I didn't really know how you could judge a belt being properly tightened. On cars, it's always been easy for me. On the plane, I don't feel satisfied not knowing the proper tension...I hate to just go by feel because you can be way off.
What I found not too long ago is this:
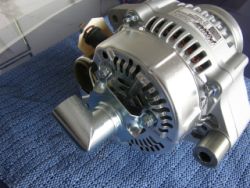
Put a torque wrench on the alternator nut, and if you're tensioning a 3/8" belt, you hold the prop still and try to spin the alternator nut with a torque wrench. A new belt should spin at between 11-13ft.lbs. One that's used should be set to 7-9ft.lbs. This would give you a tension that should prevent slip, and not be hard on the bearings.
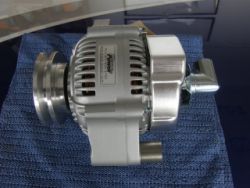
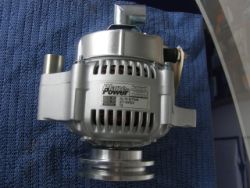
Apparently in the past I was hard on them. I did have times when, especially in warm humid weather, I could get slippage and it would squeal on startup until I pulled the power back so it could sync up and then it would be OK. Then I'd tighten the belt up and it would be good for a year or so. But, I'm sure I over-tightened it in trying to get the squeal gone. I'd simply mark the bolt position on the slider arm, and then tighten it by moving the bolt down the slider a bit and securing it...checking it with my finger by pushing on the belt. Not precise enough. So, I paid the price and felt wobble in my shaft when moving the pulley, and sent the alternator back to Plane-Power to have it checked out and rebuilt. They said that I had a spun bearing, and I paid for them to send me a brand-new rebuild...using at least one of my old parts so it would qualify as a rebuild using the same s/n. The price was great, the service and turn-around was same-day, and I've now got a basically brand new alternator mounted up. If nothing else, I learned valuable lessons in belt tightening, and I can fly my next stretch of IFR flight secure in the knowledge that my alternator was brand new at 725 hours.
 |
 |
 |