Slick Mag Service Bulletin Performed
Added 11/9/2008Updated 11/28/2008 and 3/10/2009
This page is in regards to the Mandatory Unision Service Bulletin No. SB3-08
Here's the Unison Link
If the above link is broken, I have a copy on my site here.
This particular service bulletin is getting quite a bit of attention in the online world, because there are actually quite a few mag failures in recent days, and mag failures can mean off-airport landings. In fact, I know of TWO people building RV-10's that had mag failures on their FIRST FLIGHT! If there's one way to add some stress to that first flight, a mag failure would be it. So anyway, I'm no expert, but from what I understand, Slick had some sub-quality parts for a while, so anyone who had a mag rebuild using slick branded parts, or had a new slick mag in a certain date range of manufacture (see the SB's above for more info), they could have these junky parts in them. The thing that gets hard to understand is that Unison apparently didn't know what to do about this for quite some time...but to the rest of the world it was easy....throw out the junk parts, and get some good ones. (Rumor had it, and this is just rumor AFAIK, that Slick went to some offshore parts sourcing and that's what caused the quality problem...if that's true, then DUH, buy some from the reliable places you used to in the US, right?)
So anyway, due to the Service Bulletin, people needed to perform some very often inspections of their mags (like on the order of a mag teardown every 25 hours), until the SB was complied with. The parts were dirt cheap. What I didn't know at first though was that there is more than one source for the parts, and if you rebuild using the FAA-PMA approved 3rd party parts, you were no longer subject to the SB. (** Note: There have been a couple people who have heard differently, that switching brushes doesn't release you from the SB requirements, so please, take this only as non-fact unless you verify it yourself. At least one person at Aero Accessories won't state that using their brush relieves you from the SB, even though it is produced by a different manufacturer. Also, one person emailed me that reading Slick SB 3-08A says that the SB ending compliance can be documented if the carbon brush and/or distributor block assembly are replaced by one manufacturered after Aug 14, 2008. So various information is available from various sources. ) Yee Haw! And, those parts were cheap.....More on the parts later, but basically you could buy all of the required parts for $10. (The required parts are a carbon brush, and a cam) Since then, I understand that Unison is also recommending replacement of the entire contact point assembly, and distributor block and gear assemblies as well. Not that these parts will be bad, but if you had arcing or damage, these other parts may have becom affected.
Now for some info that could make it easy for you if you don't want to do the work yourselves.
Some 3rd party slick mag parts are made by:
Aero Accessories, Inc.
http://www.aeroaccessories.com/mags.html
800-822-3200
1240 Springwood Avenue
Gibsonville, NC 27249
I ordered a Brush and Cam (3215 Brush $9, AN3611 Cam $1), and also decided that since I was going to be over 400 hours I'd also get a a set of points (AM13081 $38.49 contact), and I bought a capacitor just to keep on the shelf for the future (M3081 $65.74 capacitor) So you can see that the 2 required parts were $10, and for a little more I got new points too. If you rebuild with those parts, you are no longer affected by the SB. You can see if you can have a local A&P rebuild the mag, or you can do the work yourself. I have seen a mag taken apart before, but it had been so long that I needed to make sure I got my info together before I tackled it. BUT, I wanted to do it myself....because....and this is key to me....we do this experimental aircraft building "for education and recreation". I want to not only know how to build my plane, but maintain and repair it as much as possible, and if I can't change points on a mag and then time the mag myself....well, I'm falling short of my goal
Now, not everyone will want to do their own mag work, or trust it to a local A&P. What I found as a great option for those people was to get it rebuilt at the place I got the parts from. Check out these guys below...they'll sell you the parts, or rebuild your mag for you for a fair price in short order.
Quality Aircraft Accessories
http://www.qualityaa.com/
5746 East Apache
Tulsa,OK 74115
(918) 835-6948 (call for Justin Hicks) who says they can rebuild and turn around your mags with those Aero Accessories parts in 2-3 days for $75/mag
Aero Accessories makes everything but the impulse coupling, distributor block, and maybe one or two other things...so you can do almost a complete rebuild and replacement of Slick's junk parts.
http://www.aeroaccessories.com/images/magnetos/mags_lg.jpg
Additional copies of the original SB is available here:
http://www.lycoming.textron.com/support/publications/service-bulletins/pdfs/SB584.pdf
http://www.lycoming.textron.com/support/publications/service-bulletins/pdfs/SB583.pdf
Now for the D-I-Y rebuild
If you're gonna tear into it yourself, you're going to want to get yourself a the proper info. I'd never done anything like this before, but I found it to be BASICALLY an easy procedure, but there were some things I wish I'd heard up front that could have saved me some time pondering, and gotten rid of some wasted time where I was doing things wrong. Yes, I'll explain it below.
First of all, for the list of tools and parts you'll need.
A T-20 Torx bit screwdriver for pulling the mag apart
T-118 Mag timing pin (ACS p/n 12-01441)
A T-150 E-Gap gauge tool (ACS p/n 12-00302)
A 1/2" wrench and socket
A Buzz Box or Timing light
New Carbon Brush
New rotor cam
New Mag Gasket (62224 Lyc from Aircraft Spruce)
The T-150 E-Gap tool isn't a 100% required tool, but you'd be crazy NOT to use it for how much better the precision is when doing the internal mag timing. It's available at Aircraft Spruce (p/n 12-00302), if you search for "T150". The slick mag timing pin is T-118 (ACS p/n 12-01441), and can be found by searching Aircraft Spruce for "T118". For the Buzz Box/Timing Light, they're not very expensive. I actually built one as a "kit" that I had heard about during the time I was building the plane. Never got to use it until now. But, it was pretty cheap...like $25-40. I think even the store-bought models are under $100 easily. You'll also want to get the info you need. Someone emailed the email list the Slick Mag Overhaul Manual, so here's where I have it. I also found it really handy to read some links on the web. There is a lot out there from Sacramento SkyRanch and from various old AvWeb articles that come in very handy. Below I'll post a couple of links, just to help get you going. Google has it all.
http://www.sacskyranch.com/timingbendixslick.htm
http://www.sacskyranch.com/faqslickmagneto.htm
That skyranch article downloads as an .exe file, which is weird, but actually contains a couple of pages from the slick manual, and some instructions that I guess were posted on the web. (Click HERE to get it in .pdf form) I just got done re-doing that whole document by updating the service info with newer cleaner copies, adding my own comments and additions, all in to make it all more understandable for the less knowledgeable, and more complete. You may still want to skim their instructions, but they are messily formatted and mine should read better....but the ones I re-typed will be specific to my situation....that is to say, I have timing marks on my ring gear, that line up with a small hole on my starter, on the front of the engine. Some people need to use the engine case seam as the timing mark, some won't have a ring gear with markings....so I won't try to fill in those blanks. But I can make it easier follow what to do in my situation, and I think that my situation should be common for at least a good share of RV-10 folks.
Info Added 11/28/2008
To view MY slick mag recompilation of the above info, see this link
For a complete packaged .PDF of that page, PLUS the slick Service info updated, download this .pdf
Ok, now for the process, really this time
Before I pulled my mag, I verified the current timing that I had. It has always run very well, for over 400 hours, so I wanted to keep it that way. I only have ONE mag, so I only needed to test that one side. I left my lightspeed ignition off, and pulled all of my top plugs that go with the lightspeed. This not only makes it so the lightspeed can't fire, but it prevents any compression so the engine can't fire and start when the mag kicks off. I have only one mag, a Left Mag, with an impusle coupling on it. I hooked up the buzz box, turned the prop until my finger on the hole of the #1 cylinder top plug felt pressure building, and then looked with a flashlight to watch for the prop to get to TDC. Now I knew I was at real close to TDC on the compression stroke. Time to check the timing marks. You have to go far enough that the impulse coupling snaps (if you have one) and then go backwards to BEFORE your timing point. For instance, if you're setting the timing for 25 degress BEFORE TDC, you back up the prop so you're maybe 40 degress BTDC. Now with the buzz box on, move the prop forward until it starts to buzz solid. That will tell you when that cylinder is going to fire. For me, it was about 26 degrees that I got the buzz...and I moved it back and forth many times to verify the mark. Now, I left my prop at that 25-26 degree position and just let it sit there.
Next it was time to pull the mag wire harness cap off, and then I pulled the 2 nuts holding the mag (be sure you don't drop parts into the engine!!). There were 2 rubber C-shaped bushings that came out with the mag. Supposedly these often stay in the engine, but you need to NOT lose them in the engine also. Use grease to hold them in place if you have to when reassembling the mag to the engine. After the 2 nuts and mag retainers are off, the mag just pulls straight out. Now would not be a bad time to grab the T118 timing pin and put it in the "L" hole (for a Left rotation mag) or "R" hole.
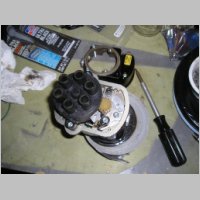
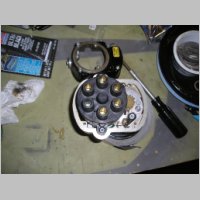
Bringing it to the bench, I put it drive-gear side down into a roll of duct tape to keep it upright. Pulled the 4 screws holding the top cover of the mag on, and then had to pull the condensor (capacitor) wire off when the cap came off. Now you can see the mag internals. It would be a good idea to put a sharpie pen mark on both the large nylon gear and the small nylon gear, where they meet, so you can verify that you have it the same later.
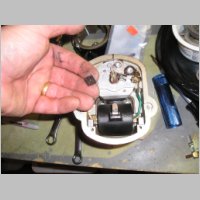
Pulling 2 more screws allowed the distributor block to come off, and then you can see the points and small nylon gear real well, and under the nylon gear is that cam that people have had self-destruct. The gear takes some care to get off. I used a pair of open-end wrenches held just right with one being a fulcrum and one the lever, and popped the gear off. The cam then pulled easily right out. The new cam goes in just as easily.
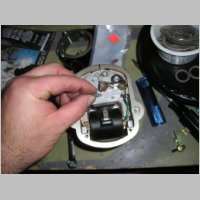
Then it was time to replace the points...just because I wanted to. My points seemed to be wearing very well, but I opted to replace them anyway...at this point more for the education than anything else, because actually, ALL of the parts in my mag were in great shape. I'd have not even maybe done the SB (and assumed that my parts were unaffected) if I had known what condition they were in. This is not to say YOU shouldn't do it....these things will self destruct if you have ones that are affected. To replace the points, there were just 2 screws to remove. The ones made by Aircraft Accessories were slightly different in design...nothing major, but, it did require me to use one of their new screws due to different lengths required. I also had to put a slight twist and bend into one of the wire terminals just to make my coil wire be positioned right. Nothing major. It would be a good idea to study your old points, and check the internal timing BEFORE you start. I didn't, so I didn't have a great "known good" baseline to look at and think about. A couple screws later and I had the new points installed. Time to set the internal timing. Let me tell you right now, READ the manual very closely. The key points I missed were 1) start with the coil in the 12 o'clock position. and 2) rotate the mag HOUSING clockwise for a left rotation mag. I had the coil at the 6 o'clock...well, things are all backwards if you do that. And, you don't rotate the mag SHAFT clockwise for a left rotation mag....it was the mag HOUSING (keeping the shaft stationary) that needed to go clockwise. Had I known these 2 things, I'd have saved at least 30-60 minutes for myself of head-scratching. The E-Gap T150 tool was dead simple to use, once I figured out which way was up on the mag. You just rotate that tool in place so it stops the rotor in the right place, and then you set the points using the screws and your buzz box so that the points are just opening. My first attempts, with the mag upside down, had my points nowhere near the "just opening" point, which is why I scratched my head so long. But, once the lightbulb went off, it was very easy. I set the points to just be opening, and then went on to replace the carbon brush.
The carbon brush was stuck in pretty tight, so I had to twist slightly and pull to get the old one out. The new one just dropped in place. I kept the timing pin in place, and then when it came time to reassemble the mag, I lined up and put the big gear near the small gear so I had the L facing the L on each gear, and popped the small gear on the end of the shaft and tapped it in place with a plastic hammer. Then, I carefully put the distributor block in place, keeping the little tick mark by the L lined directly up with the slot on the distributor block edge with the L on that gear facing the small gear's L. (you'll see it easier than the explanation here). Now, as long as I kept the pin in place, my mag was internally timed with good accuracy due to the T-150 E-Gap tool.
Time to put the mag back on the engine, with new star washers in place. I put the mag in place (took a few tries due to those rubber blocks falling out) with a new gasket, and got it roughly aligned like before. Then BEFORE TURNING THE PROP, I removed the T-118 timing pin. (DON'T forget this!). Now, I turned the prop as before, watching for the compression, and found that I was about 30 degrees. Rotating the mag slightly towards me, and trying again, it came back in to between 25 and 26 degrees. Tightened down the nuts and checked again...still the same, so tightened the rest of the way. Checked it again, and it was still the same, so threw the cowls back on and it was time for a running test. Other than a smaller mag drop perhaps than I'm used to, it all seemed to run just the same, so I called it done. Too late for a test flight, so that will wait for another day. Very satisifying, as I now know how to time my mag externally, and internally, and replace the most key and often replaced parts. Later I'll re-write those mag timing instructions and reformat them better, and put it here.
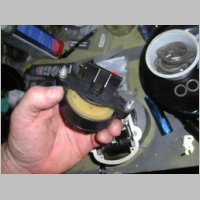
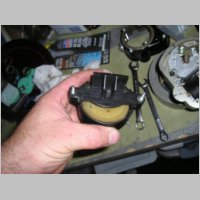
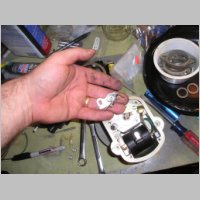
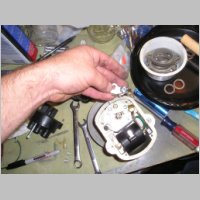
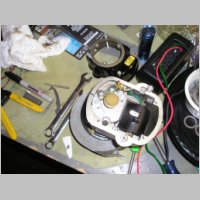
Below are the photos of the job, showing the old (black) and new (yellow/white) cam, and the old and new points, and the old and new carbon brush.
 |
 |
 |
 |
 |
 |
 |
 |
 |
 |
 |