Re-Rigging the Trim Tabs
- PLUS -
Completing Van's Service Bulletin
SB-8-6-1
Added 6/24/2008 - Flying
349.1 HrsThis is a two-part write-up on possibly related issues. First, it's about a potential "Gotcha" in rigging the trim tabs, but then we'll take a quick peek at the completion of the service bulletin 8-6-1 that Van's released regarding cracks in an aft bulkhead in the tail, where the Horizontal Stabilizer attaches.
Re-Rigging the Trim Tabs
One question that has caused concern to quite a few builders is "Why do my trim tabs not both move the same?"
First, let's discuss the CG and the trim
Well, here's the story as I know it, and a lot more info regarding what you may want to check out as you rig the trim tabs.
First, lets get one thing out of the way.... Many builders talk about the RV-10 being very Nose Heavy, and running out of nose-up trim. Well, first, LOTS of airplanes are nose-heavy, including my old Sundowner that always put you right at or even forward of the forward CG, when loaded with 2 pilots. The running out of nose-up trim is a phenomenon that I've only heard was a real issue on N410RV, Van's first RV-10. In fact, more than 3 years ago I flew that plane, and I personally in a past write-up, talked about the nose-heaviness of the plane. Yes, there is some nose-heaviness, BUT, that is by design, and it's important to consider what you're doing when you want to mess with that design. If you note where the CG is on the plane, you'll find that both the front seats, and the fuel tanks are very close to the CG. This means that both full or empty fuel, or big fat pilots or skinny minnie pilots will not have a very measureable effect on the CG. In fact, I planned CG loadings on my plane with 700lbs of pilot and co-pilot (CAN YOU IMAGINE!) and that's about what it took to get me forward of the limit on CG. So, think about it and that means that ALMOST EVERYTHING YOU CARRY that isn't you and your co-pilot will be AFT of CG. Loading beyond Aft CG is probably one of the most dangerous things you can do with your airplane. So, before you go out TRYING to "fix" the CG issue, THINK about it.
In my airplane, I have an Odyssey PC925 battery, slightly larger than the standard PC680...nice for my cold climate, and it gives more runtime for an electrically dependent plane. I also added an auxillary battery pack, but placed it under the rear passenger's knees. This keeps that weight of the Aux battery close to CG, so it doesn't have such a large effect. So you can tell, I'm already going to be a little more aft CG than the factory plane, that is devoid of much interior trimmings....most of which is ALSO aft of CG. I have the Hartzell 2 blade metal prop, and and IO-540. Some people go with other props for weight savings. IMHO, weight savings alone is probably NOT what you want to choose a prop for....because you will likely want to maintain as much of that forward CG as possible....it is what gives you load carrying capacity with safe CG range options. Choose that lighter prop for some other reason, but don't just do it for weight. Some people will also choose to add A/C to their plane, which will add a little weight up front, but also a bunch back in the tail. So now you're again potentially moving that CG range aft, having a nice interior, that fancy TV screen for the rear seats, and hey, even your portable Oxygen kit, or permanent O2 tank in the tail. All of that stuff will push you further aft, and pretty soon you'll have a plane that is A) hard to load with all your pals and stuff for a vacation, and B) going to tip over on you when you try stepping on the loading steps.
"How does this relate to the trim tabs, you long-winded bore!?" you ask? Well, the RV-10 with it's CG range that it has, requires more nose-up trim than it does nose-down. In fact, you won't likely use a whole lot of nose down trim, but in my plane on a 10 (or is it 12?) segment LED, I usually start at the 3rd or 4th from the bottom, indicating that I'm beginning with a bit of nose-down trim, but I rarely get past that. Upon landing, I'm usually 3 or so from the top....so I still have some trim left. So the RV-10 has trim tabs that move with BOTH tabs going DOWN fully, giving lots of nose-up trim, but only ONE tab goes UP, because you don't need as much nose-down trim. If you think this is weird, consider that MANY planes only have a trim tab on ONE side of the elevator, so our system is built to work with our plane, and work it does...very well.
Now for the gotcha
When you rig your trim tabs, you're told to line them up at 35 degrees down, and that's the setpoint where you kind of lock everything up and call it good. There actually IS documentation as to what the actual trim limits need to be, but I think most people actually MISS this document. It's the Flight Testing document that goes along with the plans, and it gives the actual required angles in degrees for max and min trim tab deflections. Check out page 2 of that document for more info. More below regarding the actual mis-alignment...
Well, the gotcha is that, depending on lots of things....builders diligence, parts drilling accuracy, rigging care, or whatever, this may not work according to what you intended. I credit Bill DeRouchey for bringing this up on the forum a while back, and trying to get folks to listen. I must admit, I intiially did not listen as intently as I should have, because I had never seen any negative effects to my previous state of rig.
Here's the story, as I know it: Bill noticed one day, in a specific state of trim and loading, that when he looked back at his tail, one of the elevator horns was ABOVE the Horizontal Stabilizer by a bit (I can't remember the exact amount Bill thought it was) and one of the horns was BELOW it by about the same amount. This confused him....why would it be so screwed up? And knowing that in the center, both parts are bolted together with steel brackets and tough bolts, it meant that there was an incredible twisting force being applied to the tail, as one side tried to go up and the other tried to go down. Trying to manually recreate it on the ground required LOTS of force. So, he was naturally and rightly concerned, and tried to figure out what was going on.
This is where I personally lacked some motivation to think, because I know I've looked back at my tail and elevator horns on MANY flights, and they have always been nearly perfectly symmetric. Never in the world would I see them with one above and one below. So I assumed something must be drastically rigged wrong, and that it was a problem that was builder-caused. Well...hey, maybe, but later I would come to think about it a bit more, as the topic of the "twisted tail" came up in relation to the current SB. Van's has stated that they feel the cracks were caused by shuddering of the tail in the many many (hundreds) of demonstration flights done where stalls were completed. Bill, however, took the initiative to call Van's, and get the measurements of their trim tab deflections, and he notes that their N220RV that had the cracking is also plagued with the same mis-alignment that he found when he checked his out. The concern is, looking at the photos of N220RV that show up in the Service Bulletin, there are lots of forces both forward/aft, up/down acting on that bulkhead, and that the forces caused by the twisting of a mis-rigged tail could only make things worse.
So what's up with the rigging?
First, it's extremely important for you to make sure when you drill the elevator horns, that you drill them both taped neutral and that you do a good precise job. That will at least allow you to have both elevators at the same angle and you won't be building asymmetrical elevator horns into your system. But, there is still more to worry about with the trim tab alignment. If you lock those parts down at 35 degrees down on the trim tabs fand continue on, your tabs likely won't operate in a way that is optimal, and it MAY, in the more extreme cases, cause you to have the same effects as Bill noticed. These errors of non-precision can be additive! I checked my trim tabs out, and I found that even though I haven't been experiencing the twisted tail and asymmetrical elevator horns, mine weren't totally perfect, either. What you WANT is for both tabs to come up ALL THE WAY TO NEUTRAL at the same time. PERIOD. In short, THAT is the alignment issue. When you lock them down at 35 degrees nose-up trim and tighten it all up, you are almost assured that your LEFT trim tab will never get up all the way to neutral.
The way the tabs work, the LEFT tab goes DOWN (about 35 degrees), and up to Neutral. The RIGHT tab goes down (also about 35 degrees), but also goes UP from neutral about 25 degrees. So yes, they are mean to operate that way. But, if built according to the plans, using the normal everyday parts that you are delivered, what happens is that Left tab when locked in down at 35 degrees down, never gets all the way to neutral, while the Right tab goes UP from neutral as you pass into that nose-down trim region. NOW you have the problem....one tab is pushing the Horizontal Stab UP, while the other side is pushing it DOWN. See the problem? The problem is caused by most people TRYING to get that FULL NOSE UP trim capability by locking the parts at the maximum 35 degrees of travel.
On mine, when I initially started, the RIGHT tab would go down about 33-35 degrees, and up about 25 degrees, but the LEFT tab would go down near 35 degrees, but only come UP to about 3-3.5 degrees DOWN from neutral. Measured between the tip of the trim tab vs the tip of the elevator, when the Right tab was neutral, the Left tab was about .18" DOWN. If I moved the RIGHT tab UP (nose-down trim) a bit more, due to the mechanism, the LEFT tab would actually move down to about .25" below the elevator. Yes, that's right...due to the mechanism, as you continue nose-down trim, the Left tab that was previously neutral when the right one was, will continue to have some movement. NO BIG DEAL. But, you can see that with a well-drilled elevator horn setup on my plane, I still had a LEFT trim tab that would have periods where it would FIGHT AGAINST the RIGHT trim tab. Throw in a few more errors in building since these planes ARE amateur built, and throw in a little rigging variation, and I can easily see how someone elses tabs could end up worse off than mine.
So how to fix it??
VERY SIMPLE!! When rigging the plane, once you have the entire tail on after final assembly (OR AFTER PERFORMING THE SERVICE BULLETIN!!) just FIRST ensure that your RIGHT tab goes down 32-35 degrees and up 23-25 degrees. NEXT, NEUTRALIZE that Right Trim Tab. Now, adjust your LEFT trim tab so that it is also NEUTRAL. Once it is, work the trim full travel and you should find that you get maybe 32 degrees or so down out of the LEFT tab...not maybe the full 35, but within spec, and without the twisting alignment errors. When you go full UP on the Right side, you will probably notice that the Left tab will also go up a very slight amount. Yeah, this is NOT to the spec above where it lists Zero as the min. travel and makes no mention of up travel....but this is insignificant....it is much better to have the tabs both moving the same direction...and the deflection upwards will be very small.
Will this prevent the twisted tail? Well, it certainly will keep the trim tabs from driving the elevators in opposite directions. It's still up to YOU to drill all the elevator parts properly so that the rest of the things align well.
Now see below for doing the SB.
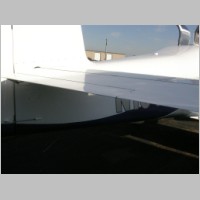
| Below:
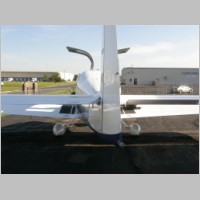
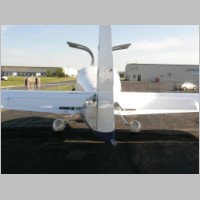
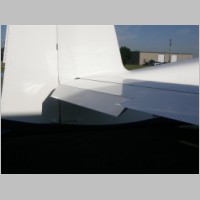
Properly rigged Trim Tabs at Neutral position. Note that both are neutral at the same time. |
||
 |
 |
 |
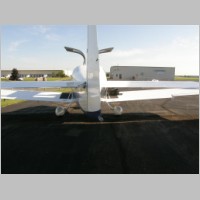
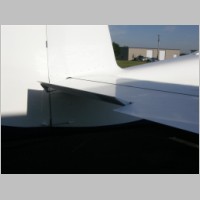
| Below:
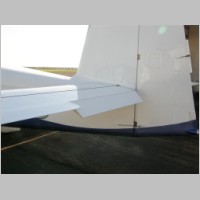
Properly rigged Trim Tabs at the full NOSE DOWN position. Note only Right tab is up, spec. 23-25 degrees. |
||
 |
 |
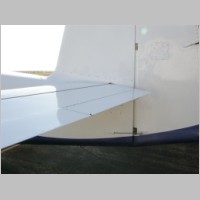 |
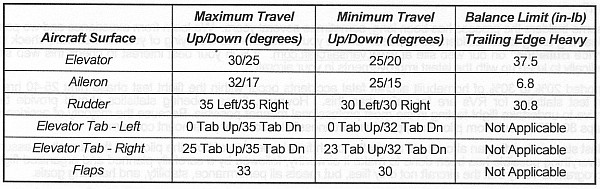
| Below:
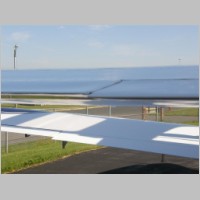
Properly rigged Trim Tabs at the full NOSE UP position. Note that both tabs deflect downward, spec 32-35 degrees. |
||
 |
 |
 |
| Note:
Previous (before completing this) Left Trim tab position when Right tab was at Neutral (0 degrees) |
Left
Elevator Horn In Flight at my average loading. |
Right
Elevator Horn In Flight at my average loading. |
 |
 |
 |
Completing Van's Service Bulletin SB-8-6-1
So when the SB came out, I was one worried puppy. Why? Well, I've always had a hard time trusting metal. Welded steel trailer hitches, trailer axles, and yes, especially all these lightweight aluminum brackets and stuff, some of which WE fabricate, that hold our tails on and together. The brackets holding the front of the tail and the front of the rudder on have always been a source of these unfounded worries as I hit turbulence. Call me a squeamish chicken, but hey, I guess the shoe fits. :) Now, for more history, I've flown in N220RV, the plane with the bulkhead cracks, and PERSONALLY hit turbulence so hard that I bounced into the ceiling and lost my headset. I think it was + and - 3G's almost instantly. So yeah, I KNOW that plane saw some bumps. In my OWN airplane I've also hit the ceiling in bumps, and not too long ago, I did a video and photo wing-tufted Stall Series that I really did some deep stalls on. I held it far into the stall while it bucked like a bronco, and that tail was shaking to beat heck. So I know my tail has been shaken and the airframe banged around. So, I was VERY curious to see if I had cracks. After all, I was at almost 350 hours, and with that history I figured that if I didn't have any cracks, this SB fix of putting in a doubler would probably be just great, and most other builders would never have cracks. But, if I had cracks, I was a bit concerned how it would hold up, even with the doubler.
First, keep in mind that cracks often start where there is a nick, or a burr, on aluminum...in a place where the forces can easily tear. So, deburring these little notches in the ribs and bulkheads properly can potentially save you some problems. I was pretty careful in deburring, so now I'm glad that I was.
I'm not going to post tons of pictures and how-to write-up of performing the SB, because there is already a web album out there with some fantastic photos....check this link: http://picasaweb.google.com/rv8erpics/RV10SB0861?authkey=HdMqmAzGxsc
The SB Process really is a breeze for anyone who built their own RV-10. It's just re-doing some things that you already did, and is a pain in the butt. If you didn't build your RV-10 in this area, but chose to buy one pre-built....well, I guess that sucks now, doesn't it. See, there are benefits to actually building your own plane....one of which is you can do your own repairs and maintenance and you know how it all goes together. :) My biggest pain was that in the routing of the tail strobe, rudder trim, and tail light wiring, I did not have connectors in any of those wires...and I did not WANT connectors in those wires....but I HAD to pull those wires out of the rudder to get the rudder off. So, I just cut the wires as close to the termination end as I could, and pulled away. From there on, I had my favorite building partner wife with me, along with a ladypal, and they kept up with some of the smaller tasks as I worked at unbolting everything, so we could remove the entire Horizontal Stab/elevators/trim tabs as a complete unit. Within about 2-2.5 hours we had the complete set of tailfeathers off.
The rivet removal went very very well. First I center-punched them even though they had dimples, with an automatic center punch. Then I just drilled the rivets most of the way thru with a #40 bit....used a 12" long #40 for a few of the rivets that were hard to get at, and then redrilled the heads with a #30 and used a small puch to snap the heads off, and #40 punch to tap the rest of the rivets through. All of the rivets came out fine, and in no time we were looking at our bulkhead. Yee haw, no cracks!
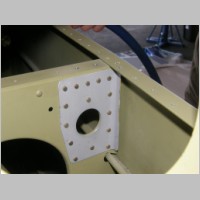
The doubler drilling was a breeze, with a small 90 degree threaded-bit drill I got at OSH from one of the tool vendors. Sharp bits help. I used a 90 degree drill so that I could line the doubler up on the intended (aft) side and ensure all holes were match drilled well. Some have said that a 12" drill bit can be used creatively also, flexed, to drill some of the tough rivets too. That should work well if you can get the drill in position well. At any rate, you'll see right away that you're adding some good strength between the angle atop the bulkhead and the doubler plate, and plenty of rivets share the load.
For installing the doubler, many have used squeezers of some sort, but, I was unable to do that easily. I got a little anal. Remember that the rivets round head should go on the thinner material. That means the bulkhead, in this case, so the shop heads would be aft. I couldn't get my handheld squeezer, with my current yokes, in a good position to squeeze those. I prefer to have the squeezers plunger against the rivets head, if possible. For me though, the rivet gun fit wonderfully in the forward bay, and it was a very very quick and easy rivet and bucking bar job for one person. No problem at all. I primed the doubler, but only used self-etching primer.
Reassembly of the tail took more time than disassembly, of course, especially with having to re-terminate the wires. To connect my now cut rudder trim wires, I used a different approach....I crimped D-Sub pins and sockets on the wires, and then heat-shrunk over them once they were connected. This is a trick I've used before that makes it so that if I want a semi-permanent connection that takes up little space and weight to sag the wire, I can have it, but to disconnect I just need to slit the heat-shrink and pull them apart.
Despite my best efforts to count turns on the trim tab cable rod ends, I was unable to keep perfect alignment of the trim tabs during the removal and reassembly. So, I re-adjusted the rod ends again to work as listed in the section above. No big deal, now that I did it the first time. The hardest part of the job was probably removal of those rod ends from the trim mechanism....which I did part with 2 people and part alone. The trick is just keeping the wrenches in place while you loosen the jamb nuts from the rod ends.
For me, I found NO cracks, but you can see from the rivets on the outer portion of that bulkhead below that the rivets heads weren't 100% solid anymore....with only a couple rivets to hold, they must have loosened just a tad from the vibration...because you can see the dark outline around the head. Not huge, but with the additional rivets in the doubler, I see that as a big improvement. My total time for the entire job start to finish was 9 to 9.5 hours. It's VERY nice to have help, if for nothing more than to put nuts on the bolts while you torque others. It may very well take some builders a bit longer, as I usually seem to move along quite well, so plan for a 10 hour day or a 12 hour day and you'll probably get it pretty much done.
 |
 |
 |
 |
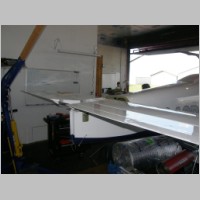
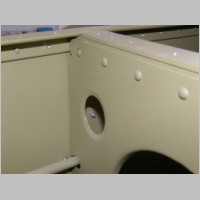
| Tail
is almost off! |
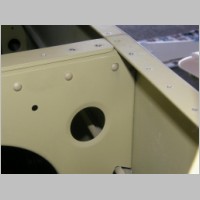
No cracks, but
look closely at rivets |
Doubler
installed |
|