This is too easy, but I struggled with a few of these before
I
came across this idea, so I figure it's worth sharing."
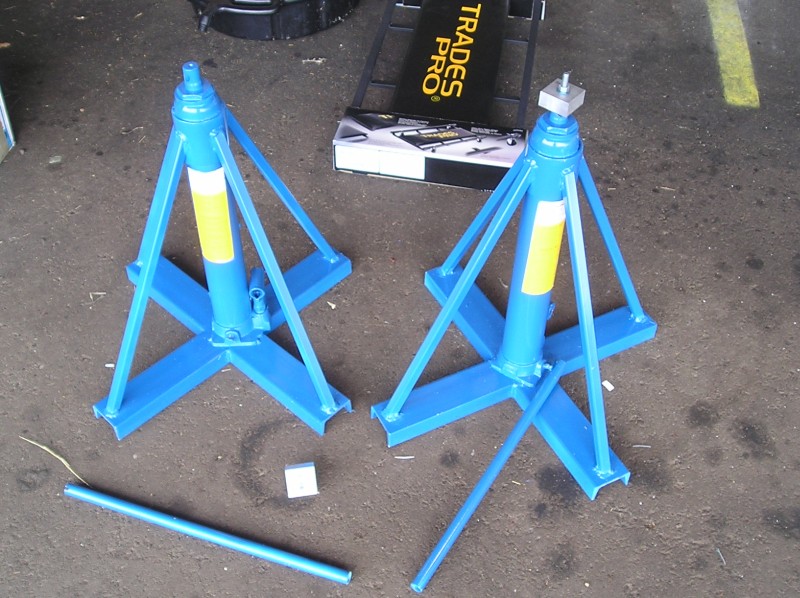
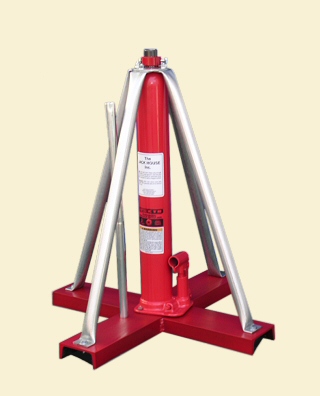
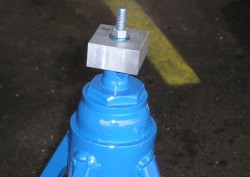
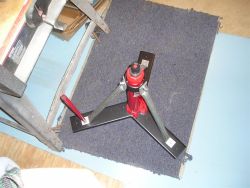
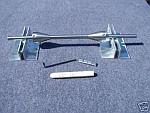
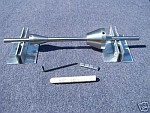
Jacking
the
RV-10
I just thought I'd throw this out there. It works great,
and was
pretty cheap. Not everyone will want the project, but the
result
is great.
The bottle jacks were from Harbor Freight. $39.99each.
The
"C" angle and 3/4" square box tube steel were from a local steel
supplier for a total of less than $44, with the exception of the
3"
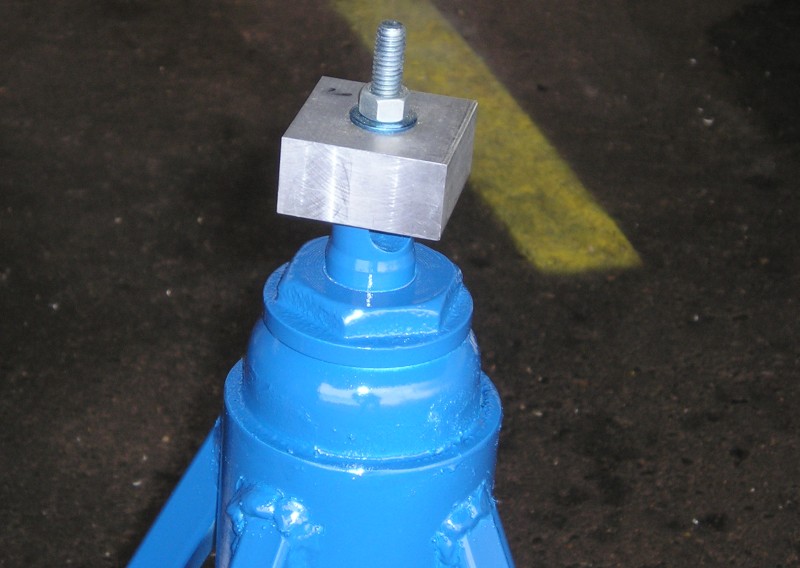
I.D. steel Pipe that I cut from scrap. The jack pads are
1" or
so thick, aluminum, milled to just accept the jack into them.
Grade 8 bolts get recessed and go through the jackpad, and
the
pad screws into the tiedown area under the wing. A buddy
of mine,
the one who helped me use his mill to cut my panel, did the
jackpads
for me.
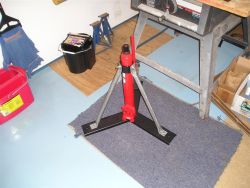
The jack stands were made with this parts list:
2ft. C-angle steel, 3" wide - Quantity 2
10.5" C-angle steel, 3" wide - Quantity 4
22" 3/4"x3/4"x.125" Box Steel legs - Quantity 8
3" I.D. Steel pipe, 1/4" approx thick, about 3-4" long -
Quantity 2
I cut it all with my Harbor freight steel chop saw (el cheapo).
Then I cut angles in the 2 ends of the legs. Then just
used a
welding magnet to hold it together while I welded it up.
As you
can tell by my welds, I'm no expert. This is the first
real
project I ever did using a wire-feed welder, using my Miller
unit that
I got at OSH a few years ago. I couldn't wait to use it,
but
started with way too much power, so it looks sloppy, but it's
plenty
strong. After I got done welding, the 3" ID tube around
the top
of the jack had a tiny gap between it and the jack, so I filled
it with
flox and epoxy. Then, since the steel was unpainted, and
the
jacks were just orange, I thought I may as well waste some time
and
paint them blue. The cheapest jacks I could find were
something
like $219/ea online, and I can only imagine what the shipping
was.
These were a total of about $80 + $11.00 shipping from HF,
and
then the steel, so under $125 for the pair.


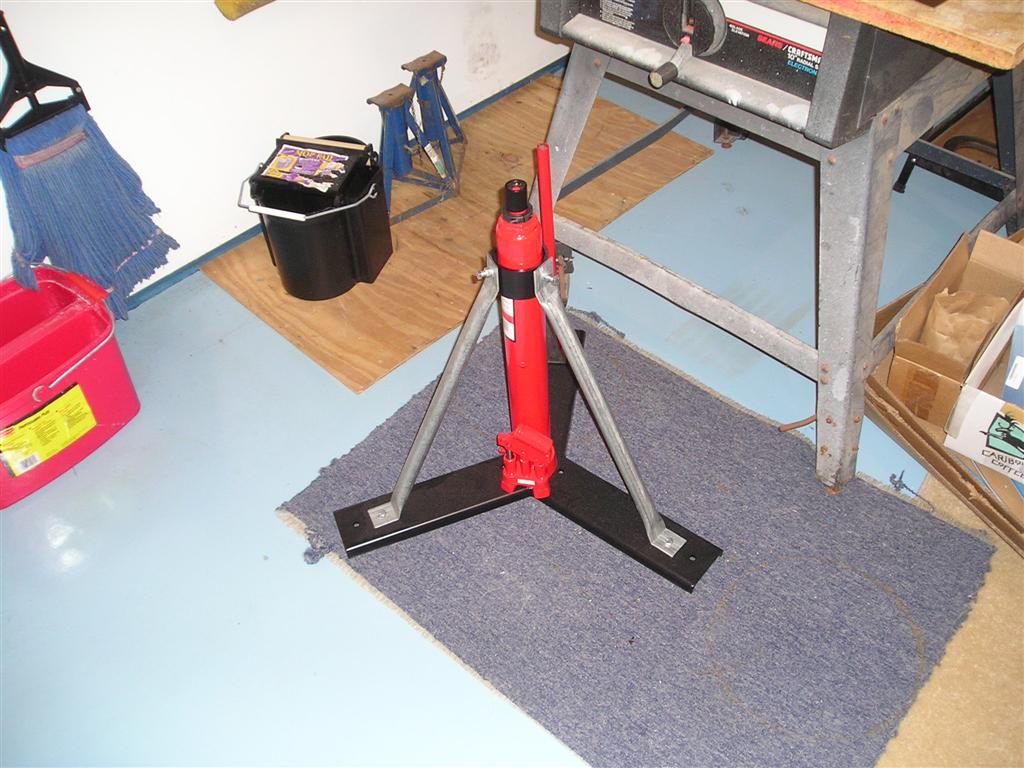
The jacks I used were from Harbor Freight, and here are the
details:
3 TON SUPER HEAVY DUTY LONG RAM
HYDRAULIC FLAT BOTTOM JACK
Enormous Stroke for Big Jobs. Ideal for use on hydraulic
cranes,
engine hoists, and a wide variety of applications for mechanics,
truckers, farmers, and off-road enthusiasts. Enormous 20''
stroke for
jobs requiring a large lift. Baked enamel finish. 1 piece
handle.
* Capacity: 3 ton
* Max. Height: 44-1/2''
* Min. height: 24''
* Stroke: 20''
* Shaft diameter: 1-7/64''
* Pinhole size: 5/8''
* Weight: 27-1/2 lbs.
ITEM 36468-2VGA
Price: $29.99 (at the time of writing this)
Here are some shots of
professional ones:

 Nosewheel
Jacking
Nosewheel
Jacking
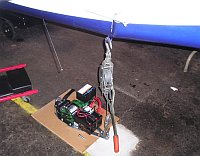
Here's a "new to me" method of working on the
nosewheel. I cut a
1' x 1' square out of my hangar floor under the
tail eyelet, and then
hand-mixed concrete and embedded about a 10"
long hex bodied turnbuckle
into the concrete, leaving the lower hook in
place. Now, flush
with my floor is a threaded hole that accepts a
1/2" bolt or in my
case, eyelet, that is removable. I used a
short hand-levered
cable winch to the tail eyelet, to lift the
nosewheel off the ground
for nosewheel maintenance. Also pictured
is my Harbor
Freight
#95912 winch, which is 3000lb rolling load
rated and has a small
key-fob wireless remote for operation. I
haven't tried it yet,
but Van's says the RV-10 should handle the tug
fine on the tail eyelet
(especially considering I'll still be pushing
the prop/spinner as I
back the plane in), so when there is ice in
front of my hangar, I
intend to use that to give the plane some
additional pull. The
winch operates about 6" at a time, with each
button push, so it should
go in nice and slow.
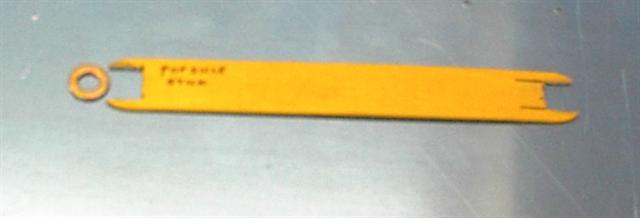
Fitting
Those
Hard-to-Reach Washers
Albert Gardner came up with this great way to make a washer
wrench from
a popsicle stick. You can buy actual washer wrenches, but
if you
want to save money or just need one in a pinch, this looks
like a
simple way to go.
Brake
Lines
(external
to
fuselage)
I've heard before that people have had problems with the brake
line
coiled around the axle leg. The coil gets flexed on
landing and
the repetitive flexing work hardens the aluminum tubing, causing
it to
crack, and your brakes to fail. Because of this, when I
did my
brakes, I put a coupling in the aluminum tubing about a foot
from the
bottom, and ran high pressure braided teflon hose from that
point.
This made for a nice coil that will never break from
flexing.
Improving on this idea, I have recently replaced the lines
with braided teflon all the
way from the fuselage to the brake, eliminating 2 more possible
nuts
that could leak. This was partially prompted by a report
of
another RV-10 that almost suffered a complete brake line failure
due to
flexing of the gear legs up by the fuselage. The overall
length
of hose required to do this
is 44" which includes the fittings on the end, but I forgot my
measurement between measuring them and ordering them, and
ordered 46"
which also worked. So anything between those 2 lengths
should
work out, but mine are 46" You can see my
lower brake hoses, both my original 1/2 teflon, and my recent
upgrade
to all teflon, in the pictures
HERE.
Smoking Rivets
A good Matronics Excerpt by Noel Simmons
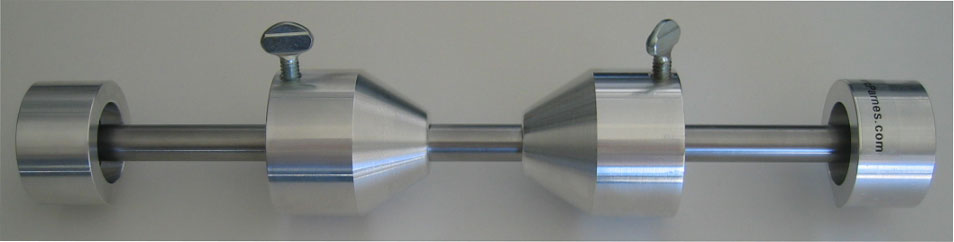
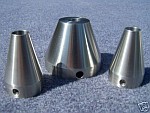
Tire
Balancing
After 330 hours of flying, it was finally time for new tires.
I
have had a shimmy between 35-40mph on landing since I started
flying
with wheel fairings, so I decided to take a tip from a couple
other
people and invest in a tire balancer to see if that would fix
it.
Indeed, it seems that by balancing my mains, my shimmy is
almost
completely gone!
Read here for
more
info.
Below, is a picture of my tire balancer, available at
Marc
Parnes
Products.
The DU42 model is made for Ducati motorcycles and the cones uses
on
this model work perfectly with the RV-10 Cleaveland Wheels.

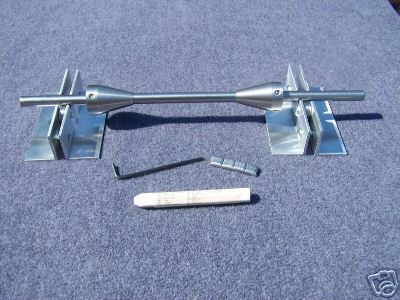
Proving that the balancer design isn't as critical as balancer
quality,
below are phots of Vic's balancer that he got off eBay, with an
auction
title of:
"THRUSTER PRECISION STATIC BALANCER" from "thruster-king".
Any good balancer should do, provided it uses the proper
cone
sizes.
Plexiglass
Care
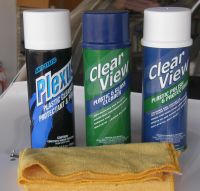 |
When it comes to taking care of
the windshield, I take it pretty seriously.
First, I hate bugs on
the windshield. To me, it's not just that I
like to take pictures
and enjoy scenery, but it's also a safety
thing. It's far too
hard to spot other traffic in the sky when you're
looking through a
windshield full of bugs. Because of this,
after every flight, I
clean the windshield and bring it back to
clear. Also, I know
many many people have had great luck using Pledge
wax for years.
Personally, I've used it on other planes and it
seems to work
fine. But when it comes to my RV-10 I hold the
bar a little
higher.
Look at the windshield once...how it's fiberglassed
in place, not very
good for easy removal. To me, skimping on the
proper windshield
cleaner just isn't worth it when you consider how
big of a pain in the
butt it will be to replace if you should mess it
up. So for my
winshield, I've switched to only the proper
materieals and cleaners.
At the bottom of the picture is shows a standard
Microfiber
towel. You can get these almost anywhere
nowdays. Those are
much better for cleaning than standard cotton
cloths, and they aren't
expensive, either. I do launder mine, but I
don't let them get
used too many times before they get relegated to
some other task...any
sign of dirt that doesn't launder out and I start
looking for a new
one. I keep about 5 or 10 on hand and buy
different colors...some
for the windshield, and others for when I use spray
wax on the wings.
(more on that below)
When it comes to cleaning products, since I started
flying the RV-10
I've used Plexus, which is made for Plexi and works
well. It's
not a bad product, although it is fairly pricey when
you consider the
other options. At OSH one year I picked up a
pair of cans...Clear
View, which comes as a foaming cleaner, and a
protector. At
first, I wasn't happy to have to use 2 separate
cans....I was used to
just spraying tons of plexus and wiping the bugs off
with the protector
material. But I soon noticed that the Clear
View product actually
seems to work better at getting the bugs off the
windshield. The
foaming spray makes it so that I can just spray, let
soak a few
seconds, and then wipe the bugs right off. I
use one color of
microfiber cloth for wiping the bugs, and the other
for applying the
protectant. After getting the bugs off, I use
their protectant
and it sprays on and wipes right off. I've
found that the bugs
come off so much easier with that stuff, that after
I finish using up
my supply of plexus, it's going to be my new
exclusive. I just
bought a bunch of cans from Great
Lakes Aero Plastics, and the 2 cans together
cost about the same as
Plexus.
|
Keeping
the
Bugs off
|
Now here's a tip I
wish I
would have heard and followed a LONG time ago!!!
Usually after
flying, I've used a spray designed for removing bugs,
that is aluminum
safe. It's a local product at our farm store
called "Jungle
Jake". Nothing against the stuff...it works
pretty well for many
uses, and is non-toxic and biodegradeable. So the
first step was to get
off the bugs, and then after that I used a couple
different brands of
spray-on/wipe-off detailer or wax. There are a
couple real good
ones out there that do a good job, and if you use them
the bugs come
off easier the next time. My previous routine
was to wipe the
bugs off and then re-wax the leading edges after every
flight.
Well that just changed!
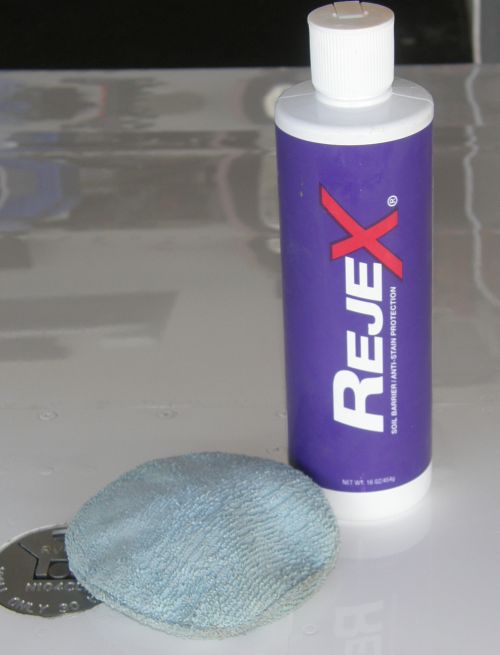
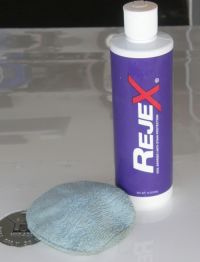
A friend and fellow RV pal recommended RejeX, which is
made bye the
CorrosionX people. It was apparently designed for the
military to keep
exhaust residue from sticking to the airframe and
making it easy to
clean off. For us with our RV's, it does an
excellent job in
keeping the bugs from sticking, too. It's not
the cheapest stuff
aroud...by the gallon it's over $100/gallon, but I
just bought 1 bottle
at OSH to try it, and then after seeing how it worked
I quickly ordered
a 2 pack from http://www.SkyGeek.com,
which
seems
to
have about the best price I could find on the stuff,
at
$26.95 for two 16oz bottles. On my first use, I
just did the
forward nose cowl, the wings, and the horizontal and
vertical
stabilizers. I did the fuselage with Turtle Wax
Premuim, as that
doesn't tend to get much for bugs on it. I let
it cure 24 hours
before flying, which is a good step I guess, and then
I gave it a try.
Lets just say I was blown away with how much easier
the bugs came
off. I didn't use any sprays, or
chemicals...just grabbed a
terrycloth towel, poured a little water on it, and
then wiped, and the
bugs all just wiped right off. It was amazing!
Supposedly the
stuff lasts pretty good, too, so maybe twice a year
I'll need to use
it...or maybe I'll do it 4 times on the leading
edges. The
experiences has been great so far, so I thought I'd
pass it along.
|
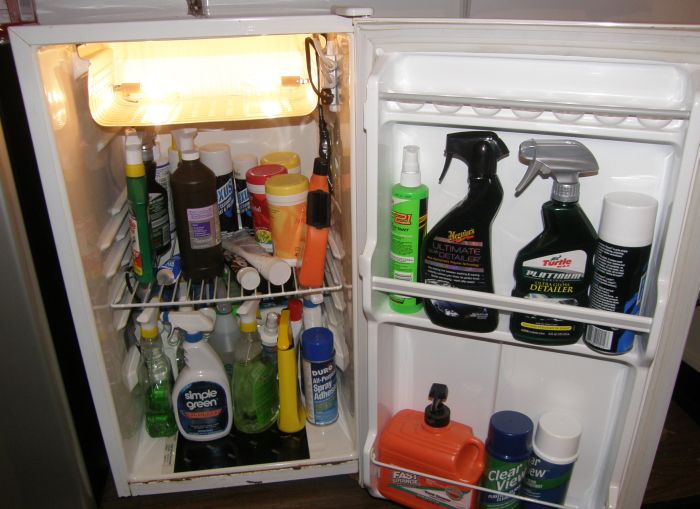
Freeze-Proof Cabinet
(Keeping liquids warm in the winter)
Here's one of my favorite little projects of the fall, now
that I
can comment on how it's working out.
This fall I wanted to prepare so my chemicals at the
hangar (windshield cleaners, hand cleaners, and all
that good stuff) wouldn't freeze and get ruined. I had
previously
used a wall mounted cabinet with foam glued
to the inside, but it still stayed pretty cold. So
this fall I advertized on Craigs list looking for a
junk mini-fridge. I got one for free, which of course is a
pretty
good price. I ripped out the guts, and put in an
outlet trio and mounted 2 15W mini-base lamp sockets in
the freezer area (so it heats that metal plate), and
stuck a 15W Reptile terrarium heating pad to the floor.
The heating pad was a waste of money...it's unnecessary, but it
does
warm things like those big bottles of simple green and other
cleaners.
Today, with OAT's that went from the -20F to +1F range,
I used my Harbor Freight infared thermometer and checked
the inside temp. It's over 100F on that metal plate,
but about 85F on the walls inside the fridge. So,
plenty of nice warm chemicals to use. I used 2 bulbs
so that there would be redundancy, because one should
easily keep it from freezing. So far I've burned out
one bulb, so having 2 was a good idea. Cheap, and
works great.
For those who worry about the safety factor, the reason I chose
15W
bulbs is to prevent it from being too warm. I also tested it
thorougly
for a few days before I loaded it with chemicals, testing it on
90F
degree days. It was simply not possible to warm this past
the
safe zone. I could, as some have suggested, install a
thermostat,
which isn't a bad idea at all, but, it does add a little more
complexity and complexity often just means one more way to
fail.
If I had a thermostat on it, I'd buy one that keeps it at about
70
degrees, but considering I only need this cabinet when the temps
are
below 40, I'm happy to just let those 15W bulbs burn all winter
long. My Reiff cylinder and oil sump heaters on the RV-10
draw
much more current than these 2 bulbs do.
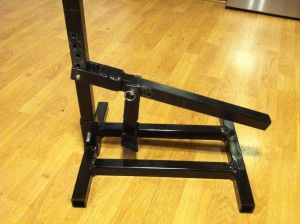
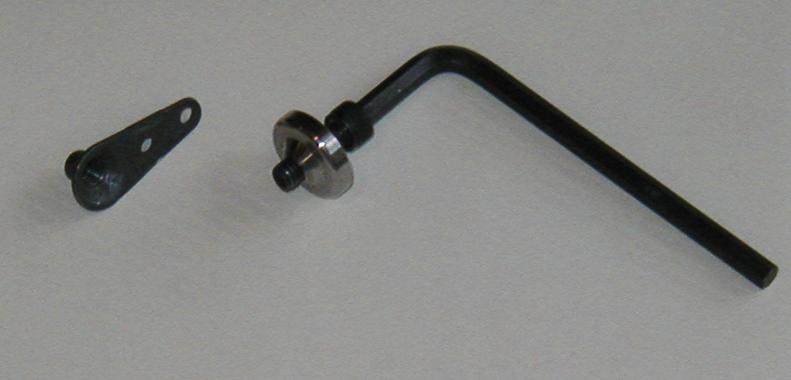
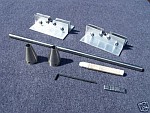
Tire changing - My Tire Bead
Breaker
After a few hundred hours, breaking the bead to swap
tires was really starting to become tough.
Read my write-up HERE
for this tire bead breaker project